Role Based Access Control (RBAC)
Overview
This section explains you how to manage access to your DataChannel account’s resources.
Access Control is a method of limiting access to DataChannel resources to specific users based on the functional & security needs of the organization.
A role holds all the permissions that allows you to carry out specific actions on DataChannel resources.
Role Based Access Control is a feature offered by DataChannel that can be utilized by you for securing and protecting your data from unauthorized access. DataChannel RBAC helps you manage who has access to which of your DataChannel resources, and what they can do with those resources. By assigning roles to users (based on the nature of their responsibilities in your organization) you can define which user/role has permission to access which resource and what action can they carry out.
Roles
-
Predefined Roles: Predefined roles give granular access to specific DataChannel resources. These roles are designed and created by DataChannel with specific tasks in mind (that are frequently occuring requirements across organizations), and contain all of the permissions you need to accomplish those tasks.
-
Super Admin: As the name suggests, this role has unrestricted access to all resources included in the current plan of a DataChannel Account. A typical account should not have more than 1 or 2 Super Admins given that these roles have maximum access to all resources. In addition the Super Admin can:
-
Create/ Delete workspaces (for an enterprise level account).
-
Access and change account settings.
-
Access and change subscriptions/ plans.
-
Access invoices for the account / all workspaces (for enterprise account).
-
Create custom roles.
-
Add/ delete users and assign roles to them including a Super-Admin role.
-
Access Account dashboards and workspace dashboards.
-
Generate/ view API keys.
-
Create / view templates.
-
Create/ Run / Edit/ Delete any DataChannel resources.
-
Traverse across the DataChannel Product.
-
Add warehouse to the DataChannel account.
-
-
Admin:- This role is assigned by the Super Admin / Admin. For Enterprise level accounts, the Super Admin creates a user with an Admin role for each Workspace. This role has permission to manage user access to DataChannel resources within the account/workspace (as applicable). The Admin can also assign roles to other users within the account/workspace (as applicable). In addition the Admin can:
-
Access and change account settings / workspace settings (as applicable).
-
Add/ delete users and assign roles to them (excluding a Super-Admin role).
-
Access Account dashboards / workspace dashboards (as applicable).
-
Create / view templates.
-
Create/ Run / Edit/ Delete any DataChannel resources.
-
Traverse across the DataChannel Product. Add warehouse to the DataChannel account.
- NOTE
-
The Admin does not have the permission to access the API keys / create workspaces / create custom roles / access and change subscriptions / plans / invoices.
-
-
User: The User role is assigned by the Super Admin / Admin. The user role has permission to:
-
Traverse across the DataChannel product.
-
View data pipelines, reverse syncs, transformations, orchestrations etc.
-
View templates.
-
Edit/ Run data pipelines, reverse syncs, transformations, orchestrations etc.
- NOTE
-
The user role does not have the permission to access the API keys / subscriptions/ plans / invoices / settings. Also, user role can not create a new user/role in DataChannel. User role can not add a new warehouse to the DataChannel account. Neither can the user edit /create templates.
-
-
Finance: The Finance role is assigned by the Super Admin. The Finance role has permission to:
-
Access and change subscriptions/ plans.
-
Access invoices for the account / all workspaces (for enterprise account).
-
-
Guest: The Guest role is assigned by the Super Admin/ Admin. Guest role only has viewing access to DataChannel resources. The Guest role has permission to:
-
Traverse across the DataChannel product.
-
View data pipelines, reverse syncs, transformations, orchestrations etc.
- NOTE
-
The Guest role does not have the permission to access to the API keys / subscriptions/ plans / invoices / settings. Also , a guest can not create/ run/ edit any DataChannel resource or pipeline.
-
-
-
Custom Roles: Custom Roles are user-defined roles that you can create to meet specific needs for your project/organization. Custom roles can be mapped to one or more required permissions to meet your specific needs. To design/ create/ manage Custom roles, you need to be holding the Super Admin role. Using Custom roles, gives account owners the flexibility to grant/revoke permissions/ privileges at a granular level.
Permissions
Basic Permissions: The following are the basic permissions that can be used individually/ in combination with each other to achieve the desired functionality for any role:
-
Create: Permission to create resources such as Forward or Reverse ETL connectors, transformations, orchestrations etc.
-
Edit: Has permission to modify/edit/update existing resources. Also has permission to view the data preview for each of the resources such as configured connectors, transformations, orchestrations etc.
-
View: Permission to view a list of resources such as configured connectors, transformations, orchestrations etc.
-
Delete: Permission to delete resources such as configured connectors, transformations, orchestrations etc.
-
Run: Permission to schedule automatic/manual run of resources such as configured connectors, transformations, orchestrations etc.
Understanding the Hierarchy of Permissions
Case 1 (For all Accounts except Enterprise Level Accounts):
Here, users are in a hierarchical relationship with the Super Admin/ Account Admin:
-
The Super Admin/ Account Admin can create and delete users.
-
The Super Admin can create and delete roles.
-
The Admin can assign and delete predefined roles (but can not create a custom role).
-
The Super Admin/ Account Admin can assign any role to a user.
-
The Super Admin/ Account Admin can grant/revoke access/permissions to a user on any resource.
-
Only the permissions/roles assigned to a particular user by the Super Admin/ Account Admin are applicable to them.
-
By themselves, the user can not change the permissions/roles granted by the Super Admin/ Account Admin.
Case 2 (For Enterprise Accounts):
For Enterprise Accounts the hierarchy is a bit more complex as it involves an additional level that is Workspaces. Here, Workspace Admins are in a hierarchical relationship with the Super Admin of the Default Workspace of the Enterprise Account.
-
The Super Admin can create and delete Workspaces.
-
The Super Admin can create and delete roles applicable to a Workspace Admin.
-
The Super Admin can grant/revoke access/permissions to a Workspace Admin on any resource.
-
By themselves, the Workspace Admin can not change the permissions/roles granted by the Super Admin.
-
The Workspace Admins can create and delete users within their workspace.
-
The Workspace Admins can assign and delete roles within their workspace. These roles can only be a subset of the permissions/roles granted to them by the Super Admin. That is, while assigning roles the Workspace Admins can not grant / revoke access to any resource to which they themselves do not have access.
-
The Workspace Admins can assign any role to any user within their workspace.
-
The Workspace Admins can grant/revoke access/permissions to any user on any resource within their workspace.
-
Only the permissions/roles assigned to a particular user by the Workspace Admins are applicable to them.
-
By themselves, the user can not change the permissions granted by the Workspace Admins.
Creating a Custom Role:
Custom Roles can only be created by a Super Admin. To create a Custom Role, perform the following steps:
-
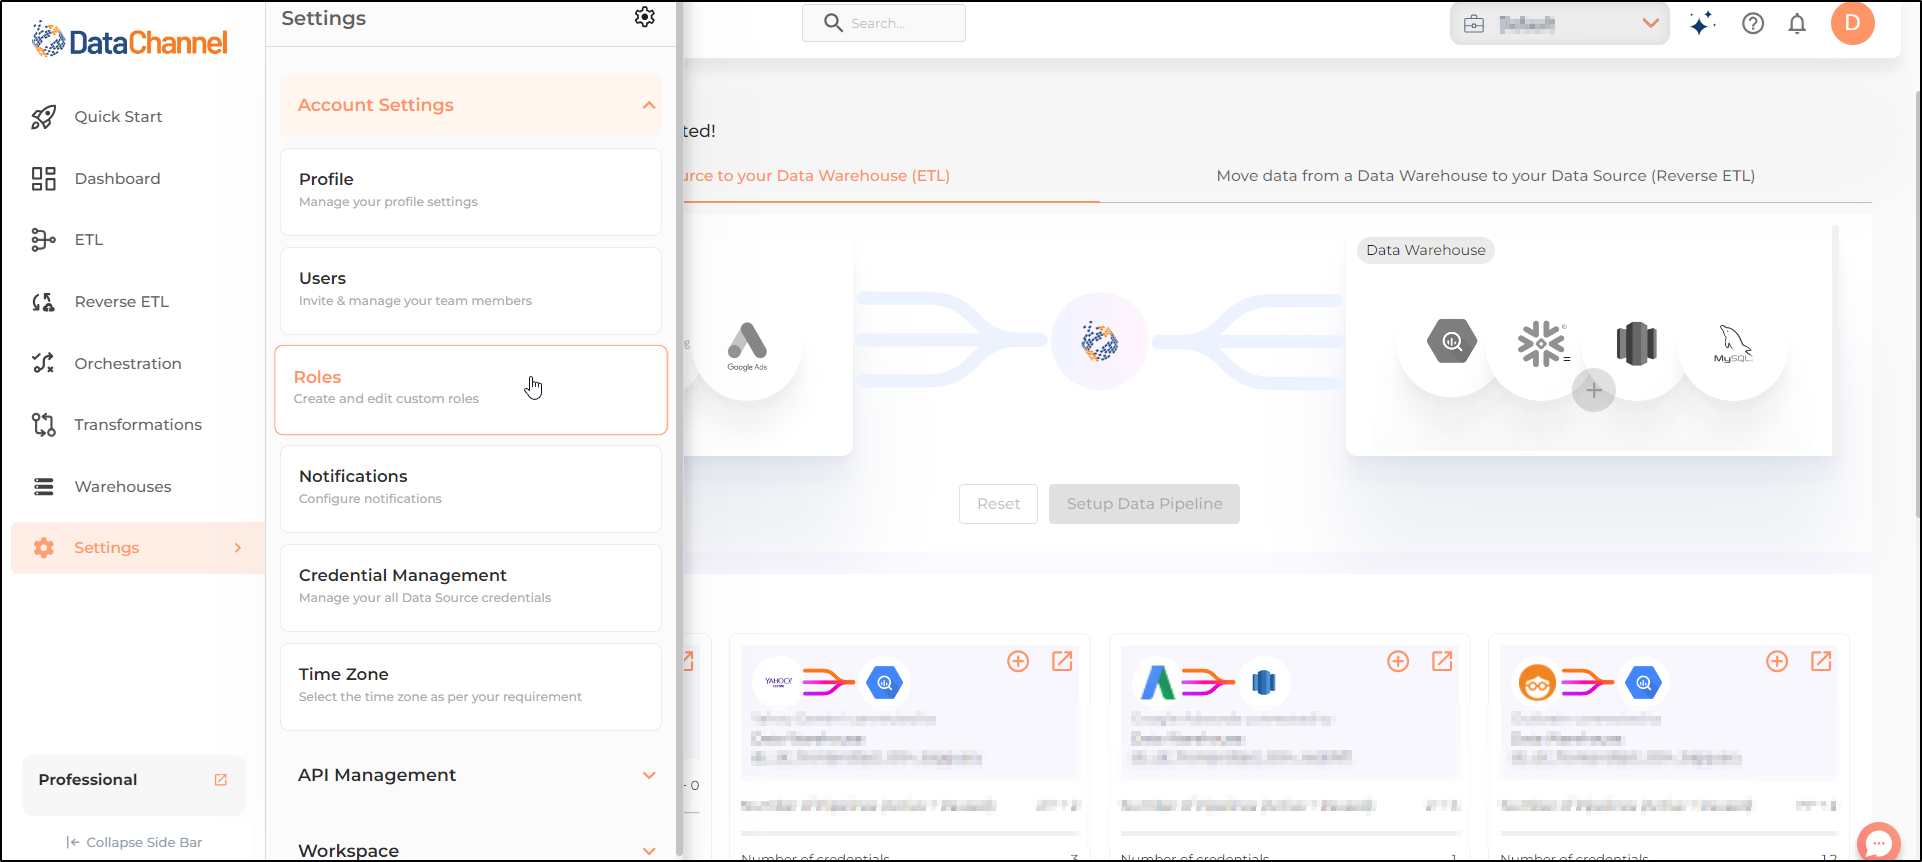
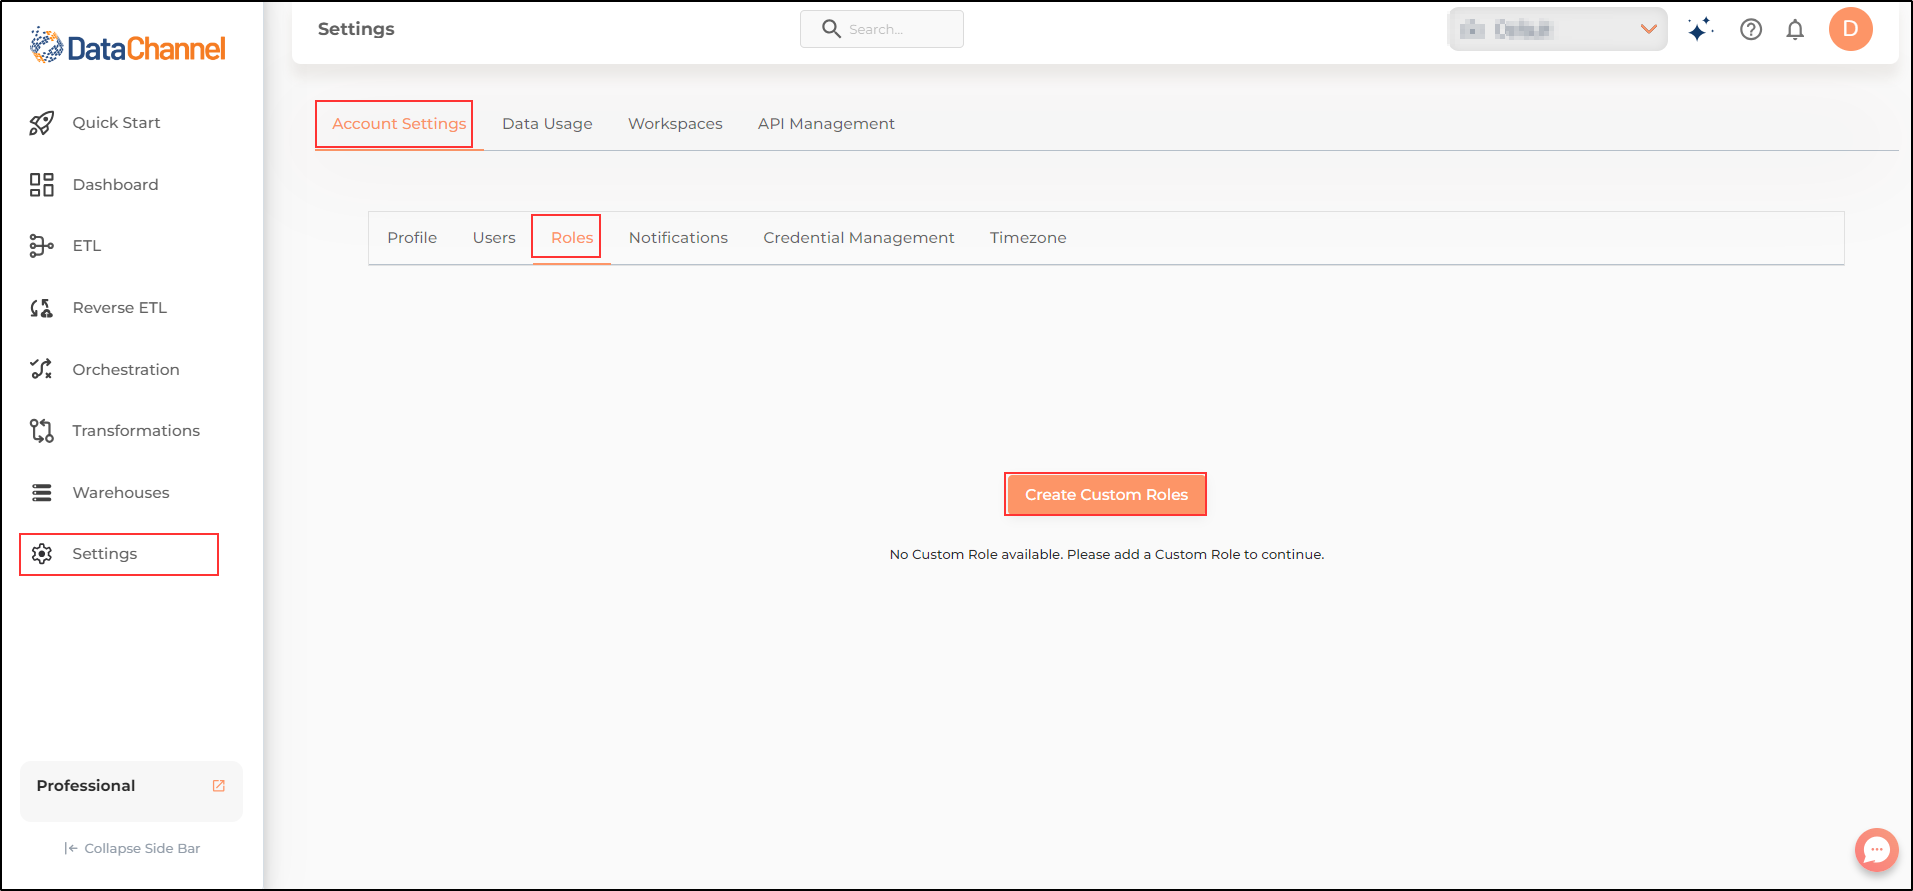
Go to Roles in the Account Settings menu on the Settings Tab.
-
Click on Create Custom Roles.
-
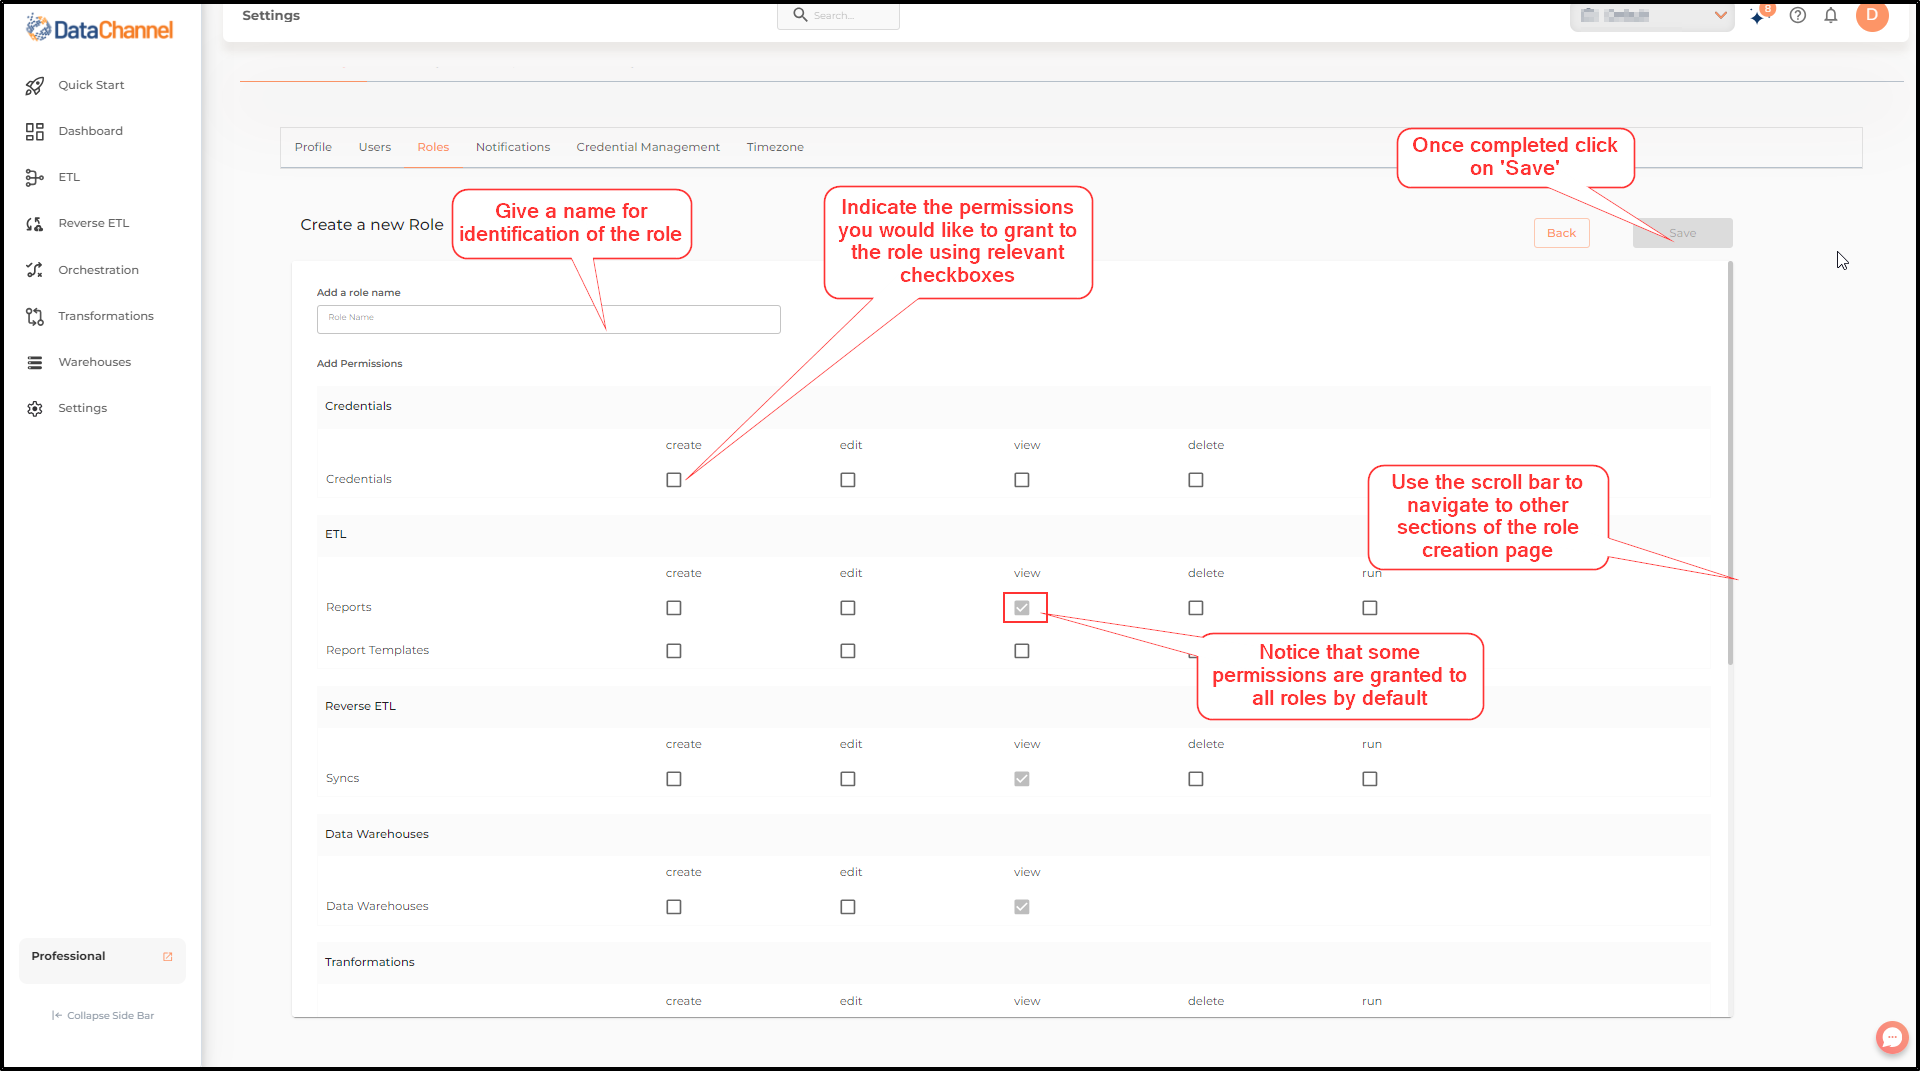
The Role creation page appears as shown in the image.
-
Enter the Role Name for identification of the role.
-
Indicate the permissions you would like to grant to the role using relevant checkboxes. You will notice that some permissions are granted to all roles by default.
-
Scroll through all sections of the role creation page to grant all required permissions.
-
Once completed, click on Save.
Assigning a role to a User:
To assign a Role to a user, perform the following steps:
-
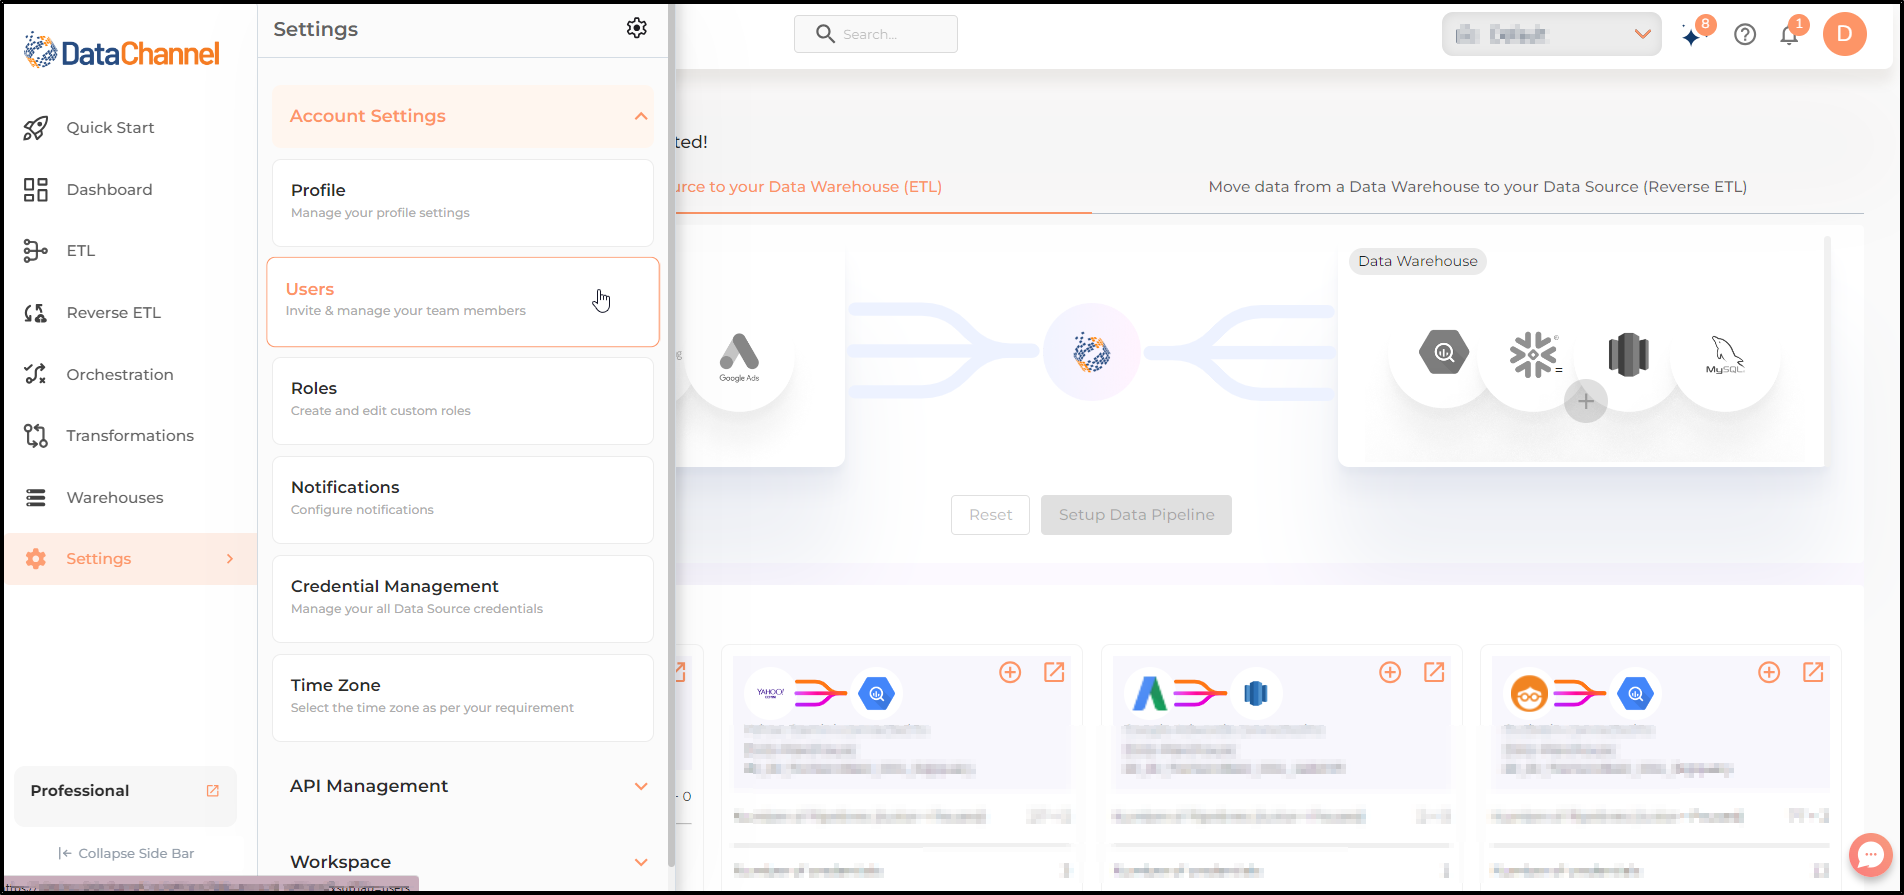
Go to Users in the Account Settings menu on the Settings Tab.
-
Click on Add New User.
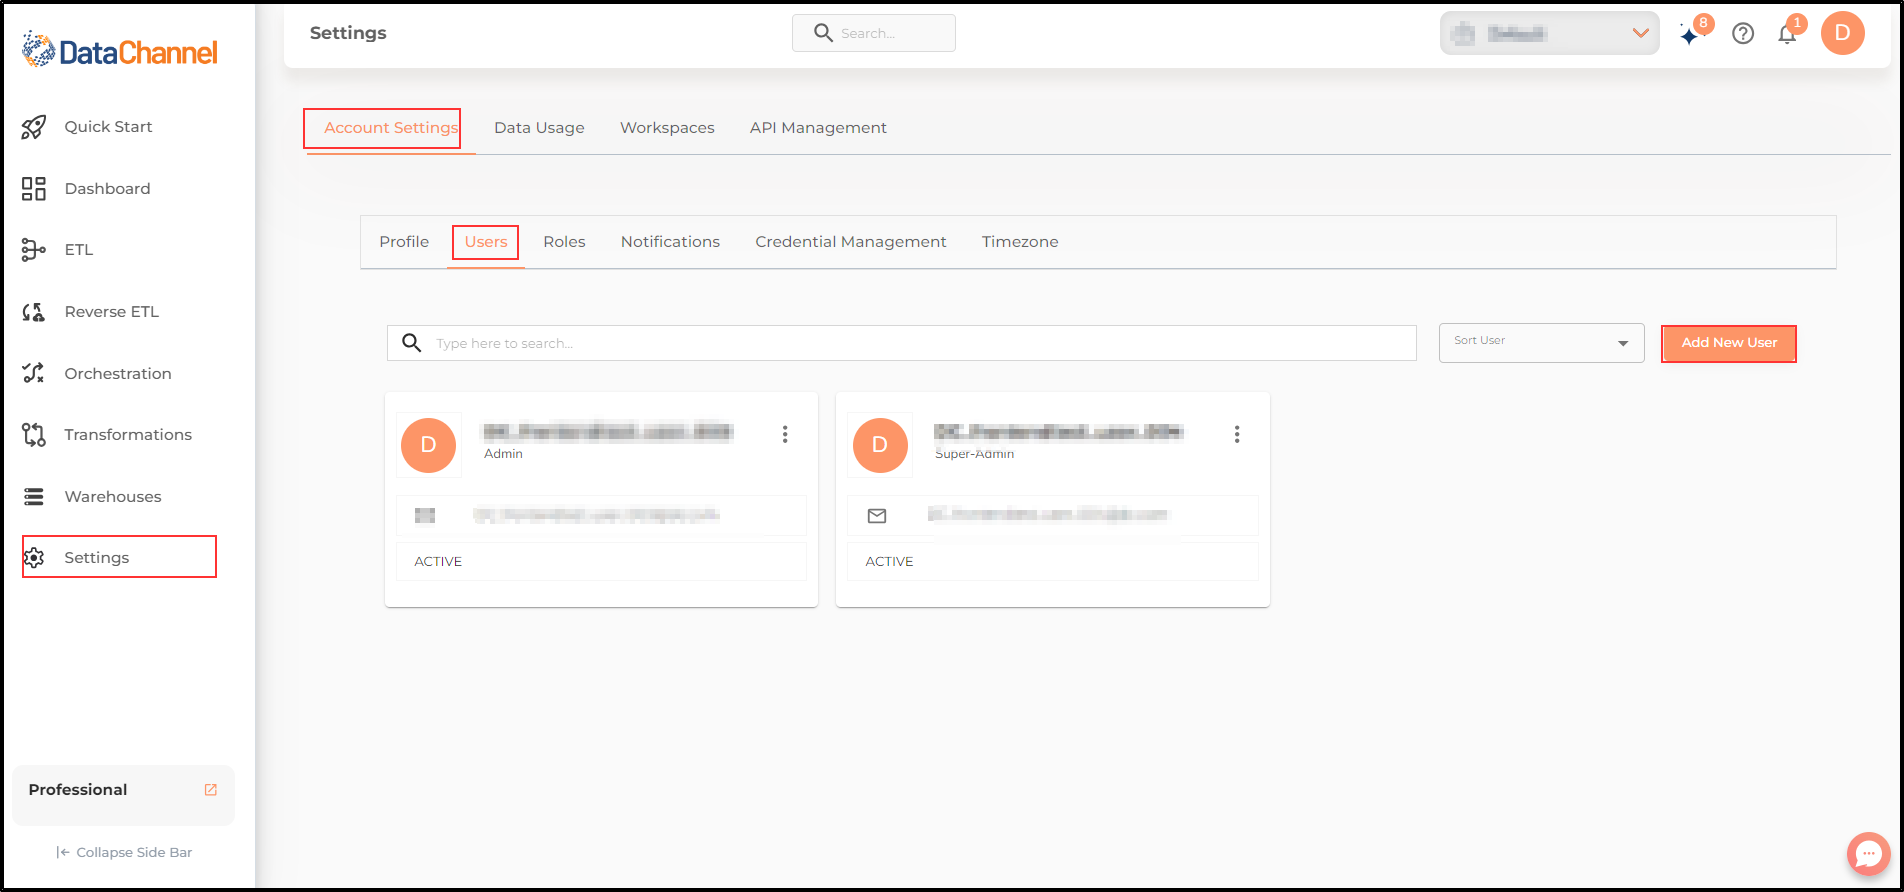
-
The User creation page appears as shown in the image.
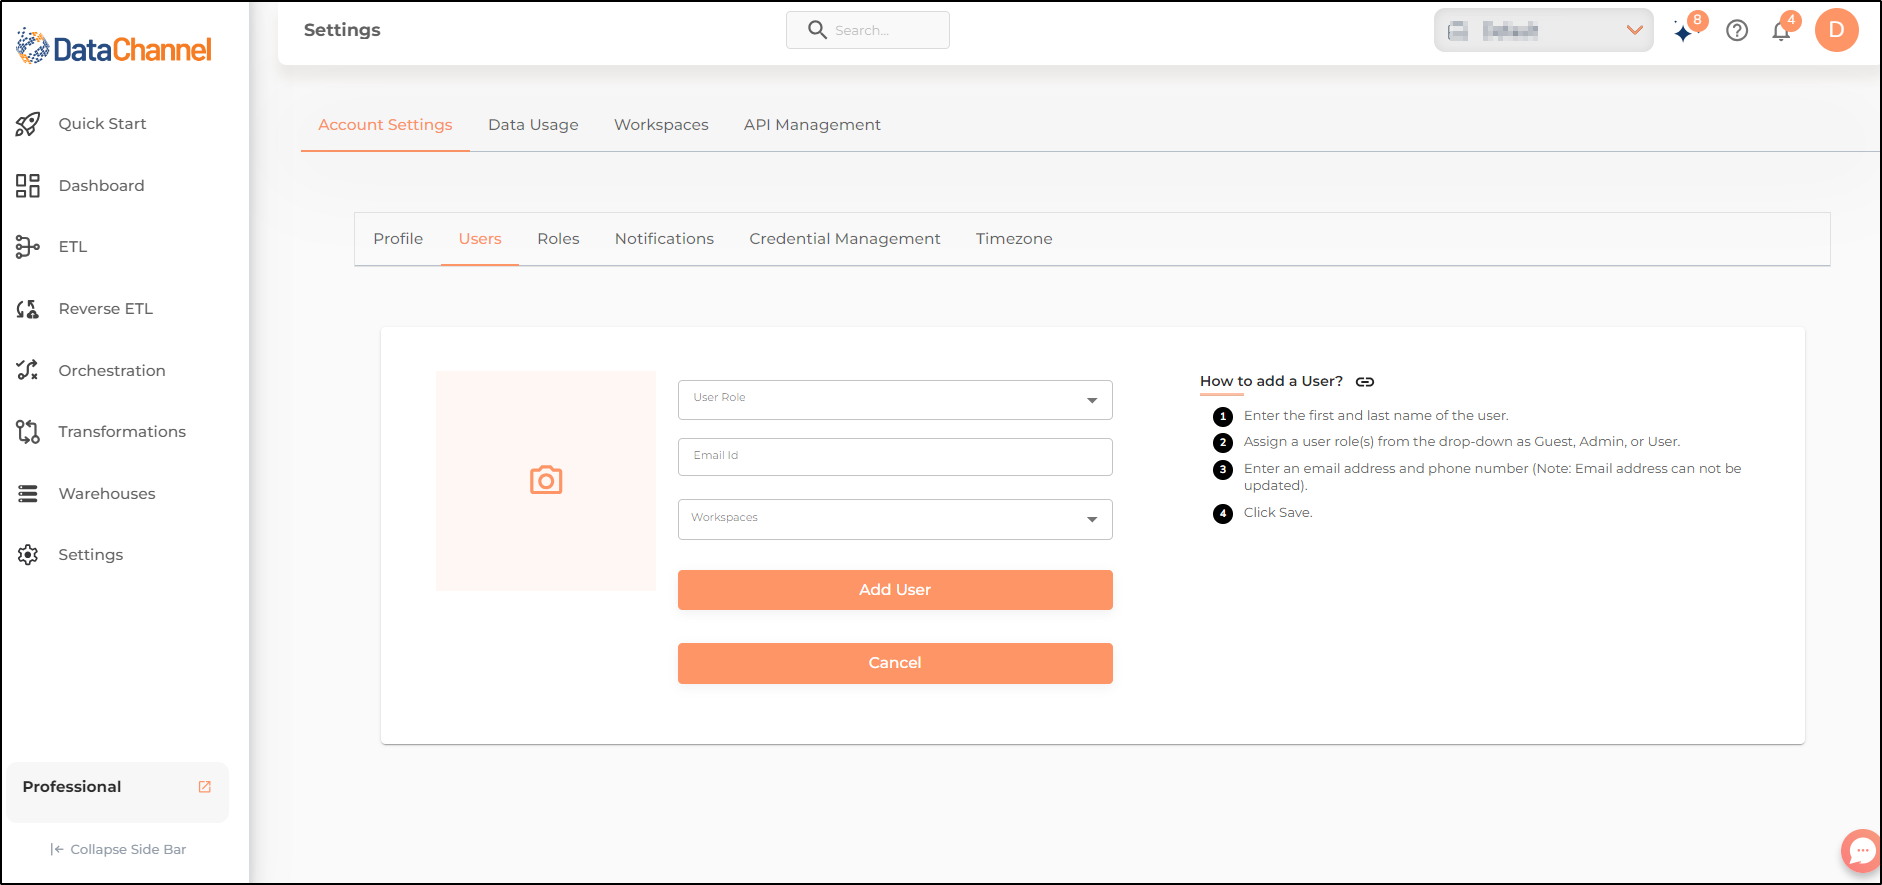
-
Enter the User Role to assign a role to the new user.
-
Enter the email id of the user.
-
If you are using Workspaces, select the workspace to which the user is assigned.
-
Once completed, click on Add User.
-
An email will be sent at the given email address to add the user.
Can’t wait to find out?
Send us an email at info@datachannel.co.