Familiarisation with the User Interface
Reverse ETL
Overview
This section will help to familiarize you with the layout on the Reverse ETL page of the DataChannel Console. This tab allows you to create, configure and schedule custom syncs to move data from your data warehouse to your desired destination. You can explore the list of supported destinations and choose the appropriate ones that would help you make your data more actionable. Configuring reverse syncs enables you to integrate your warehouse data with tools / functionalities offered by the destination applications. Also, this section allows you to view and create Data Models and Segments.
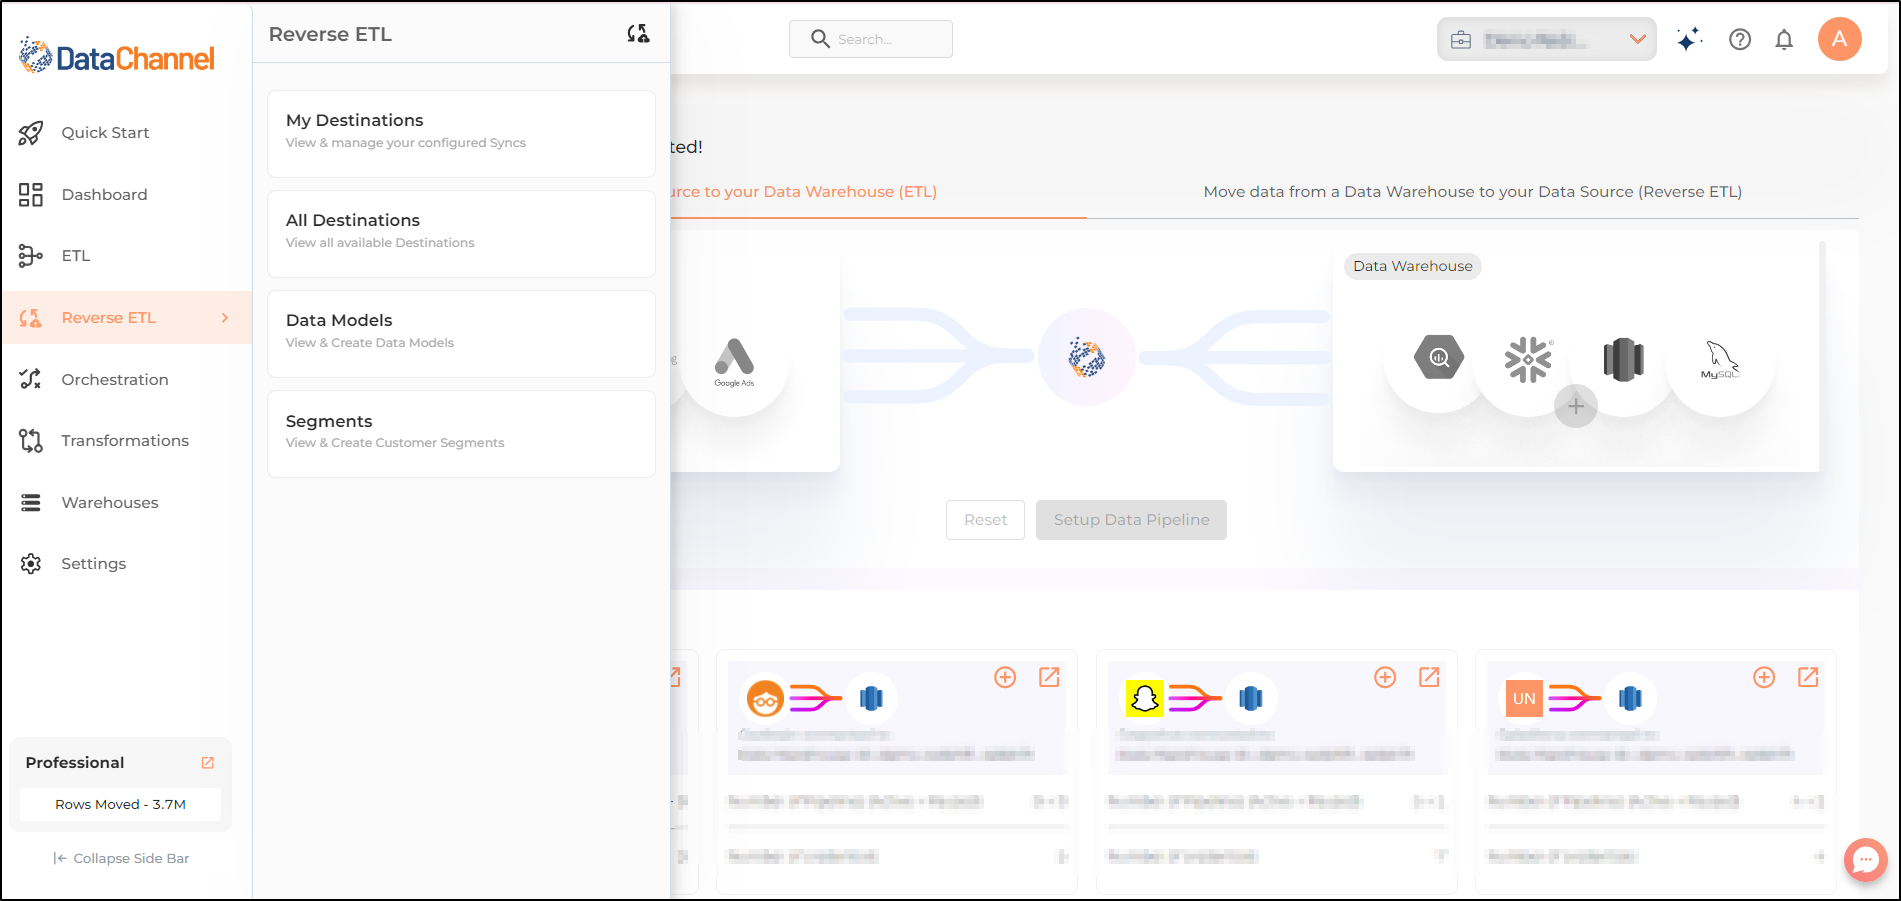
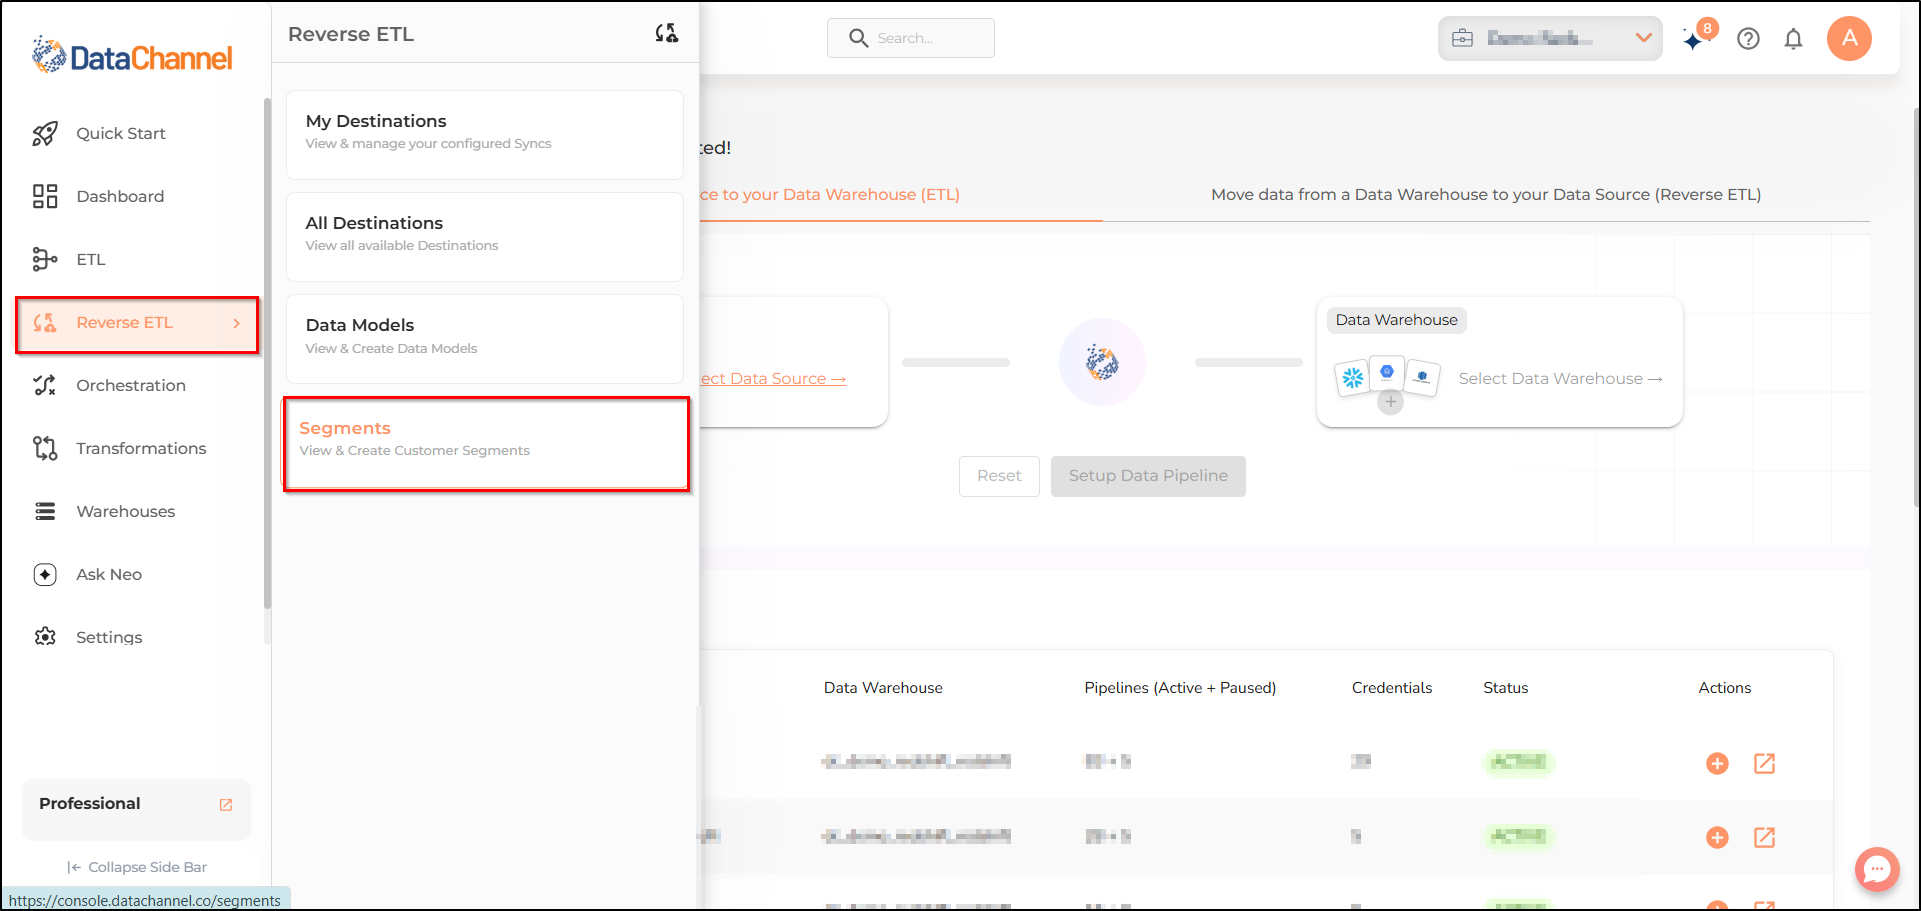
You can access the Reverse ETL menu by clicking on the Reverse ETL Tab which is the fourth icon on the sidebar, right below the ETL Tab.
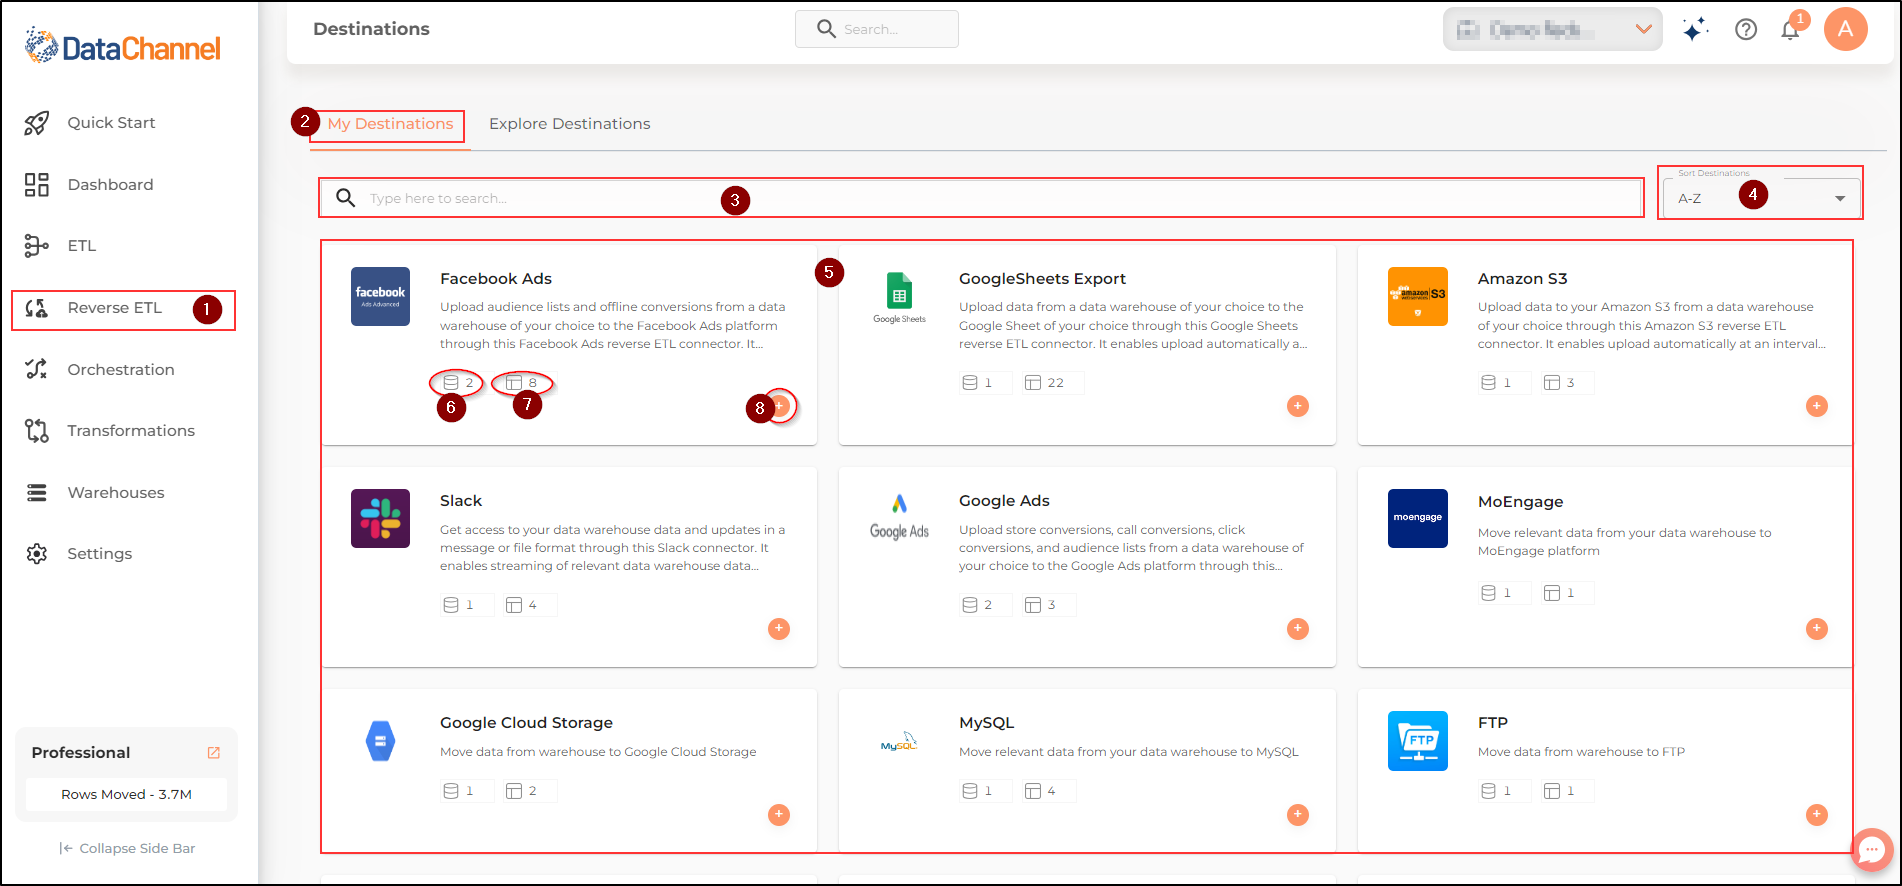
My Destinations
-
Go to the Reverse ETL tab, fourth icon on the sidebar, right below the ETL Tab.
-
Go to the My Destinations option, and it opens a carousel of all the reverse connectors configured by you so far.
-
The search box inside the My Destinations tab allows you to quickly find a specific reverse connector configured by you.
-
The sort dropdown inside the My Destinations tab allows you to quickly sort the reverse connectors configured by you alphabetically.
-
Below the search and sort boxes the main UI screen inside the My Destinations tab contains a carousel of individual cards for each of the reverse connectors configured by you. Each card gives a brief description of the data destination it pertains to.
-
There are two icons on each reverse connector card. The first icon represents the total different types of reverse syncs available on DataChannel to connect to different API End points in the Data Destination.
-
The second icon icon on each revese connector card represents the number of reverse syncs configured by you for that particular Data Destination.
-
The + icon on each connector card allows you to add new syncs for that particular Data Destination.
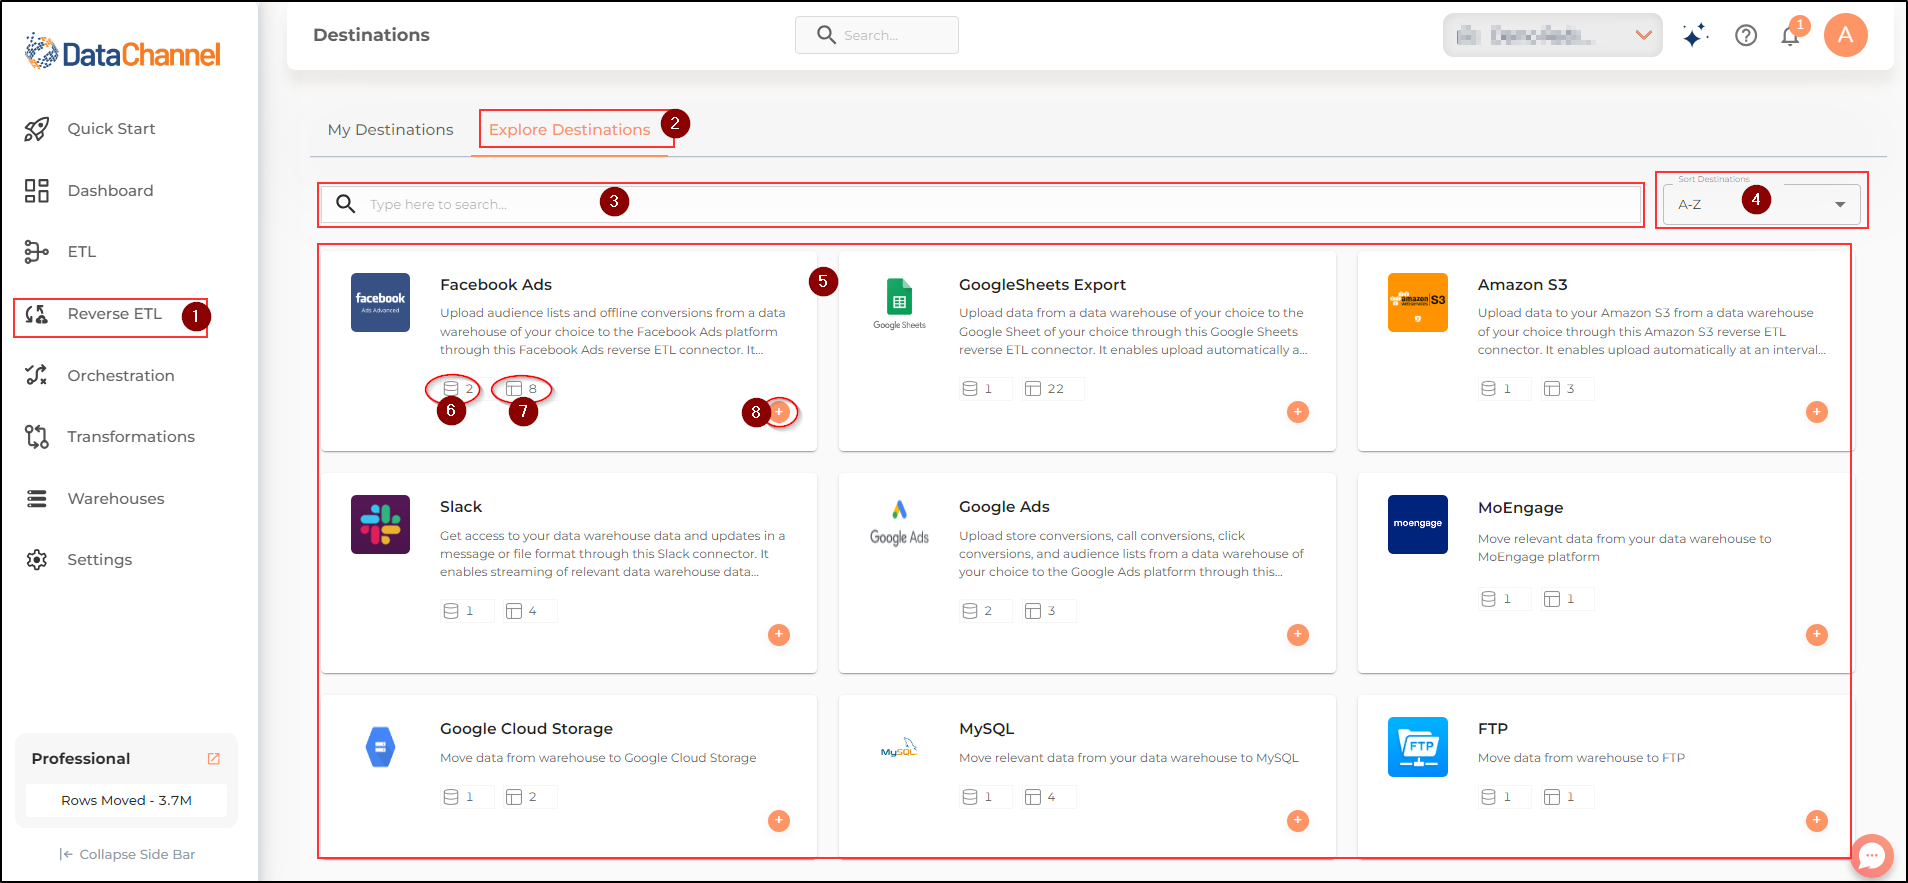
Explore Destinations
-
Go to the Reverse ETL tab, fourth icon on the sidebar, right below the ETL Tab.
-
Go to the Explore Destinations option, and it opens a carousel of all the reverse connectors configured by you as well as new reverse connectors that you can explore and add.
-
The search box inside the Explore Destinations tab allows you to quickly find a specific reverse connector.
-
The sort dropdown inside the Explore Destinations tab allows you to quickly sort the reverse connectors configured by you alphabetically.
-
Below the search and sort boxes the main UI screen inside the Explore Destinations tab contains a carousel of individual cards for each of the reverse connectors configured by you. Each card gives a brief description of the data destination it pertains to.
-
There are two icons on each reverse connector card. The first icon represents the total different types of reverse syncs available on DataChannel to connect to different API End points in the Data Destination.
-
The second icon icon on each revese connector card represents the number of reverse syncs configured by you for that particular Data Destination.
-
The + icon on each connector card allows you to add new syncs for that particular Data Destination.
To familiarize yourself with the complete process of adding a new sync on the DataChannel Console, it is recommended that you watch the video Tutorial-Steps to create a reverse sync.
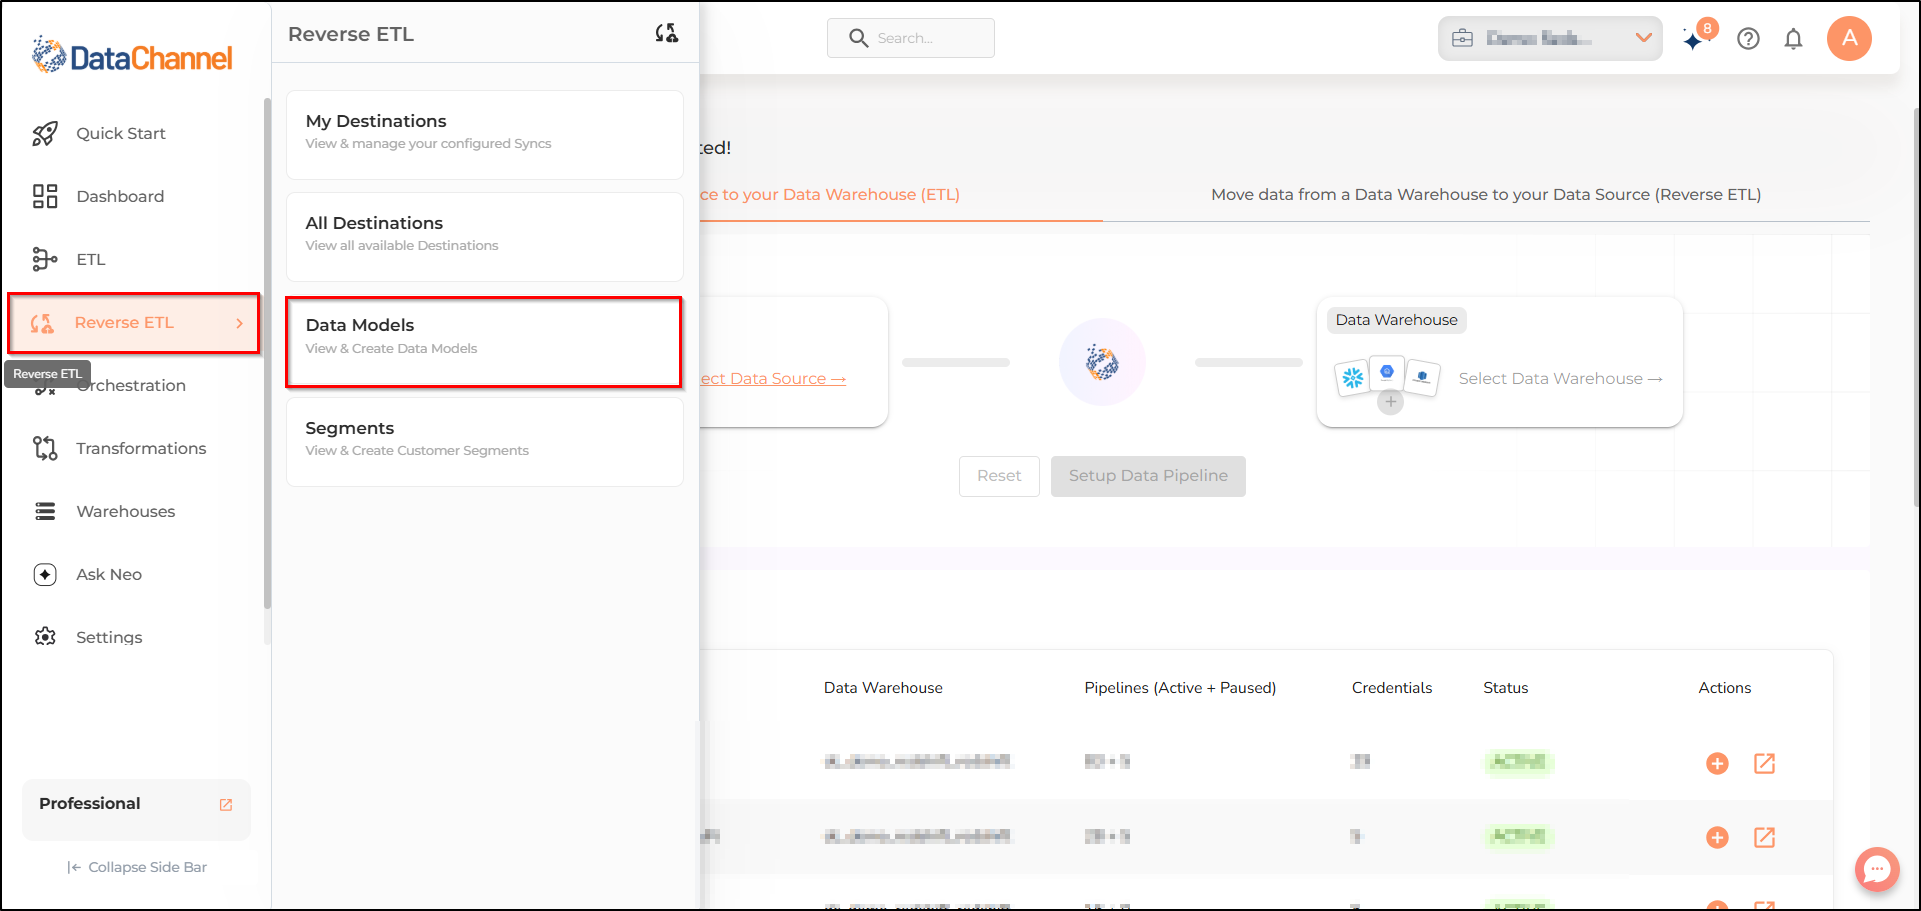
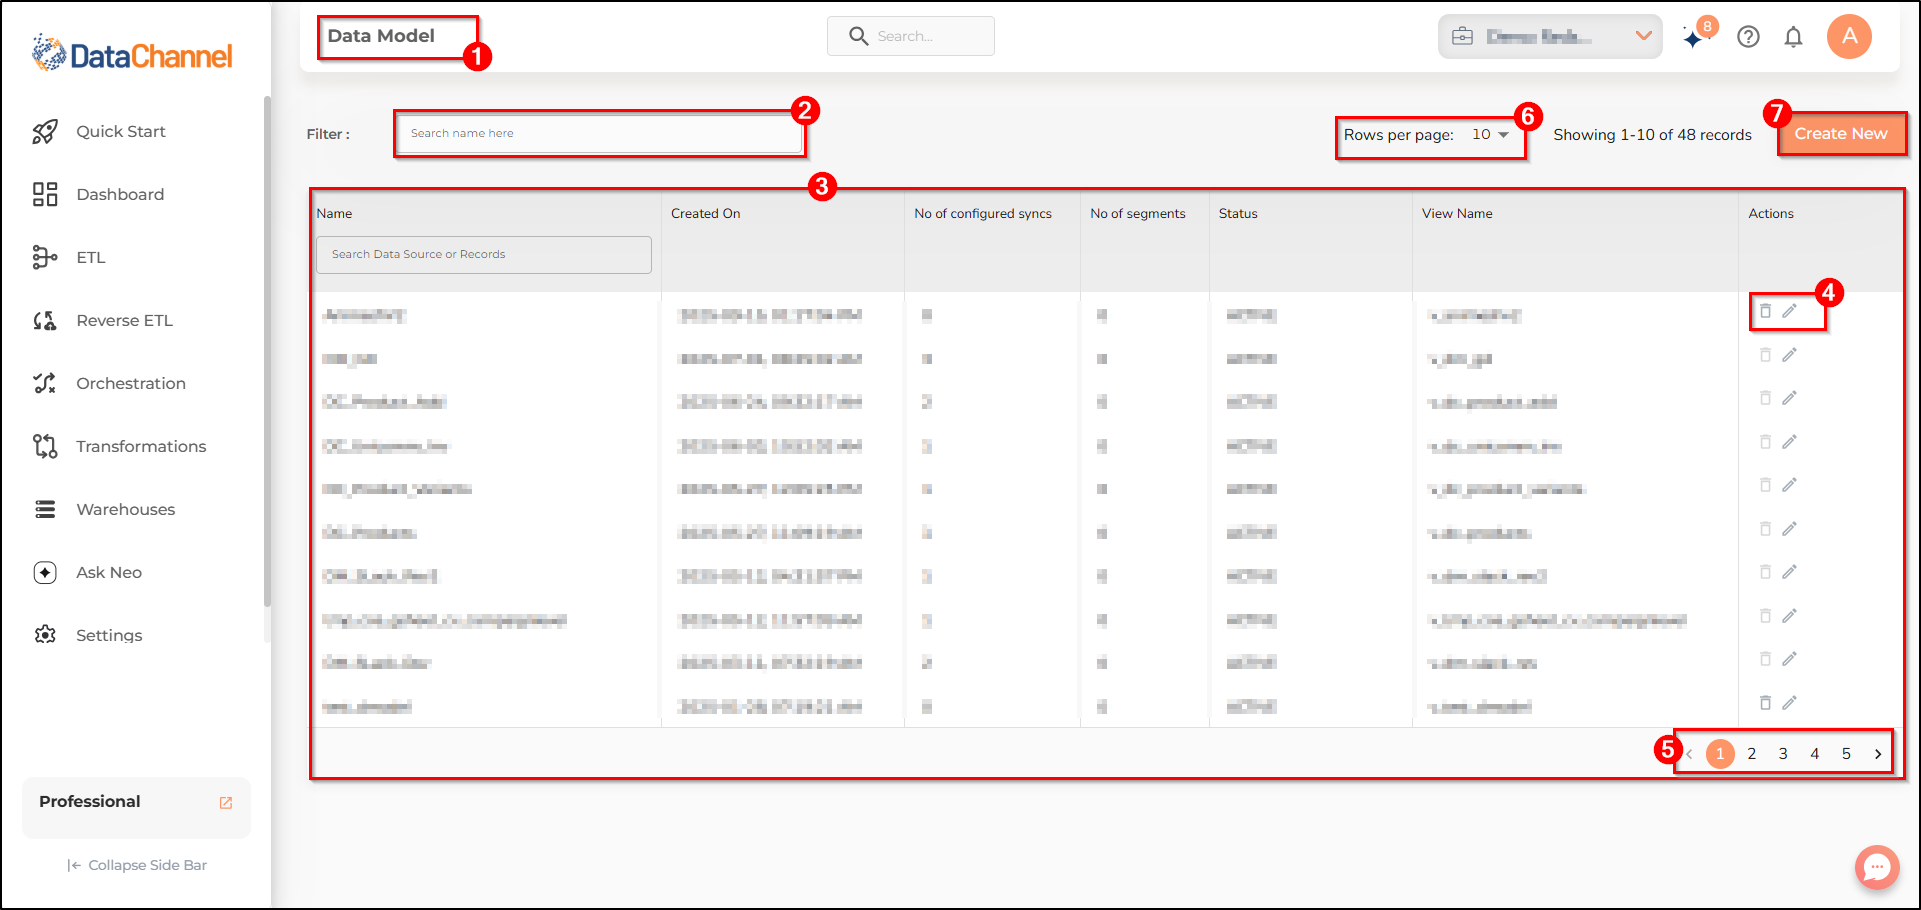
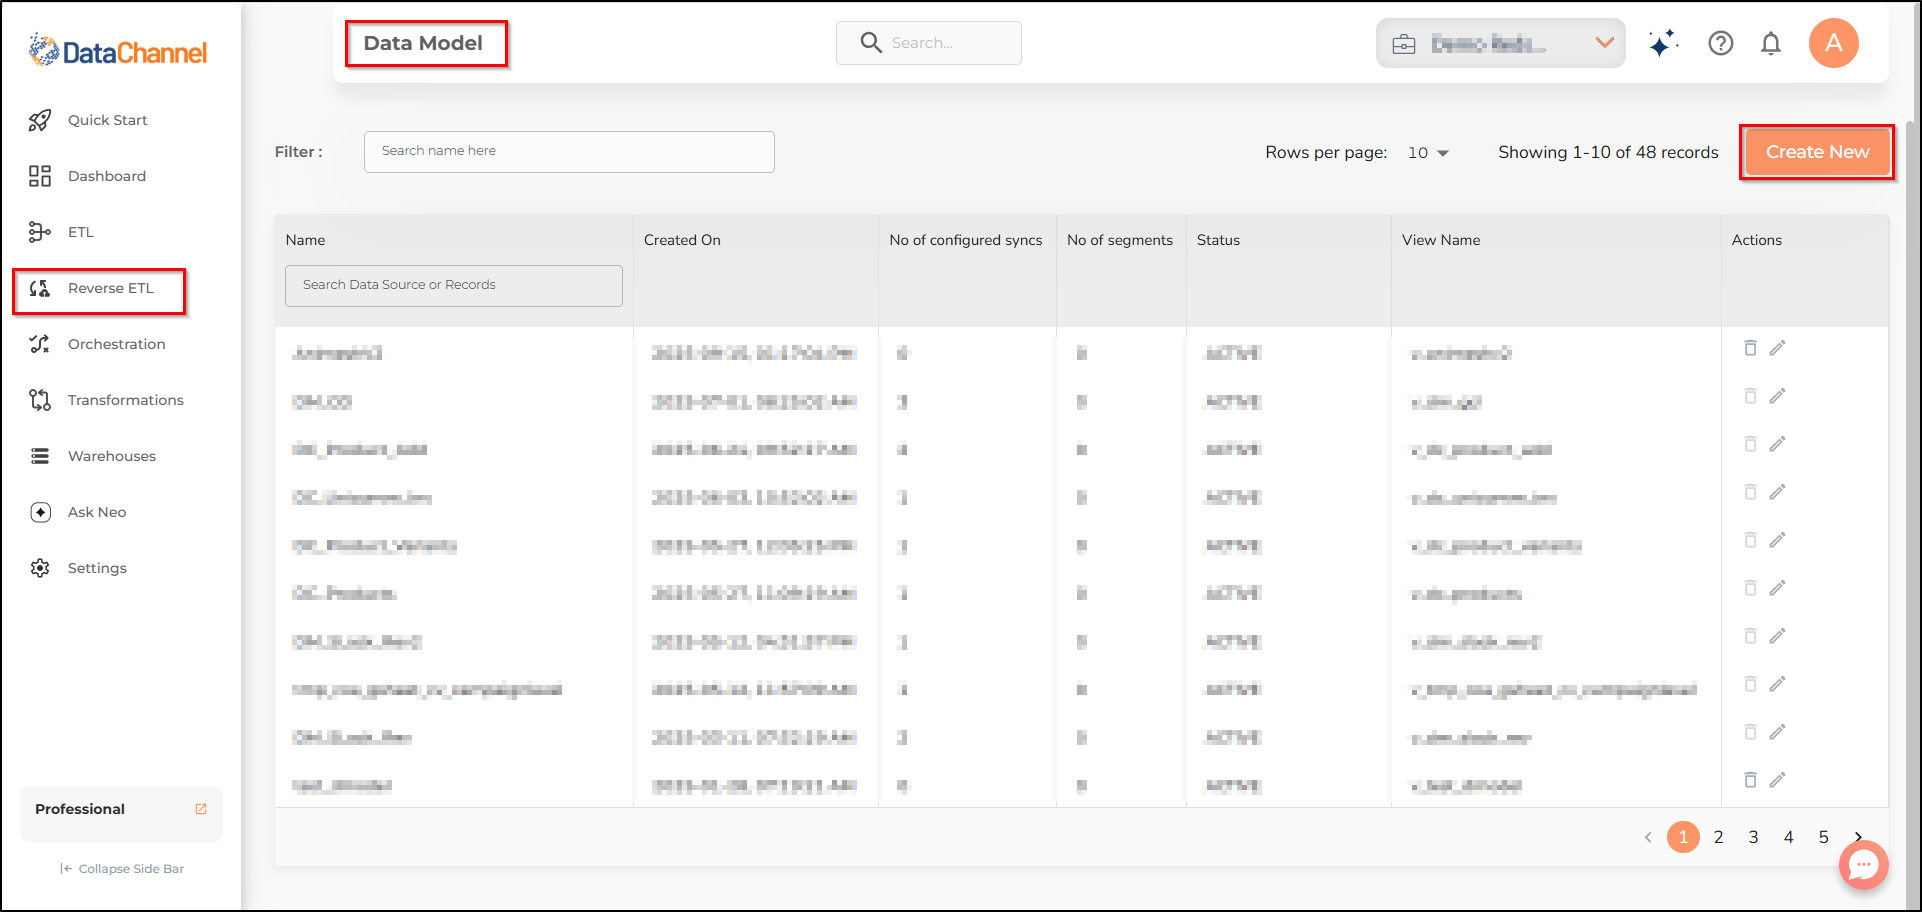
Data Model
This section will help to familiarize you with the layout on the Data Models page of the DataChannel Console. A data model determines the fields, tables that will be fetched from the stored repository to create and map the schema in the destination web application. Thus, the data model will be the script that ensures that the correct data is fetched and moved to the desired destination.
-
You can access the Data Models page by clicking on the Data Models option in the Reverse ETL tab.
-
The search box, located below the Top Banner, inside the Data Models page allows you to quickly find a specific Data Model created by you.
-
The Data Models List pane displays a Table with the details of all the Data Models created by you.
-
The icons in the actions column of the Table allow you to Delete/Edit a Data Model.
-
Navigating between different pages of the Data Model List pane is possible through the page numbers on the navigation bar, near the bottom right corner of the pane.
-
The Rows per page dropdown located on the top right part of the Main UI Screen allows you to select the number of rows visible on one page of the Data Models List pane.
-
The Create New button, located below the Top Banner, on the top right corner of the Main UI Screen, allows you to create a new Data Model for applying to your Data in the Data Warehouse.
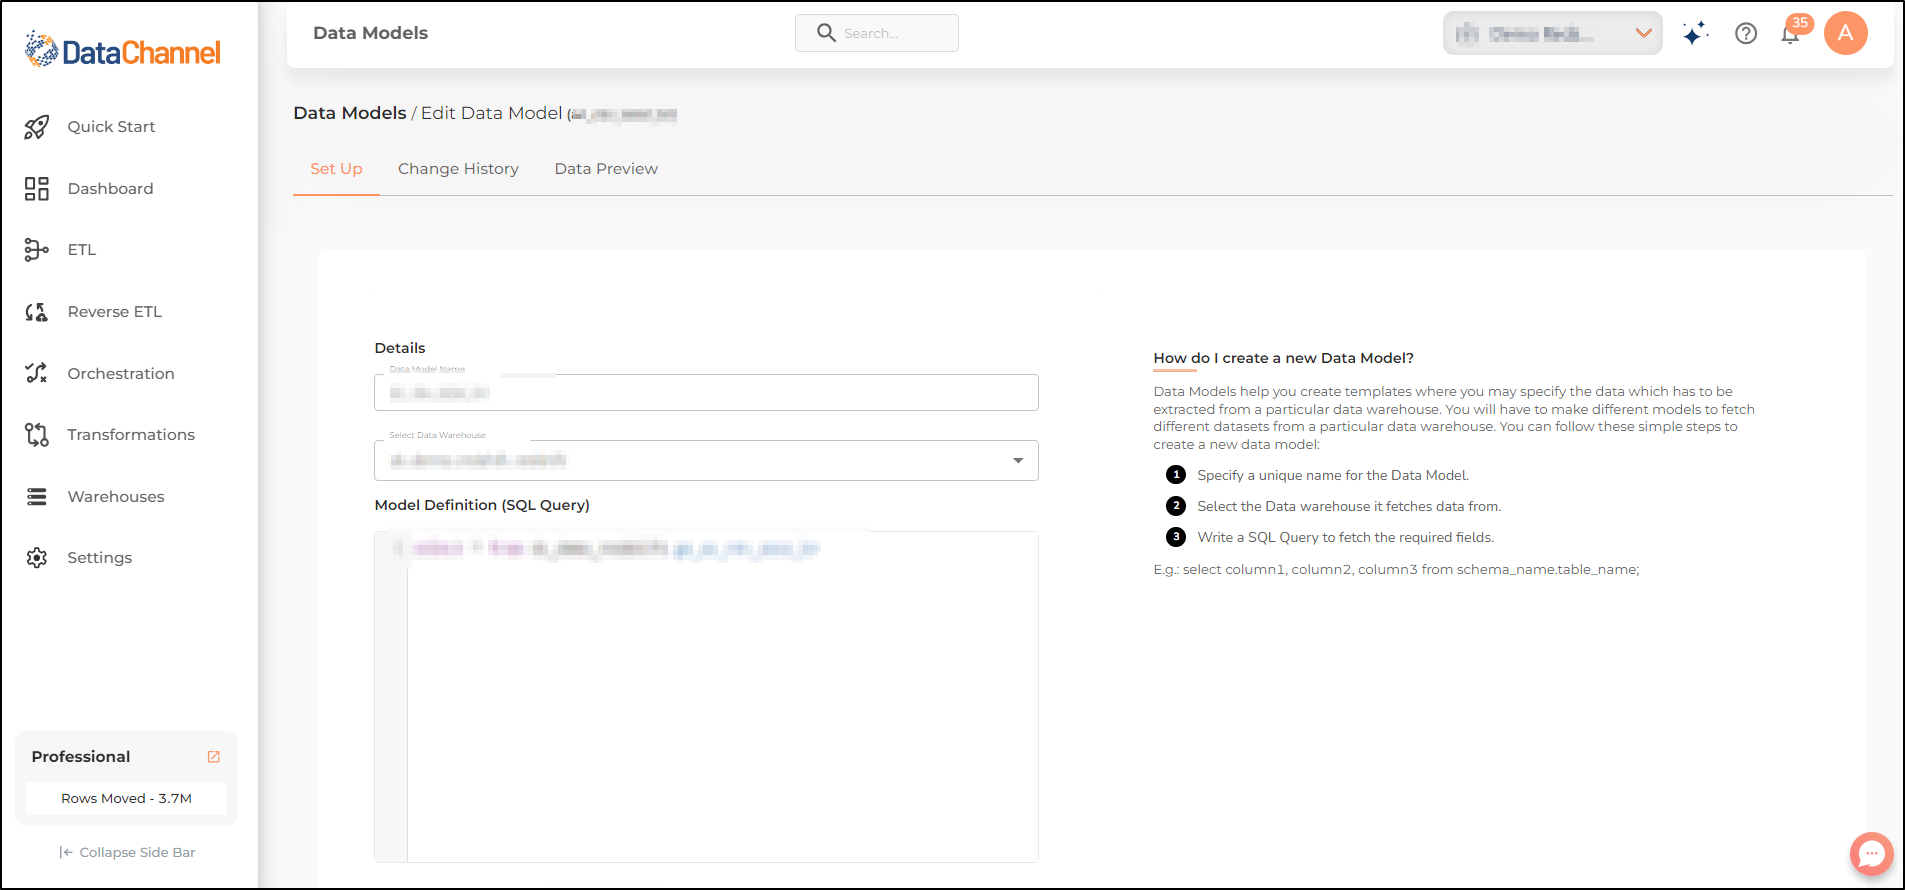
Creating a New Data Model
-
Go to the Data Models option in the Reverse ETL tab and click on the Create New button to create a new Data Model for applying to your data in the data warehouse.
Make sure that you have added a data warehouse before attempting to create a Data Model. -
In the fields that appear on the screen, give a name to the Data Model and Select a Data Warehouse to which you want to apply the Data Model. Enter the Model Definition (SQL Query) that you wish to execute to fetch the required fields. Validate the SQL and don’t forget to click the Add Model button.
Segments
This section will help to familiarize you with the layout on the Segments page of the DataChannel Console. Segments are a portion of your Data Model which you can create using our visual query builder. This allows you to define rules / filters to be applied to the data fetched from the data warehouse. Thus, when defining a data model, using segments you can specify the conditions that must be met, in order to be included in the query results. Segments run on top of data models, and are easy to create using our visual query builder.
-
You can access the segments page by clicking on the Segments option in the Reverse ETL tab.
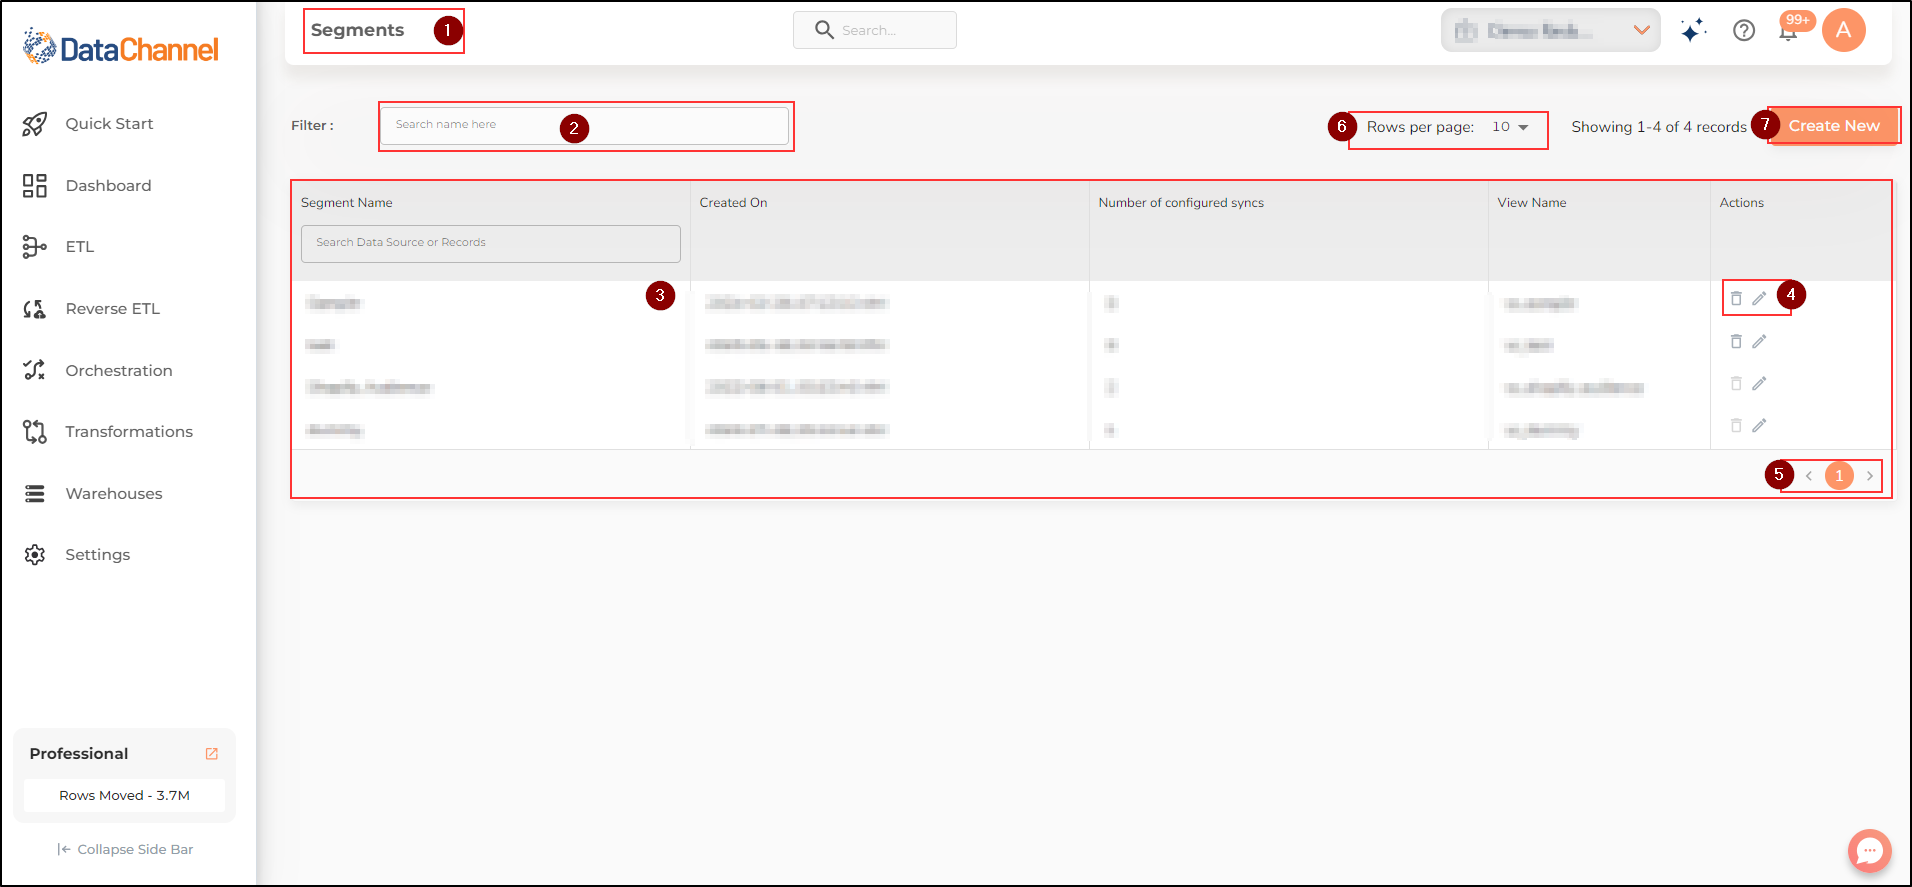
-
The search box, located below the Top Banner, inside the Segments page allows you to quickly find a specific Segment created by you.
-
The Segments List pane displays a Table with the details of all the Segments created by you.
-
The icons in the actions column of the Table allow you to Delete/Edit a Segment.
-
Navigating between different pages of the Segments List pane is possible through the page numbers on the navigation bar, near the bottom right corner of the pane.
-
The Rows per page dropdown located on the top right part of the Main UI Screen allows you to select the number of rows visible on one page of the Segments List pane.
-
The Create New button, located below the Top Banner, on the top right corner of the Main UI Screen, allows you to create a new Segment within a Data Model.
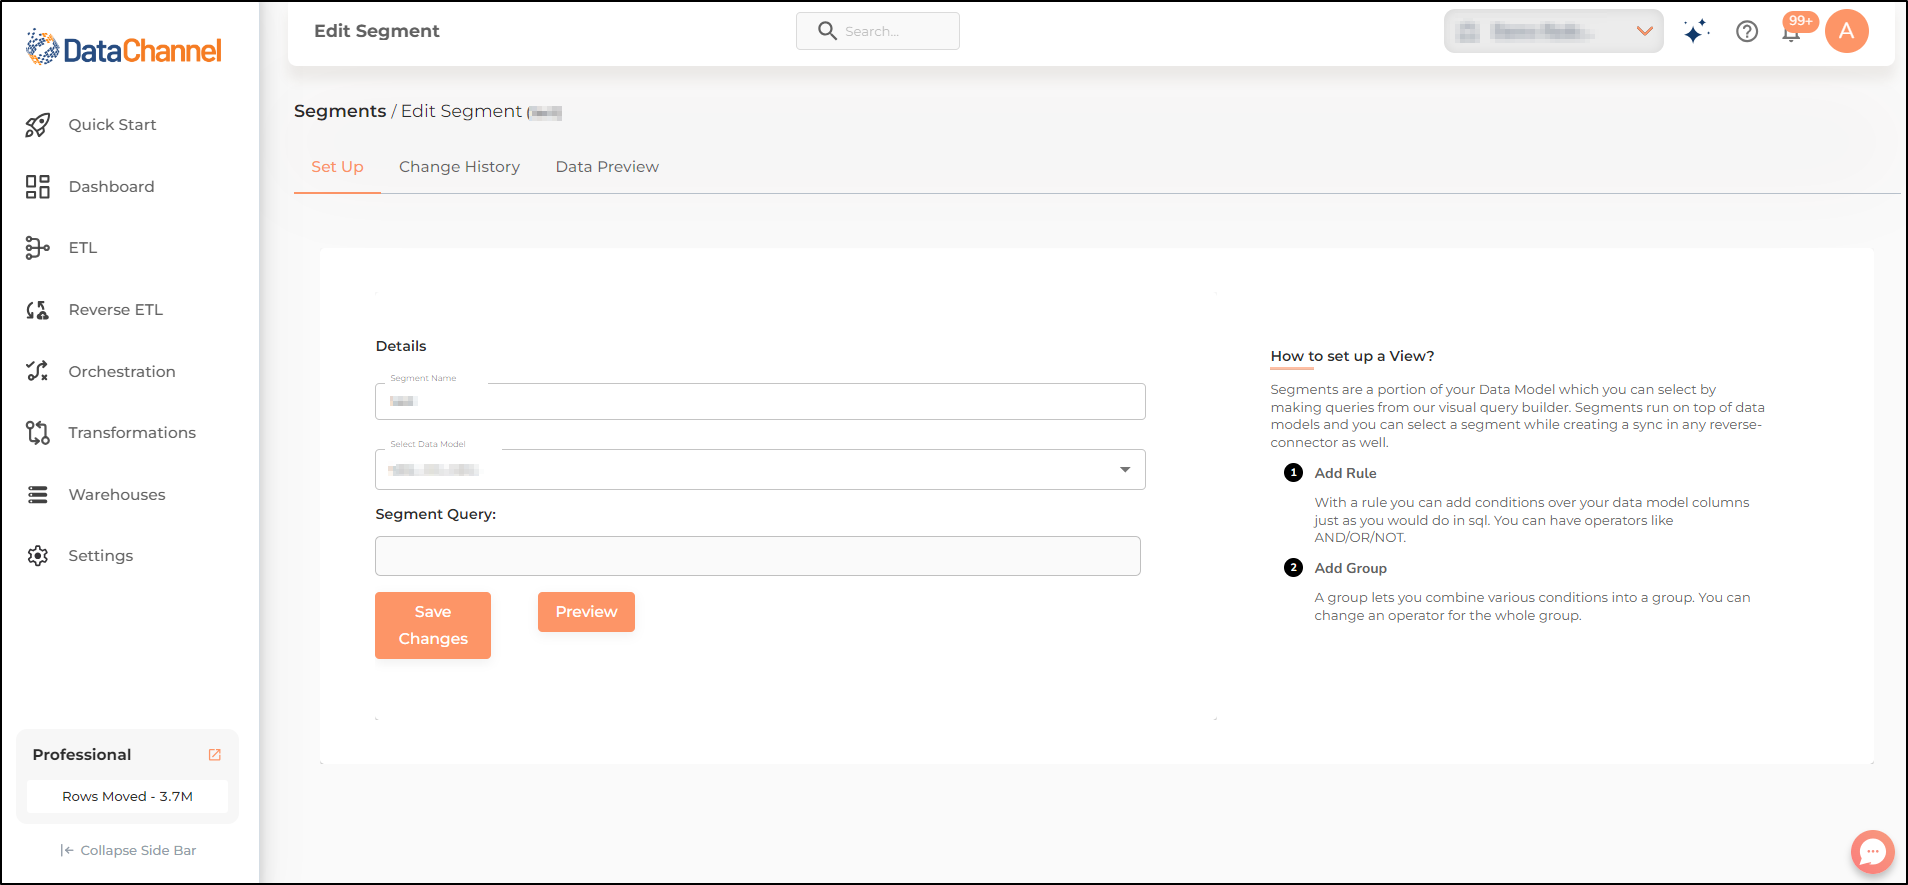
Creating a New Segment

-
Go to the Segments option in the Reverse ETL tab and click on the Create New button to create a new Segment for applying to your Data Model. Make sure that you have added a Data model before attempting to create a Segment.
-
In the fields that appear on the screen, give a name to the Segment and Select a Data Model to which you want to apply the Segment. Enter the Segment Query using the Visual Query Builder. The visual Query builder lets you use Add Rule and Add Group options to build the query. Add Rule allows you to add conditions over your data model columns while Add Group lets you combine various conditions into a group, so that you can change an operator for the whole group. You can Preview the Segment using the Preview Button. Lastly, don’t forget to click the Add Segment button.
Still have Questions?
We’ll be happy to help you with any questions you might have! Send us an email at info@datachannel.co.
Subscribe to our Newsletter for latest updates at DataChannel.