AWS Redshift Data Warehouse
Introduction
Amazon Redshift is one of the most popular, scalable, easy to manage data warehouse options for those wanting to setup a Data Warehouse on the cloud. Read more about the features and how to get started with the popular platform from AWS here.
In case you wish to use this platform to host your data that you are aggregating using DataChannel, you can either setup a cluster of your own or use a DataChannel Managed Redshift Warehouse. This document will show you how you can connect / provision a Redshift based warehouse in minutes using the DataChannel Platform.
Self Managed Redshift Cluster
|
Prerequisites for connecting your Redshift Cluster
Substitute the placeholder in the above query with the desired Database name. You may choose any name for your Database but keep in mind that the Database name should be 1-64 characters. Valid characters are lowercase alphanumeric characters. This database is where DataChannel will actually create tables, load data, and run queries. If you don’t have access to query editor v2, you can use any database client ( E.g Dbeaver) to connect to your redshift and run the same queries.
Substitute the placeholders in the above query with the desired Username, password and Schema name. Please make a note of these as you will require them when configuring your warehouse with DataChannel.
Please make a note of your Amazon S3 Bucket Name and AWS Region as these will be needed when configuring your warehouse with DataChannel.
Save this information and keep it handy when configuring your warehouse, to allow DataChannel to interact with your AWS Redshift resources. For more information on creating and managing credentials click here. |
|
Tips to ensure smooth functioning
|
To find your AWS Redshift Details
You’ll be needing certain AWS redshift details when configuring your Data Warehouse at DataChannel:
-
Open your AWS admin console.
-
Check the Top Banner to make sure that you are in the correct region.

-
Search for Redshift in the search box and from the search results, click on "Amazon Redshift".
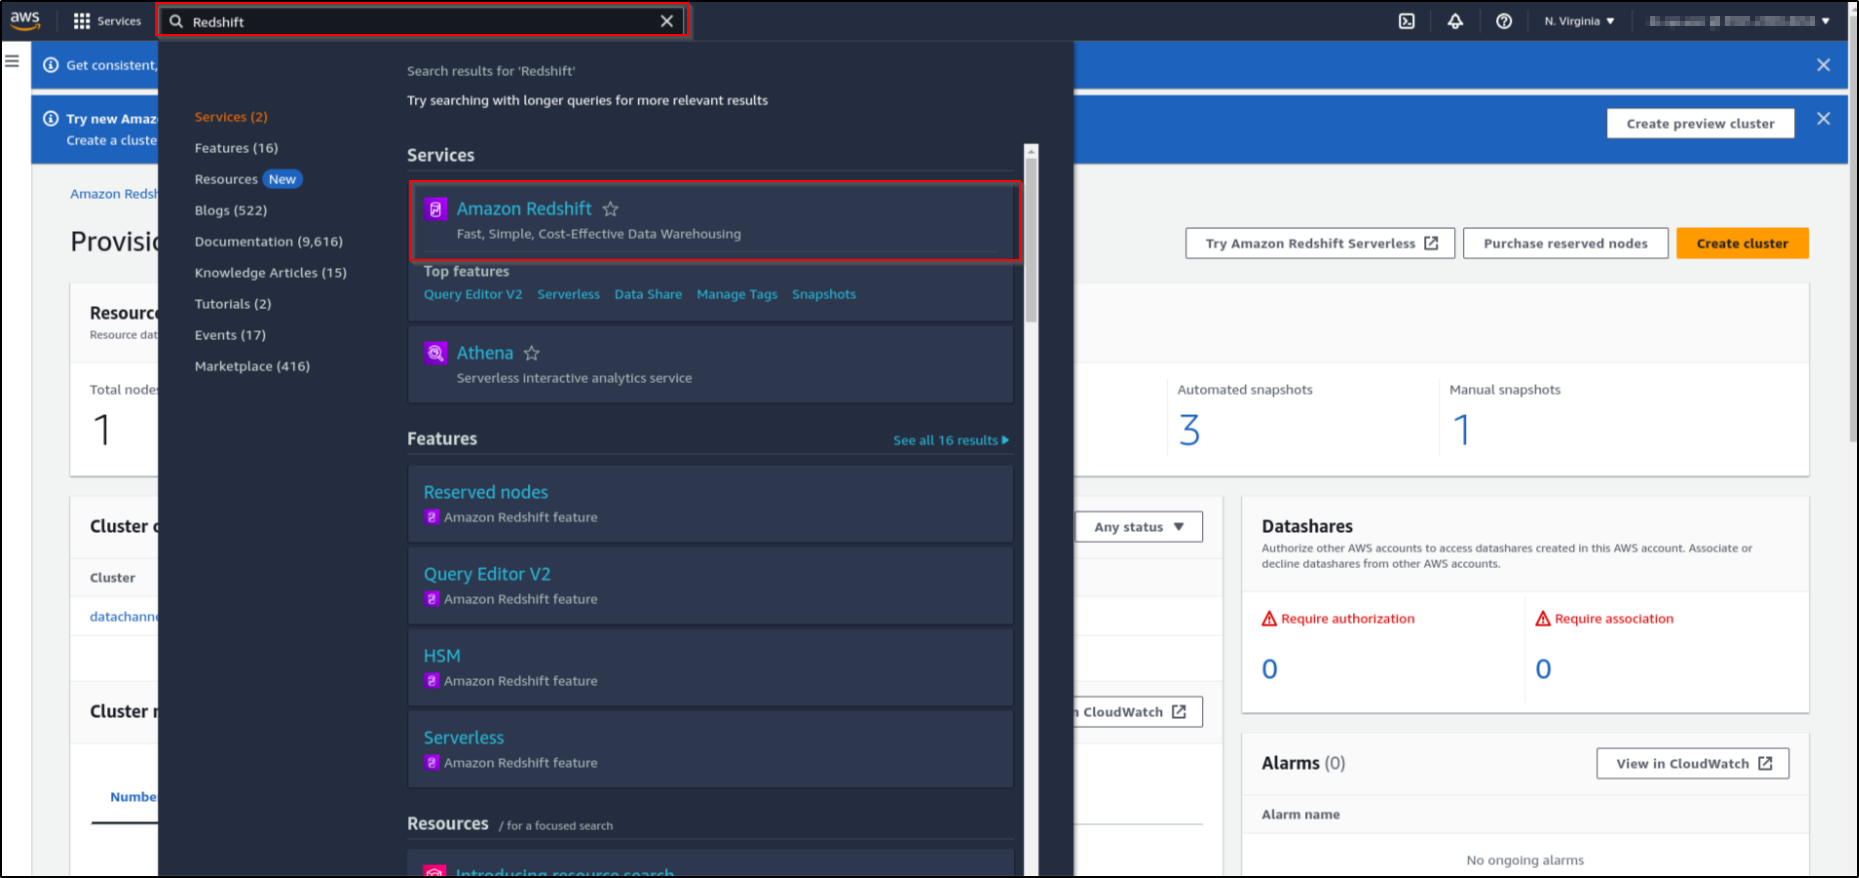
-
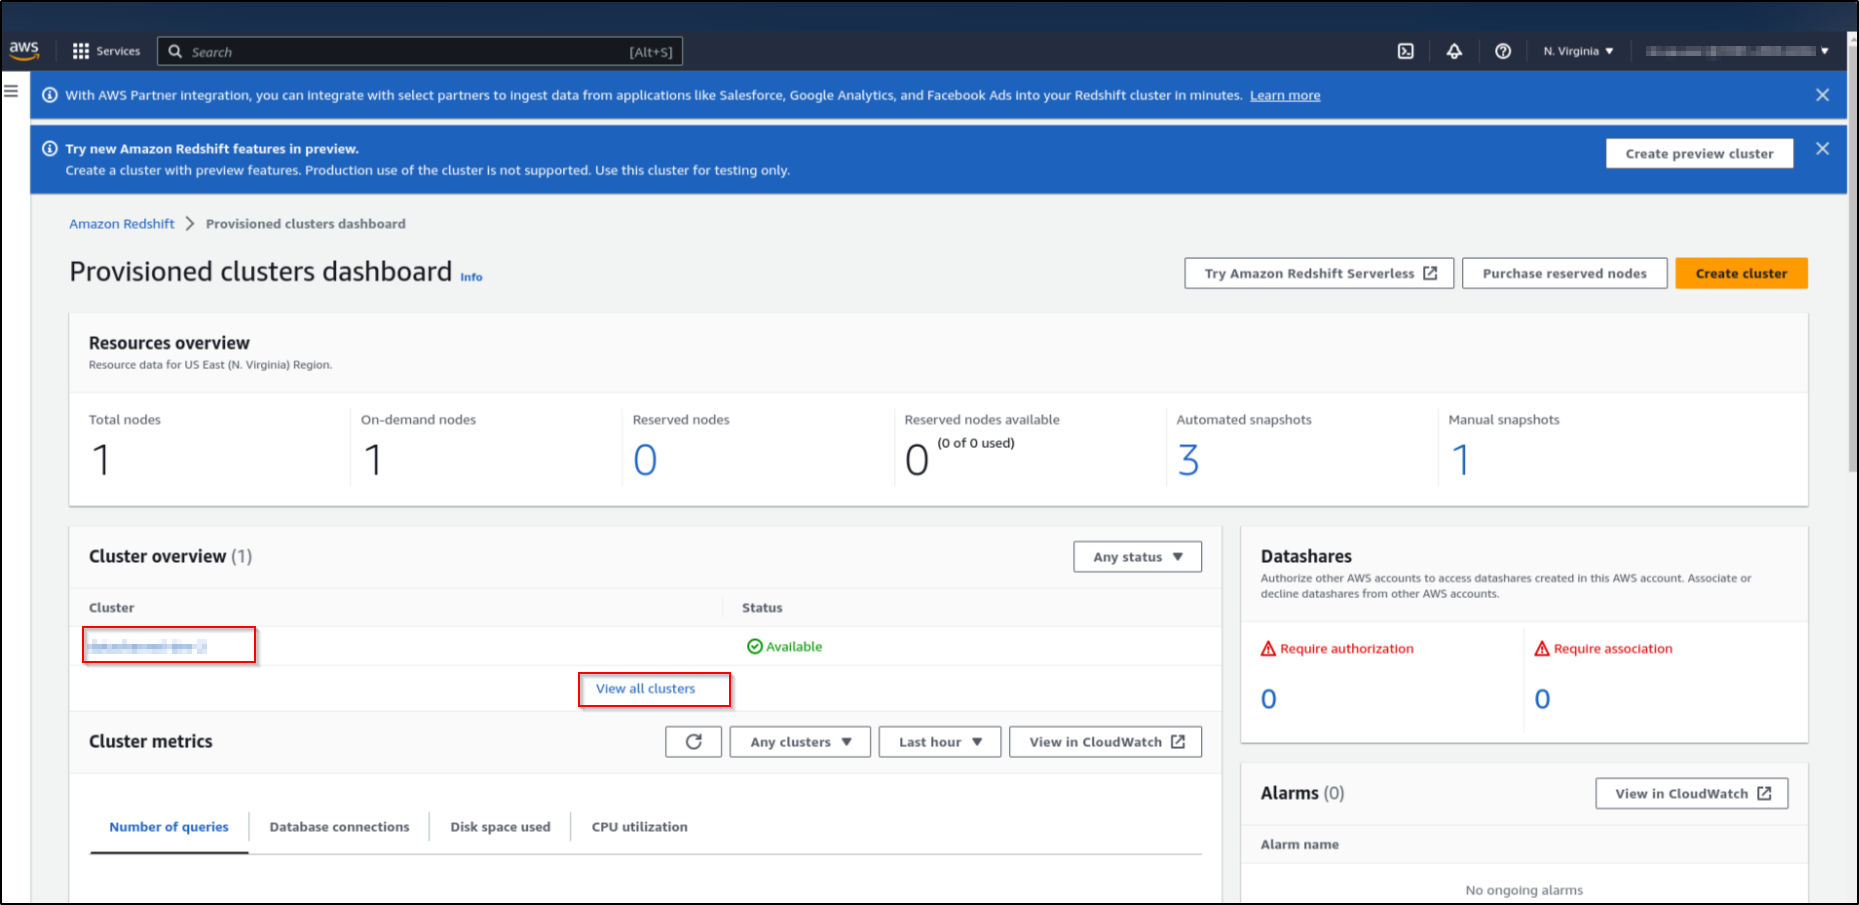
This will list all the clusters that you have in your current region. Click on the cluster that you want to use.
-
Copy the "Endpoint URL" from the General Information. This will have a format:
{cluster_url}:{port}/dev. cluster_url is your Host Name. The “Endpoint URL” also gives you the details of Amazon Redshift Database Port Number (see format).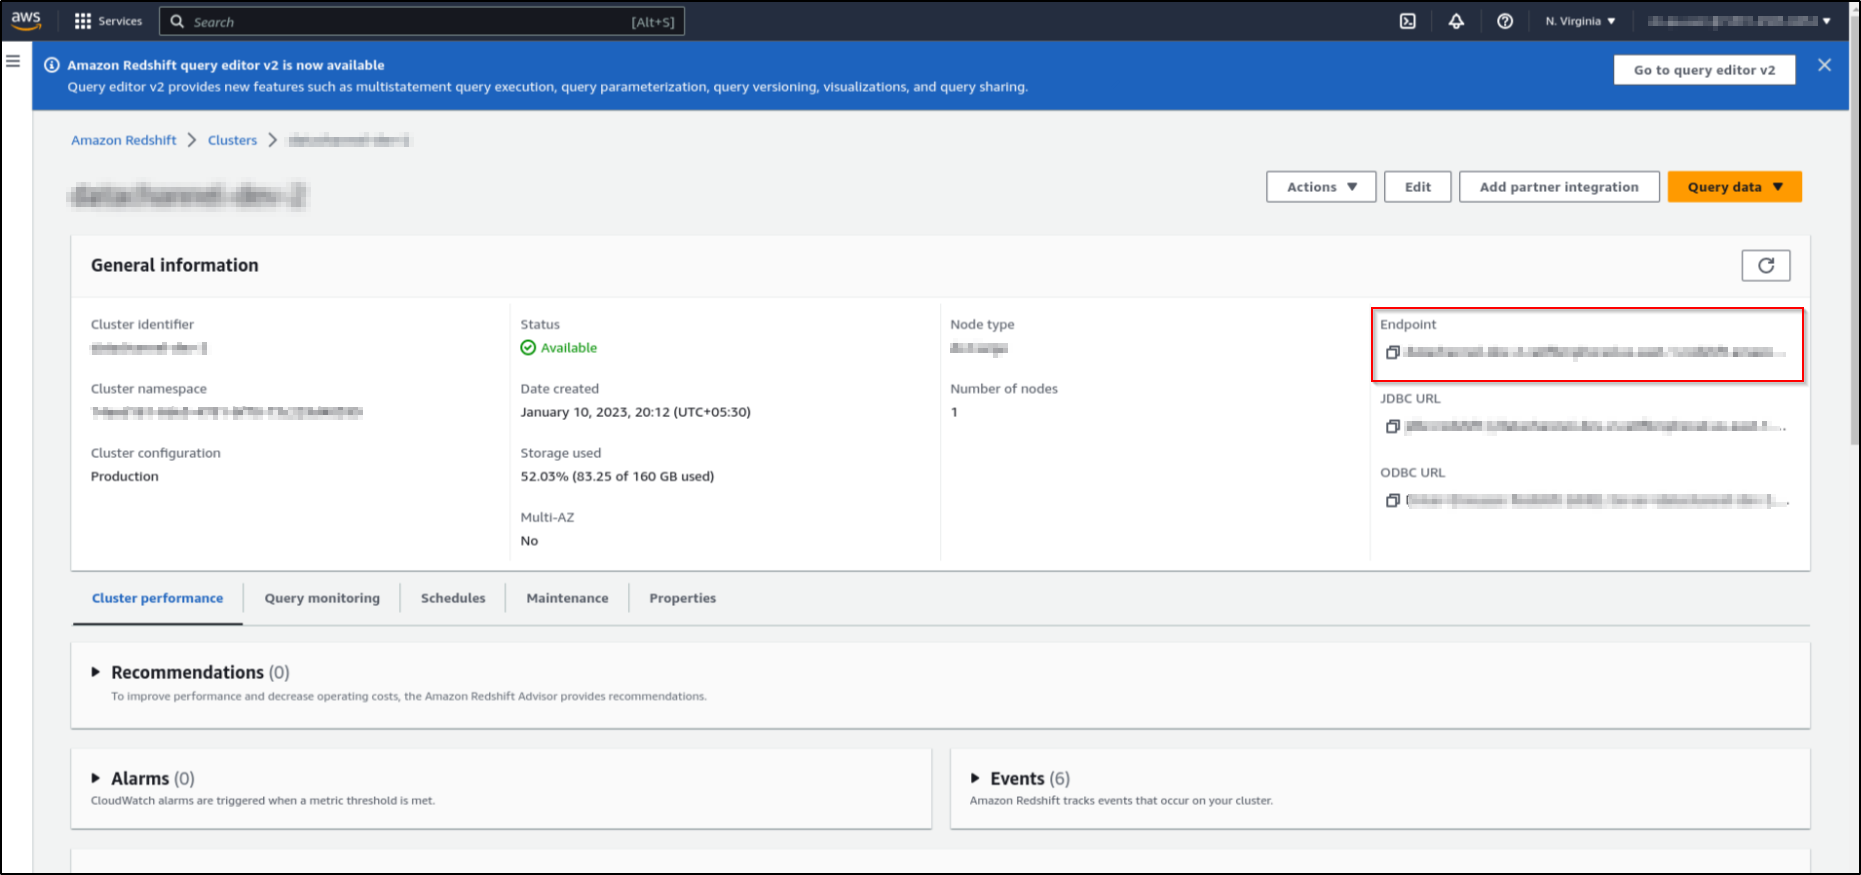
-
You now have the required AWS Redshift details to enter into the fields on the DataChannel Console namely, Username, Password, Host Name, Port number, Database Name and Schema Name.
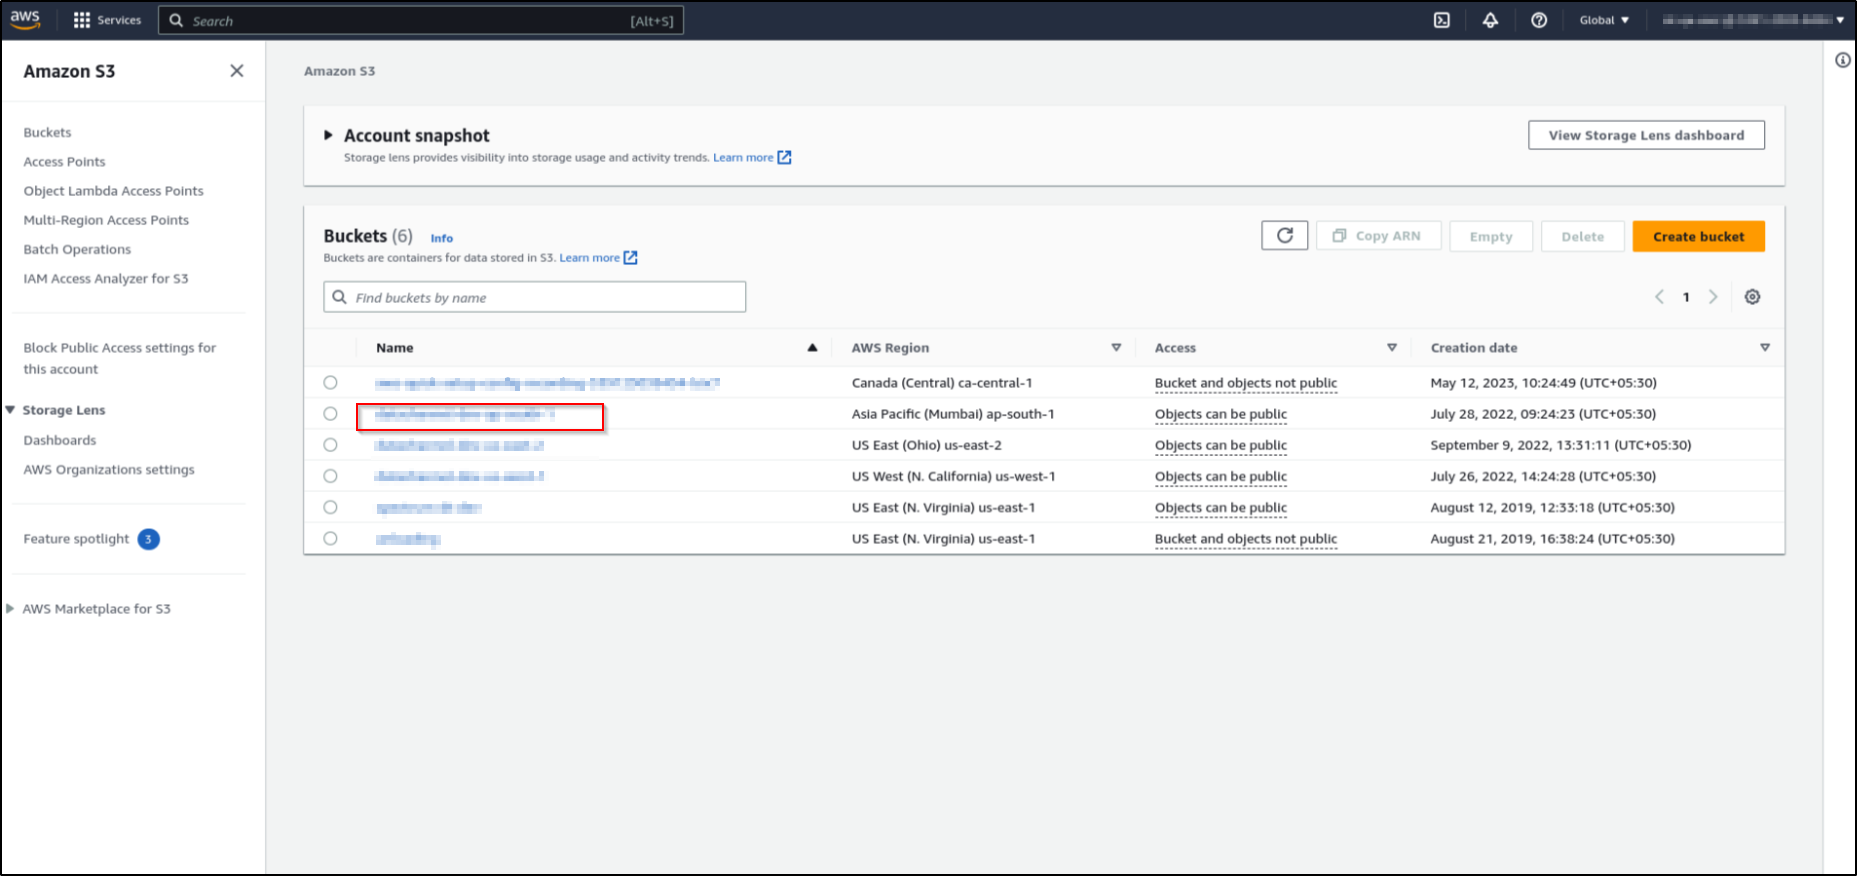
To find your S3 Bucket Details
You’ll also be needing certain S3 Bucket details when configuring your Data Warehouse at DataChannel. You can get the bucket details by following these steps:
-
Open your AWS admin console.
-
Check the Top Banner to make sure that you are in the correct region.
-
Search for ‘Bucket’ in the search box on the Top Banner and click on ‘S3’.
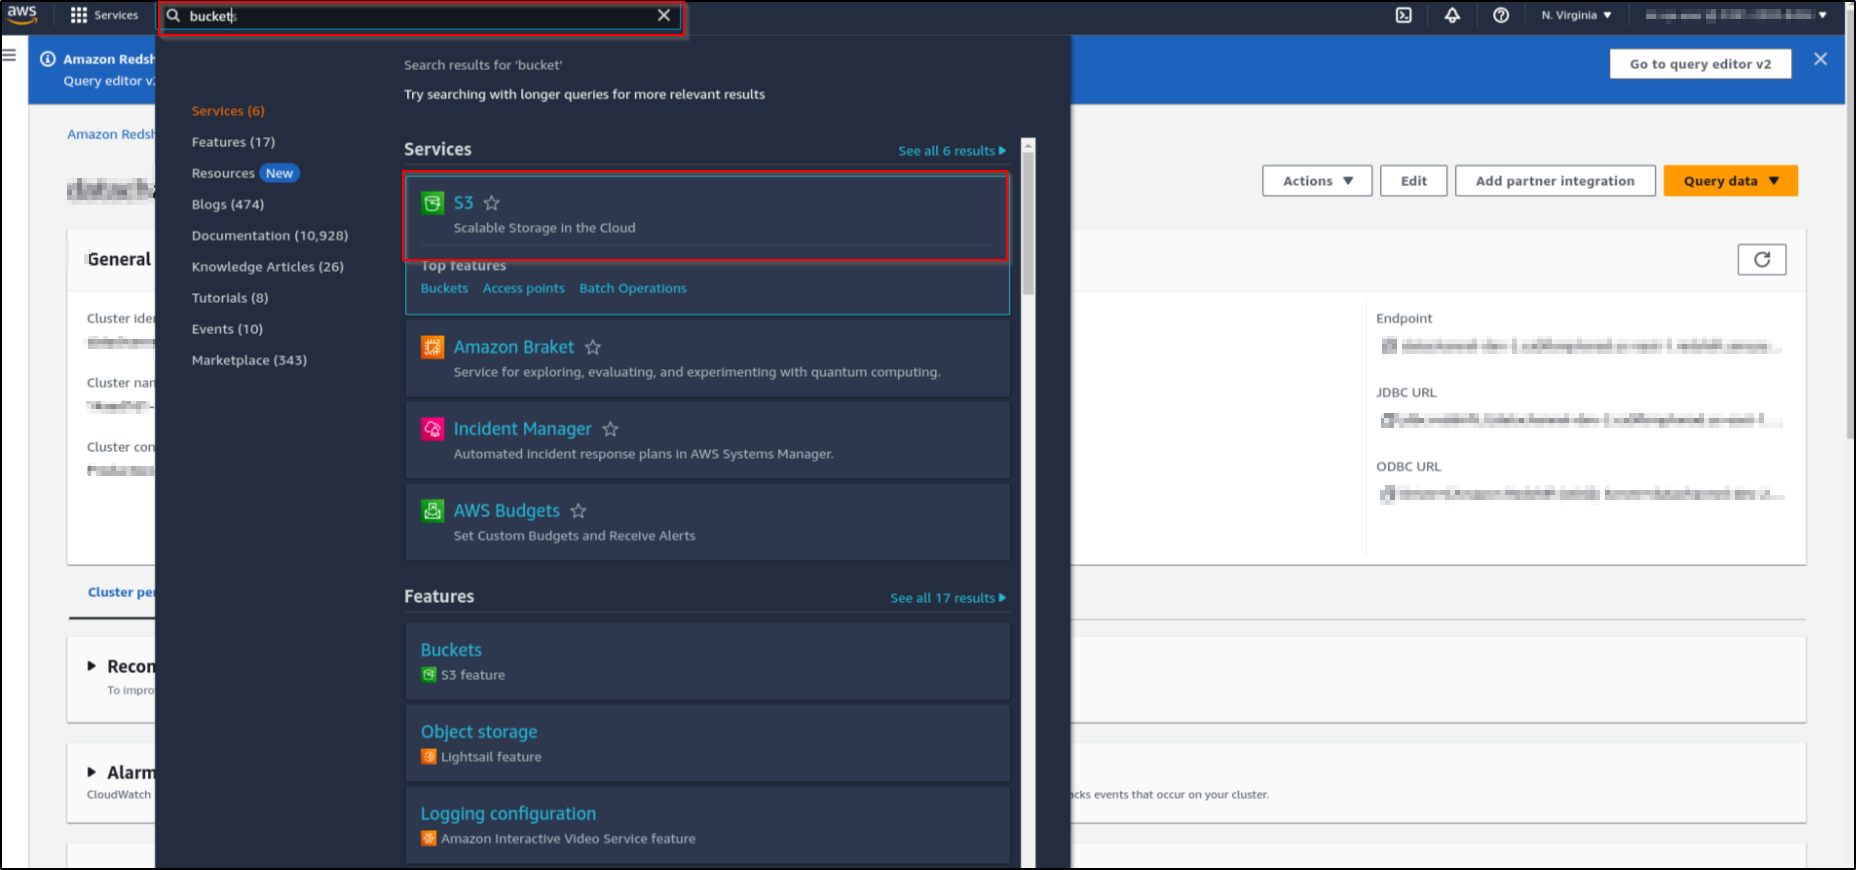
-
This will list all the buckets you have in your account. Click on the bucket that you want to use.
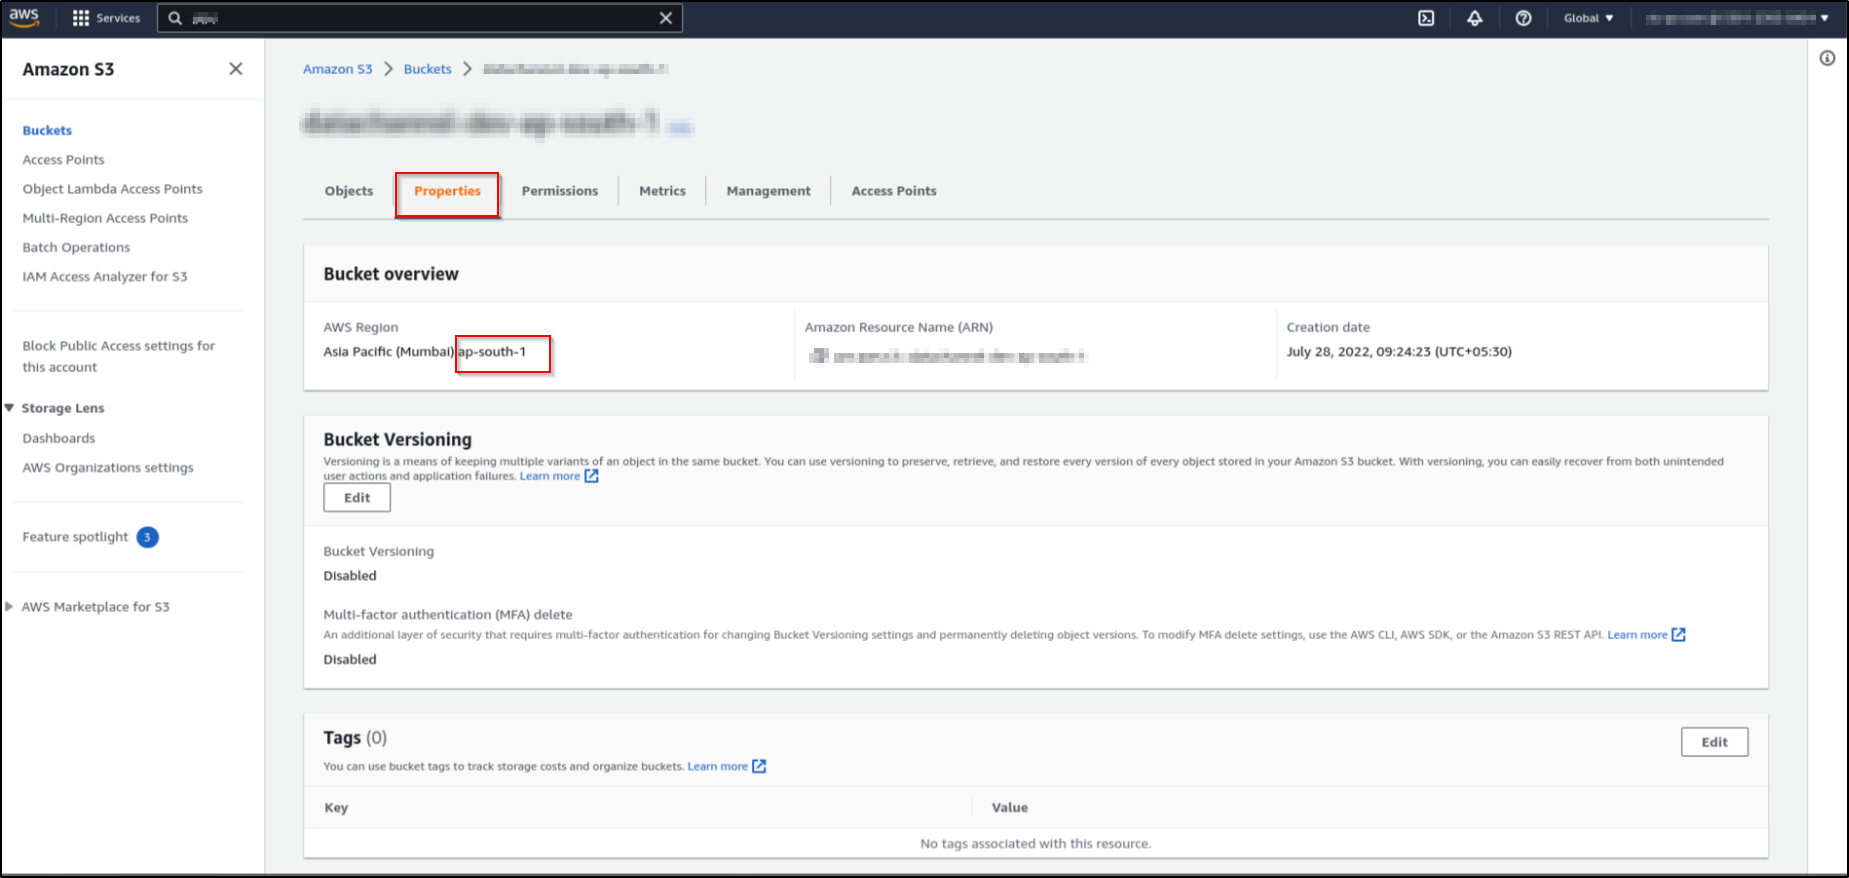
-
Click on the properties tab. This will show the bucket details such as Bucket region. Copy the region code. This is your AWS S3 location.
-
For finding your AWS secret key and access key, refer AWS Documentation
-
You now have the required S3 details to enter into the fields on the DataChannel Console namely, Bucket name, AWS S3 Location, Access Key and Secret Key.
Additional Steps to be followed if you are using a Firewall
In case you are using a firewall, then you might need to edit inbound rules to allow Datachannel IP’s to connect to your AWS network. You can follow these steps:
-
Open your AWS admin console.
-
Check the Top Banner to make sure that you are in the correct region.
-
Search for Redshift in the search box and from the search results, click on "Amazon Redshift".
-
This will list all the clusters that you have in your current region. Click on the cluster that you want to use.
-
Open your cluster details and click on properties.
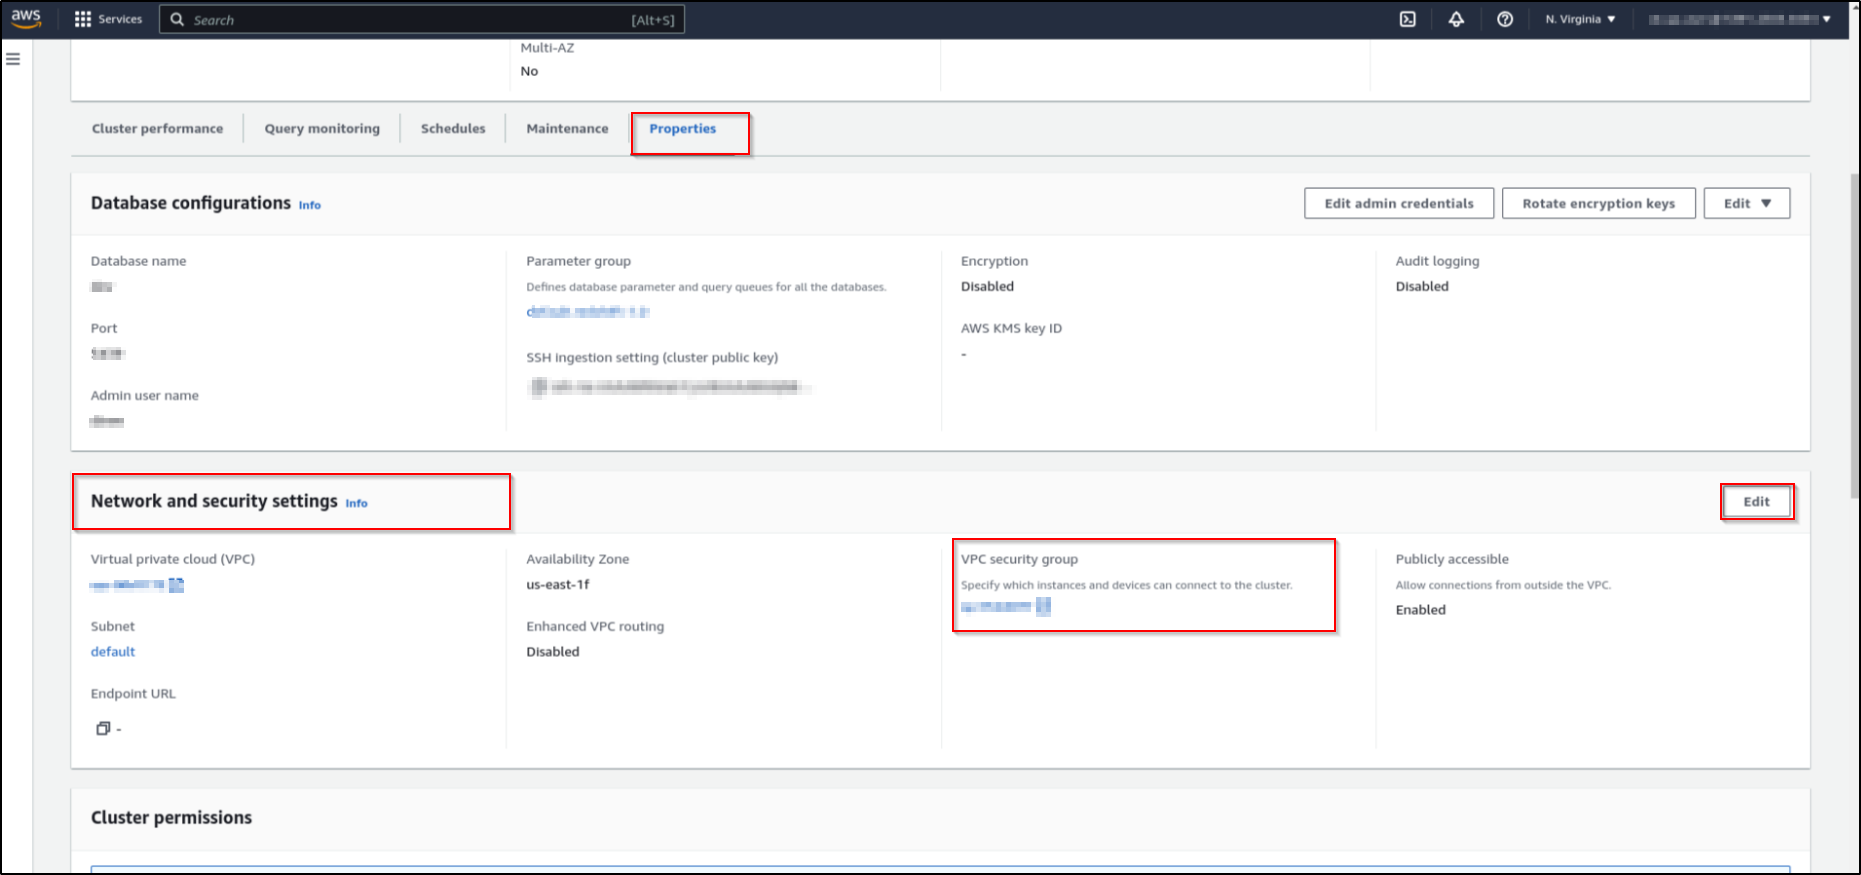
-
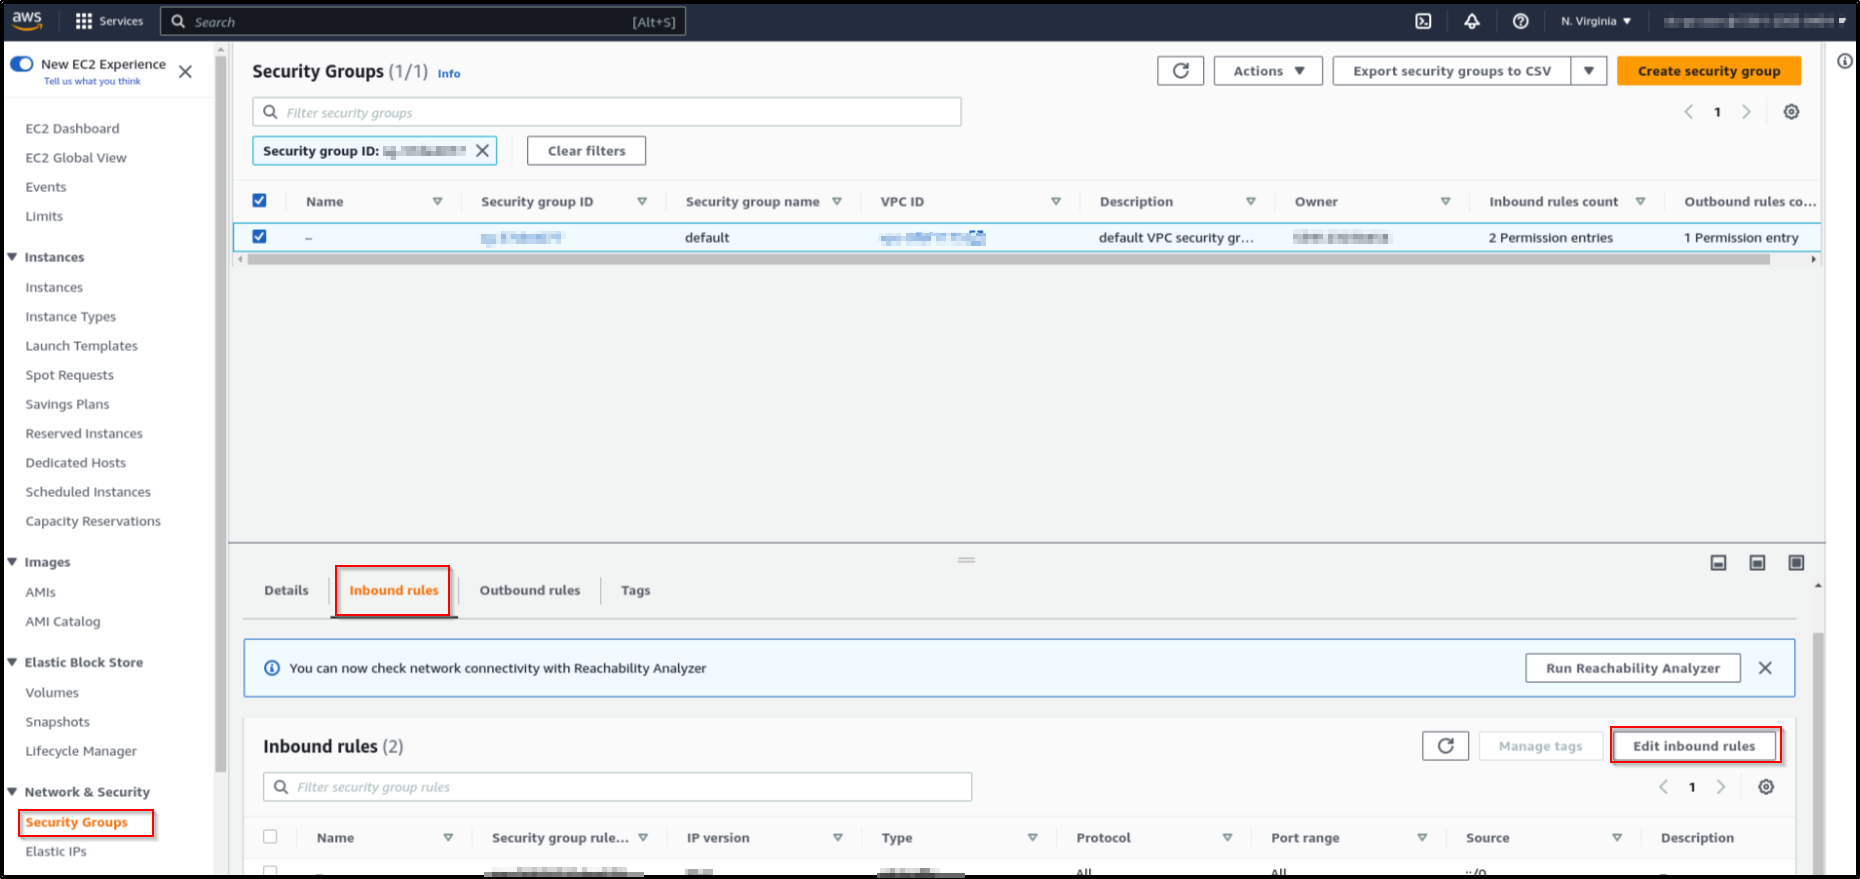
In the "Network and security settings" section, click on the VPC Security group. This will open the VPC security group details page.
-
Click on "Edit inbound rules".
-
Click on Add rule. Make sure the Type is "Custom TCP". Enter your port number in the "Port range" field.
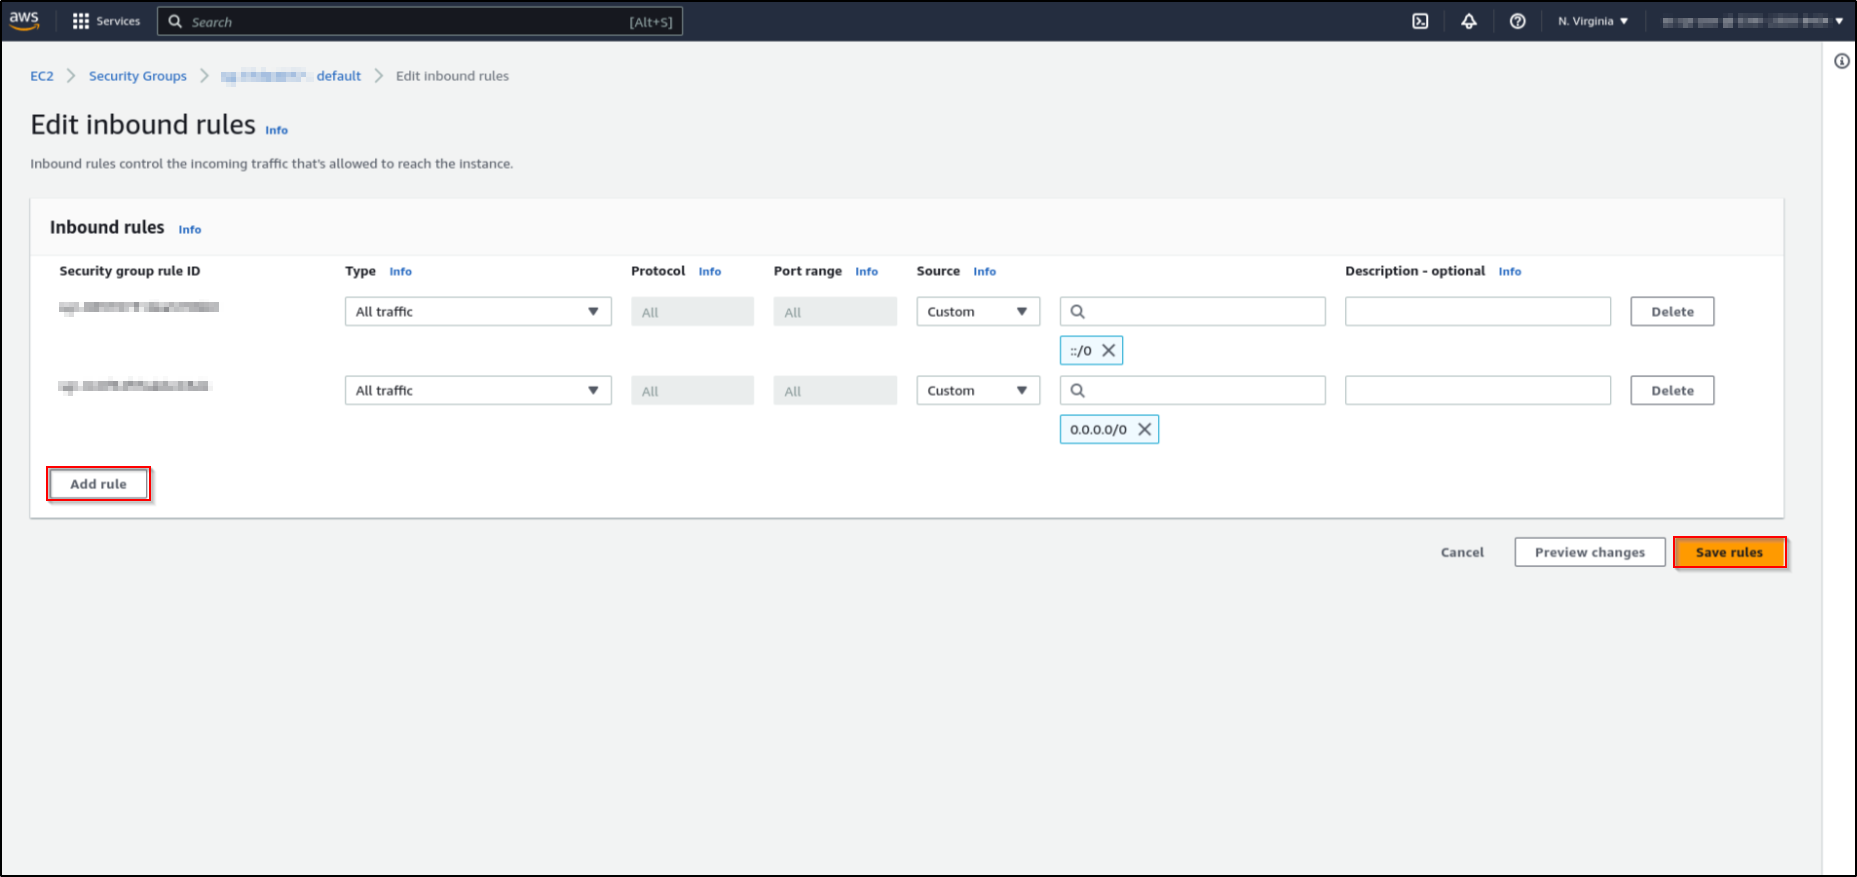
-
Enter the DataChannel IP in Source.
-
Please note that you will have to do the above steps for all the datachannel IPs.
-
When finished, click on Save rules.
Step By Step Guide
- Step 1
-
Click on Data Warehouses tab in the left side bar navigation to reach the Data Warehouses Module as shown below.
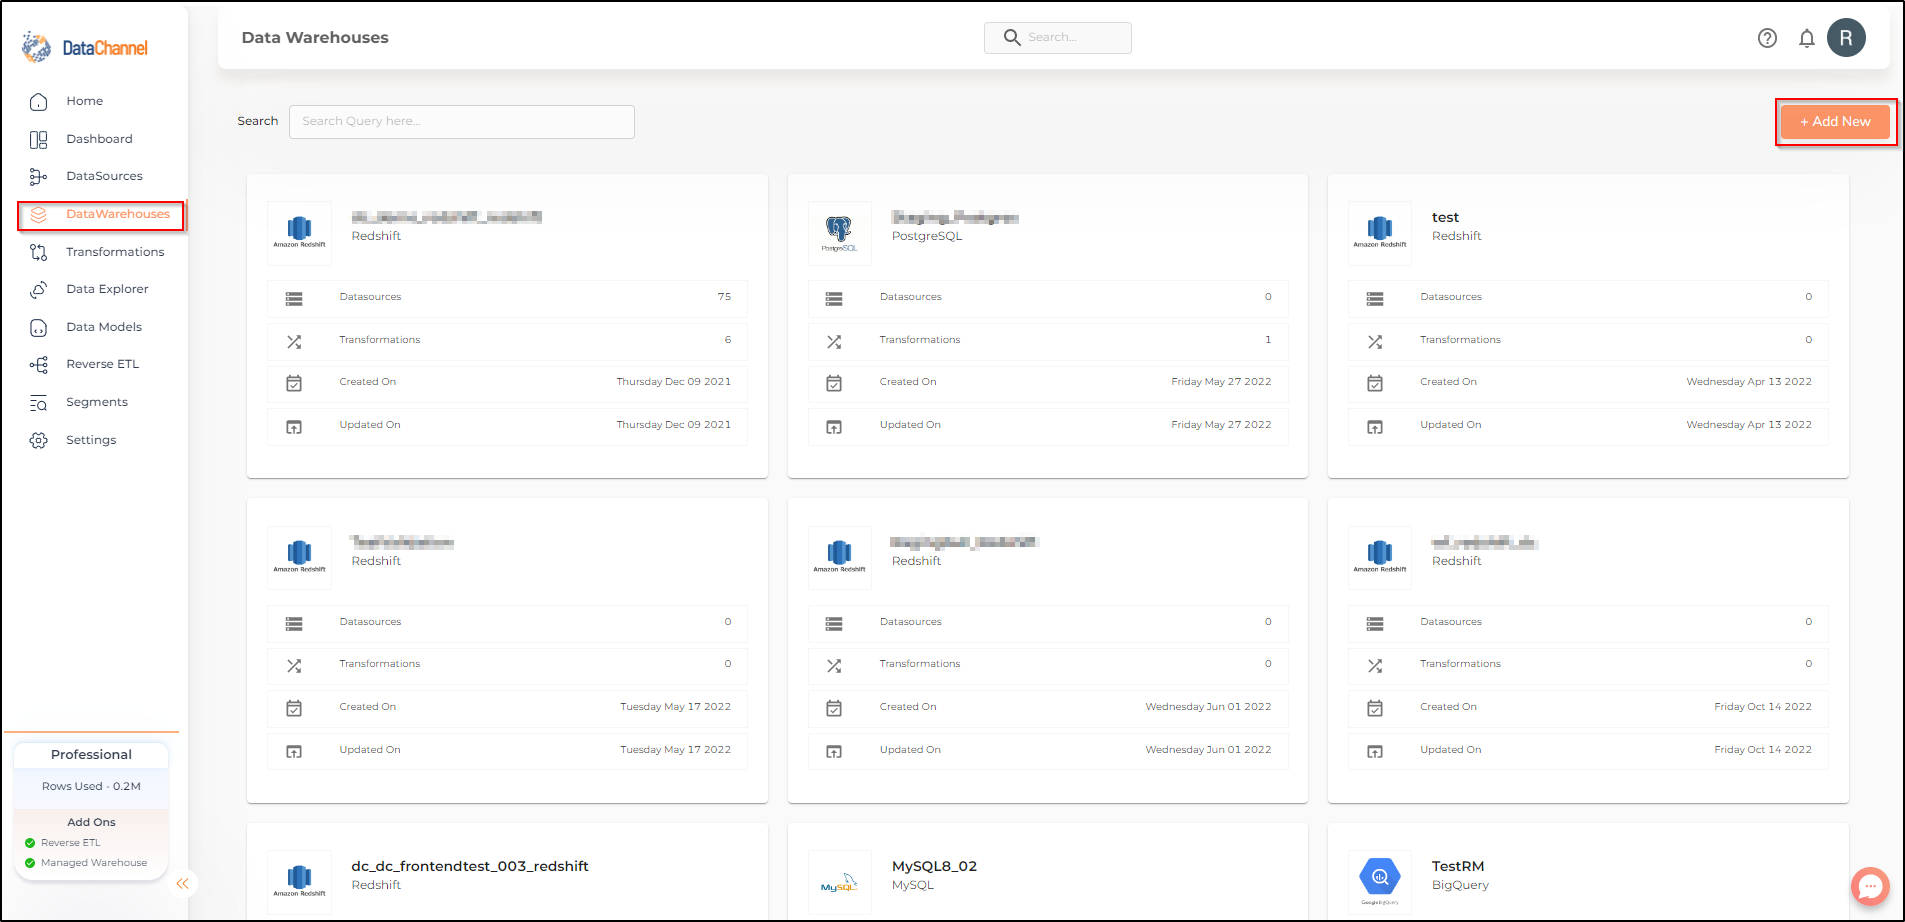
- Step 2
-
Click on Add New to add a new Data Warehouse to your account.
- Step 3
-
Select Redshift from the listed Warehouse options.
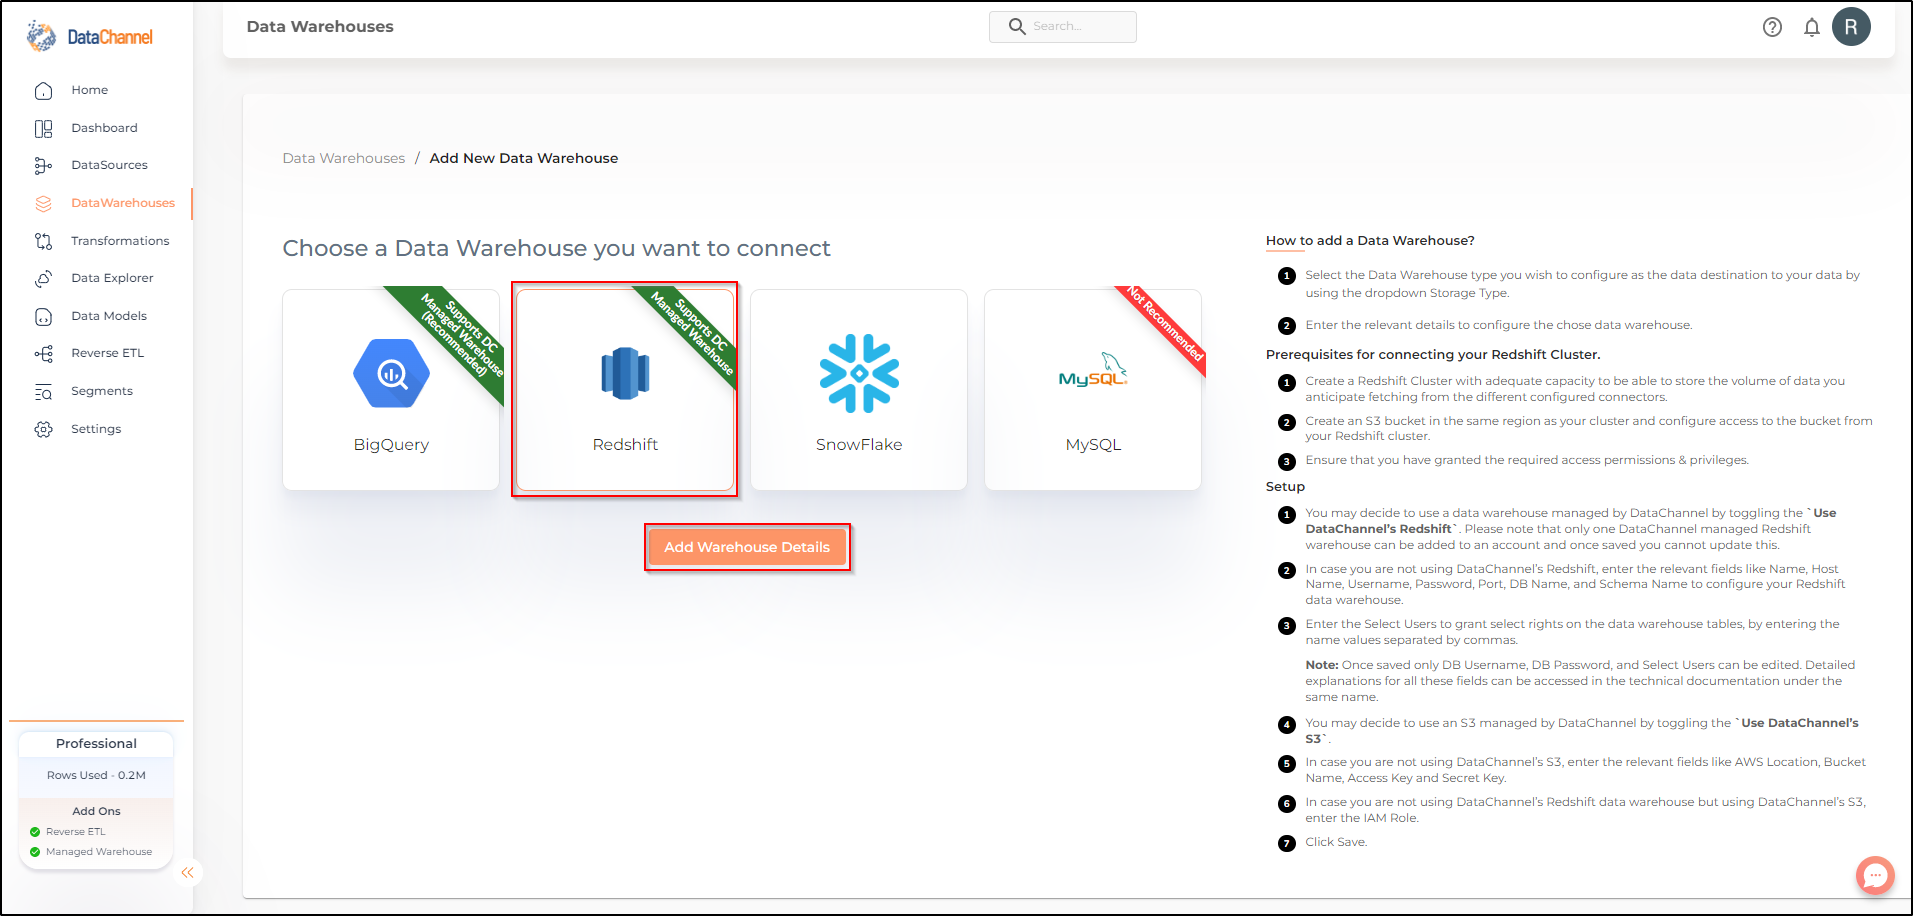
- Step 4
-
You may choose to opt for a DataChannel Managed warehouse.
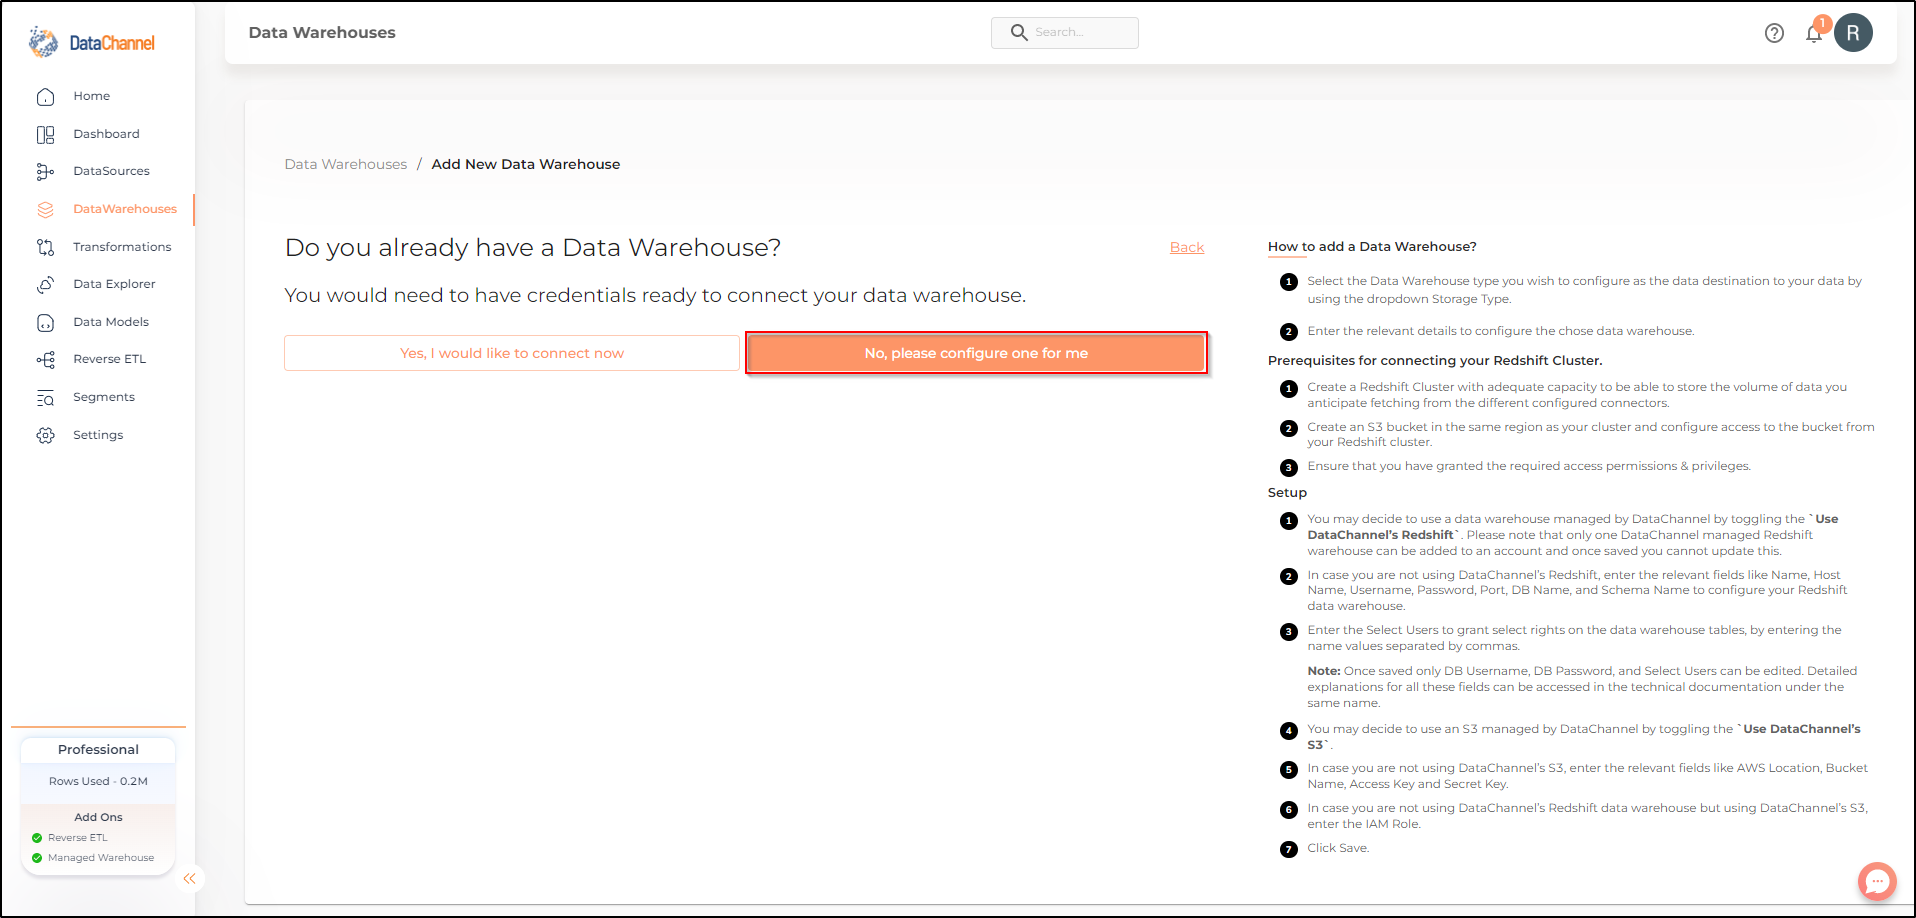
- Step 5
-
Else, you may choose to connect your own warehouse.You would need to have credentials ready to connect your data warehouse.
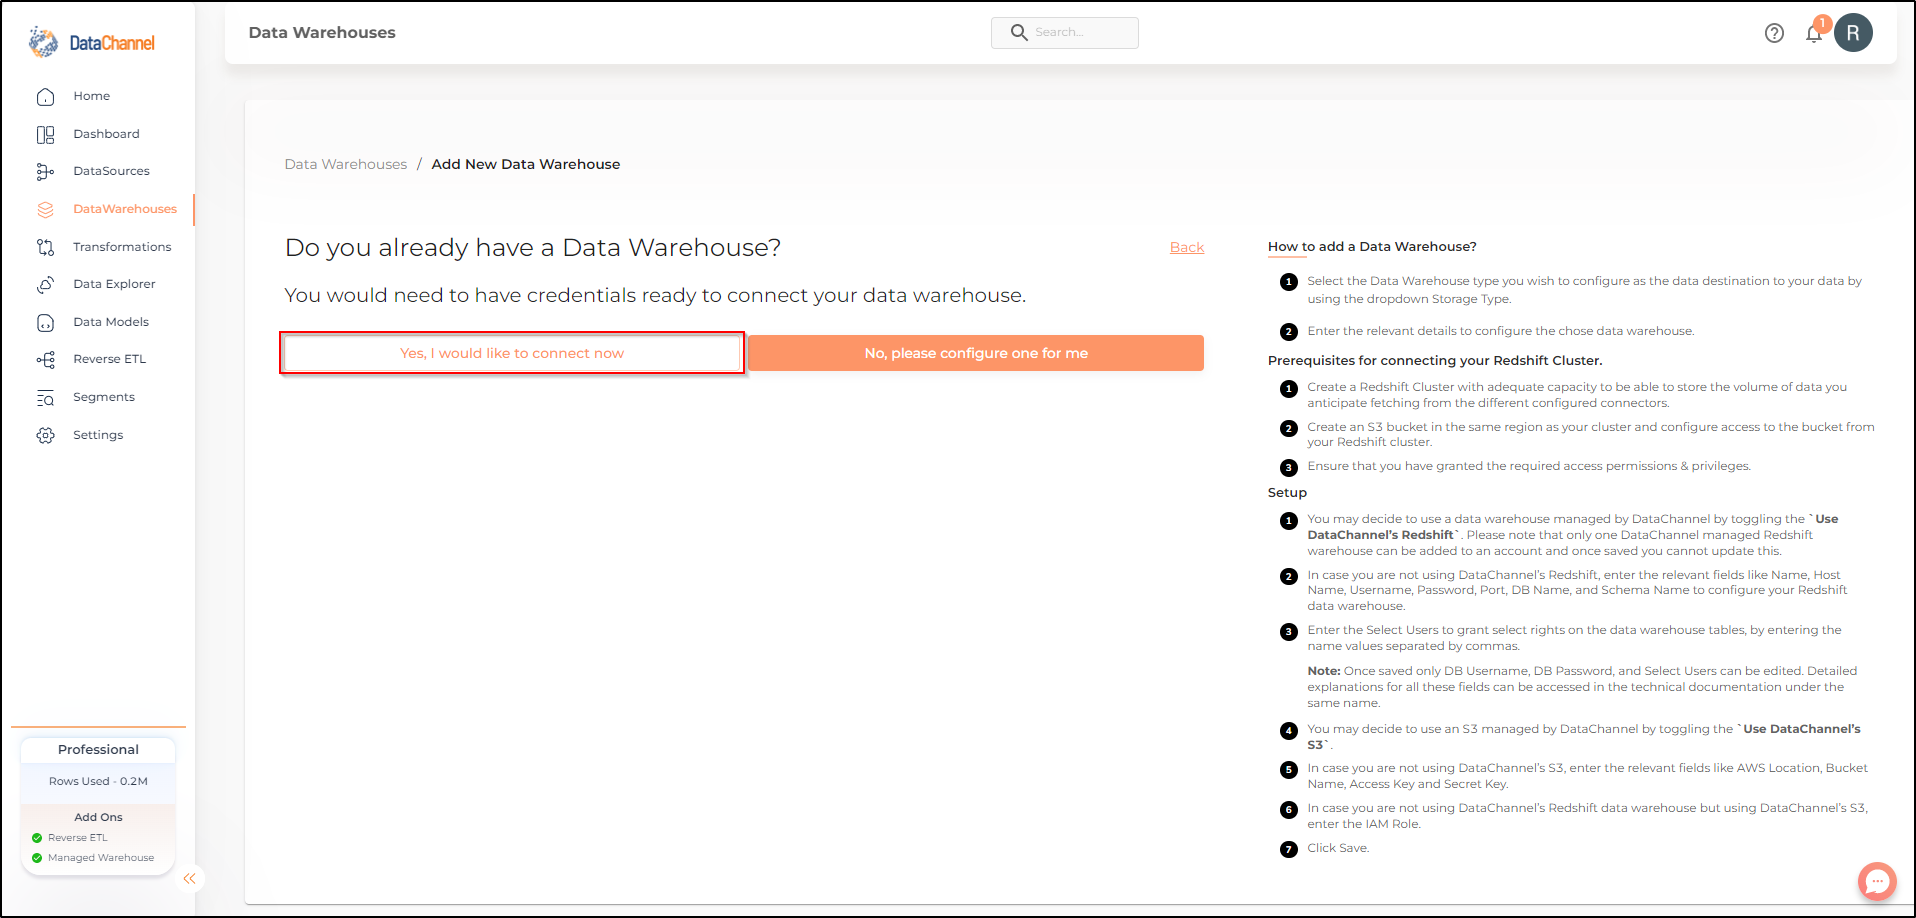
Option 1 : Adding your own Redshift Data warehouse to your DataChannel Account
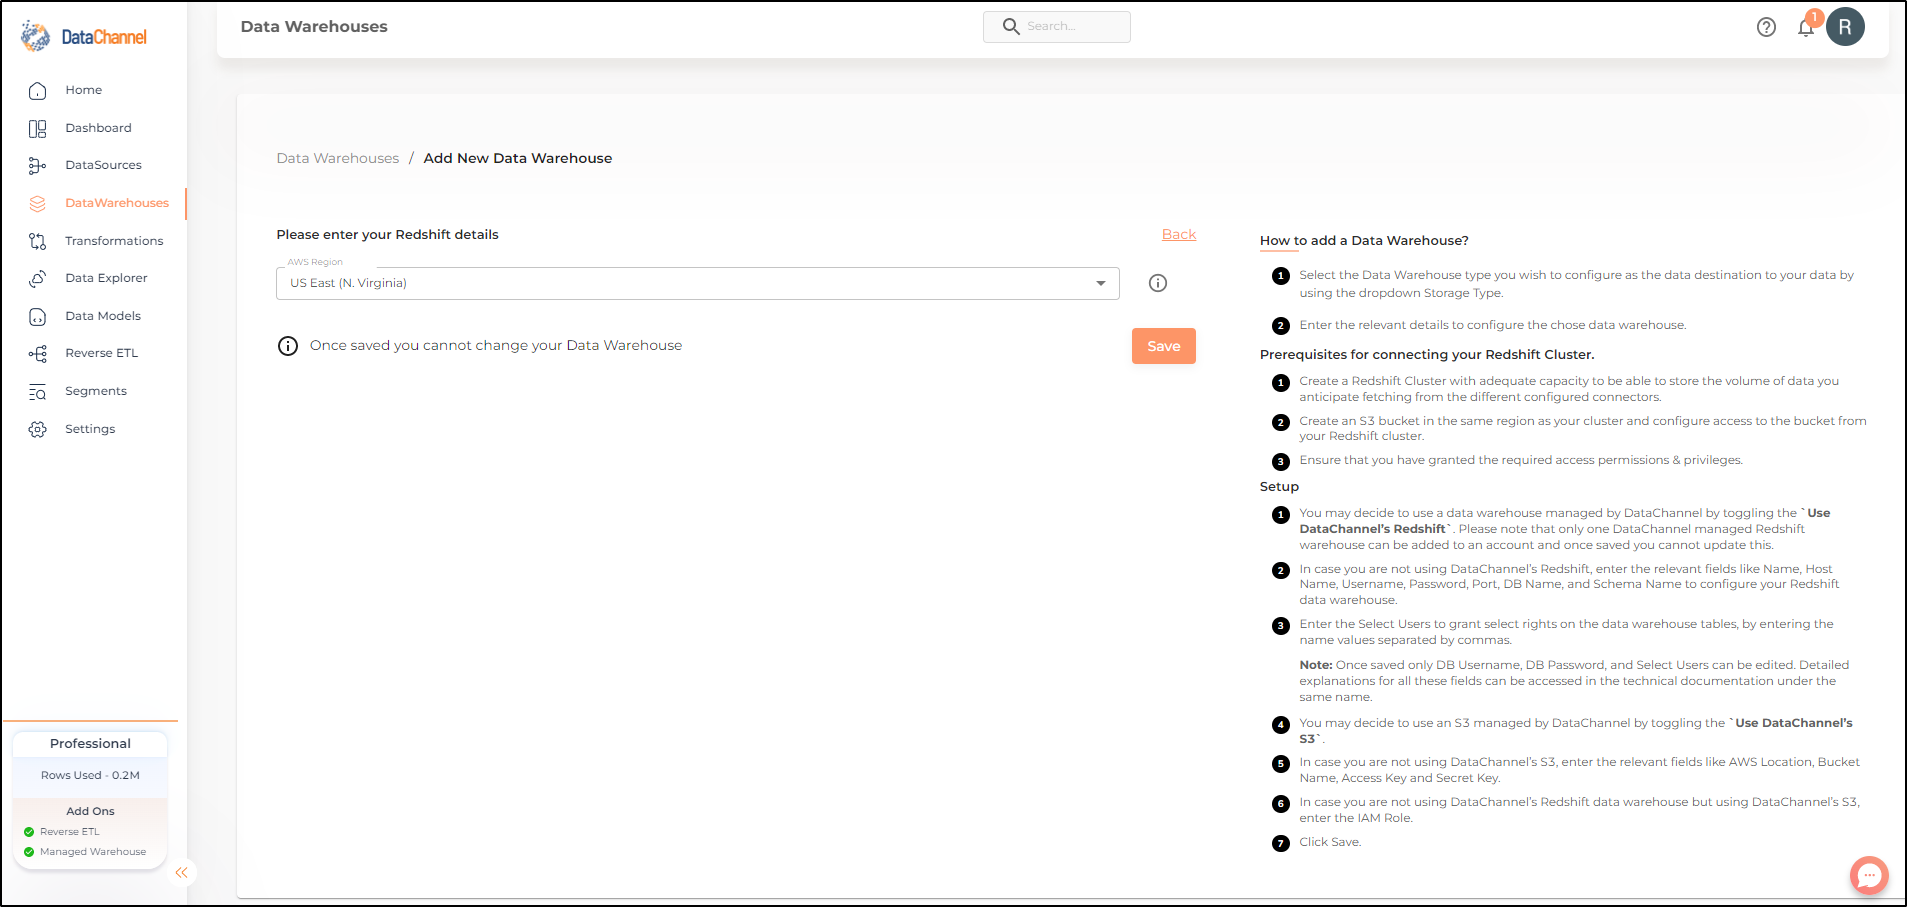
- Step 6
-
Enter the details for your AWS Redshift and S3 Bucket in the form and click on Validate Configuration to add the warehouse. An explanation of each of the fields in the form is given in the table below.
| Field | Description |
|---|---|
Name |
Required Provide a name for your warehouse. It needs to be unique across your account. |
Host |
Required Provide the hostname or end-point for the cluster. |
Username |
Required Provide a username which will be used to create the tables and load data. This user needs to have all rights on the schema that you intend to use. In case you are creating a dedicated schema for the data from DataChannel (which is recommended), then this user can be the schema owner. |
Password |
Required Provide the password for the load user. |
Select Users |
Optional Comma separated list of users who should get select rights on tables created by DataChannel using the schema and username specified by you. |
Port |
Required Provide the port number for your cluster. The default value for this is 5439 unless you have changed it while creating your redshift cluster. |
DB Name |
Required Provide the name of the database you have created in your cluster. |
Schema Name |
Required Provide the database schema where DataChannel should push the data. As mentioned above, it is recommended to create a new schema for DataChannel in your database. |
Use DataChannel S3 |
Required Leave this toggle off so that you can specify your own S3 bucket. |
AWS Location |
Required Provide the AWS region where your S3 bucket has been created. This should typically be same as the region in which your Redshift cluster is hosted. Example |
Bucket Name |
Required Provide name of the S3 bucket where DataChannel should copy files before loading them into your Redshift instance. Note that DataChannel does not remove the files after they have been copied into Redshift so it is advisable to use life cycle properties to manage the removal / archival of the raw files to manage S3 costs. |
Access Key |
Required Provide the access key required to access the S3 bucket using the API. Refer AWS documentation here to learn how to manage your access keys. |
Secret Key |
Required Provide the secret key required to access the S3 bucket using the API. Refer AWS documentation here to learn how to manage your secret keys. |
IAM Role |
Required Provide the IAM role required to access the S3 bucket using the API. Refer AWS documentation here to learn how to create and manage your IAM Role. |
Still have Questions?
We’ll be happy to help you with any questions you might have! Send us an email at info@datachannel.co.
Subscribe to our Newsletter for latest updates at DataChannel.