Google BigQuery
Introduction
Google BigQuery is one of the most popular, scalable, easy to manage data warehouse options for those wanting to setup a Data Warehouse on the cloud. Read more about the features and how to get started with the popular platform here.
In case you wish to use this platform to host your data that you are aggregating using DataChannel, you can either setup a cluster of your own or use a DataChannel Managed BigQuery Warehouse. This document will show you how you can connect / provision a BigQuery based warehouse in minutes using the DataChannel Platform.
Self Managed Google BigQuery Warehouse
|
Prerequisites for connecting your BigQuery Cluster
|
To find your Google BigQuery Details
You’ll be needing certain Google BigQuery details when configuring your Data Warehouse at DataChannel:
-
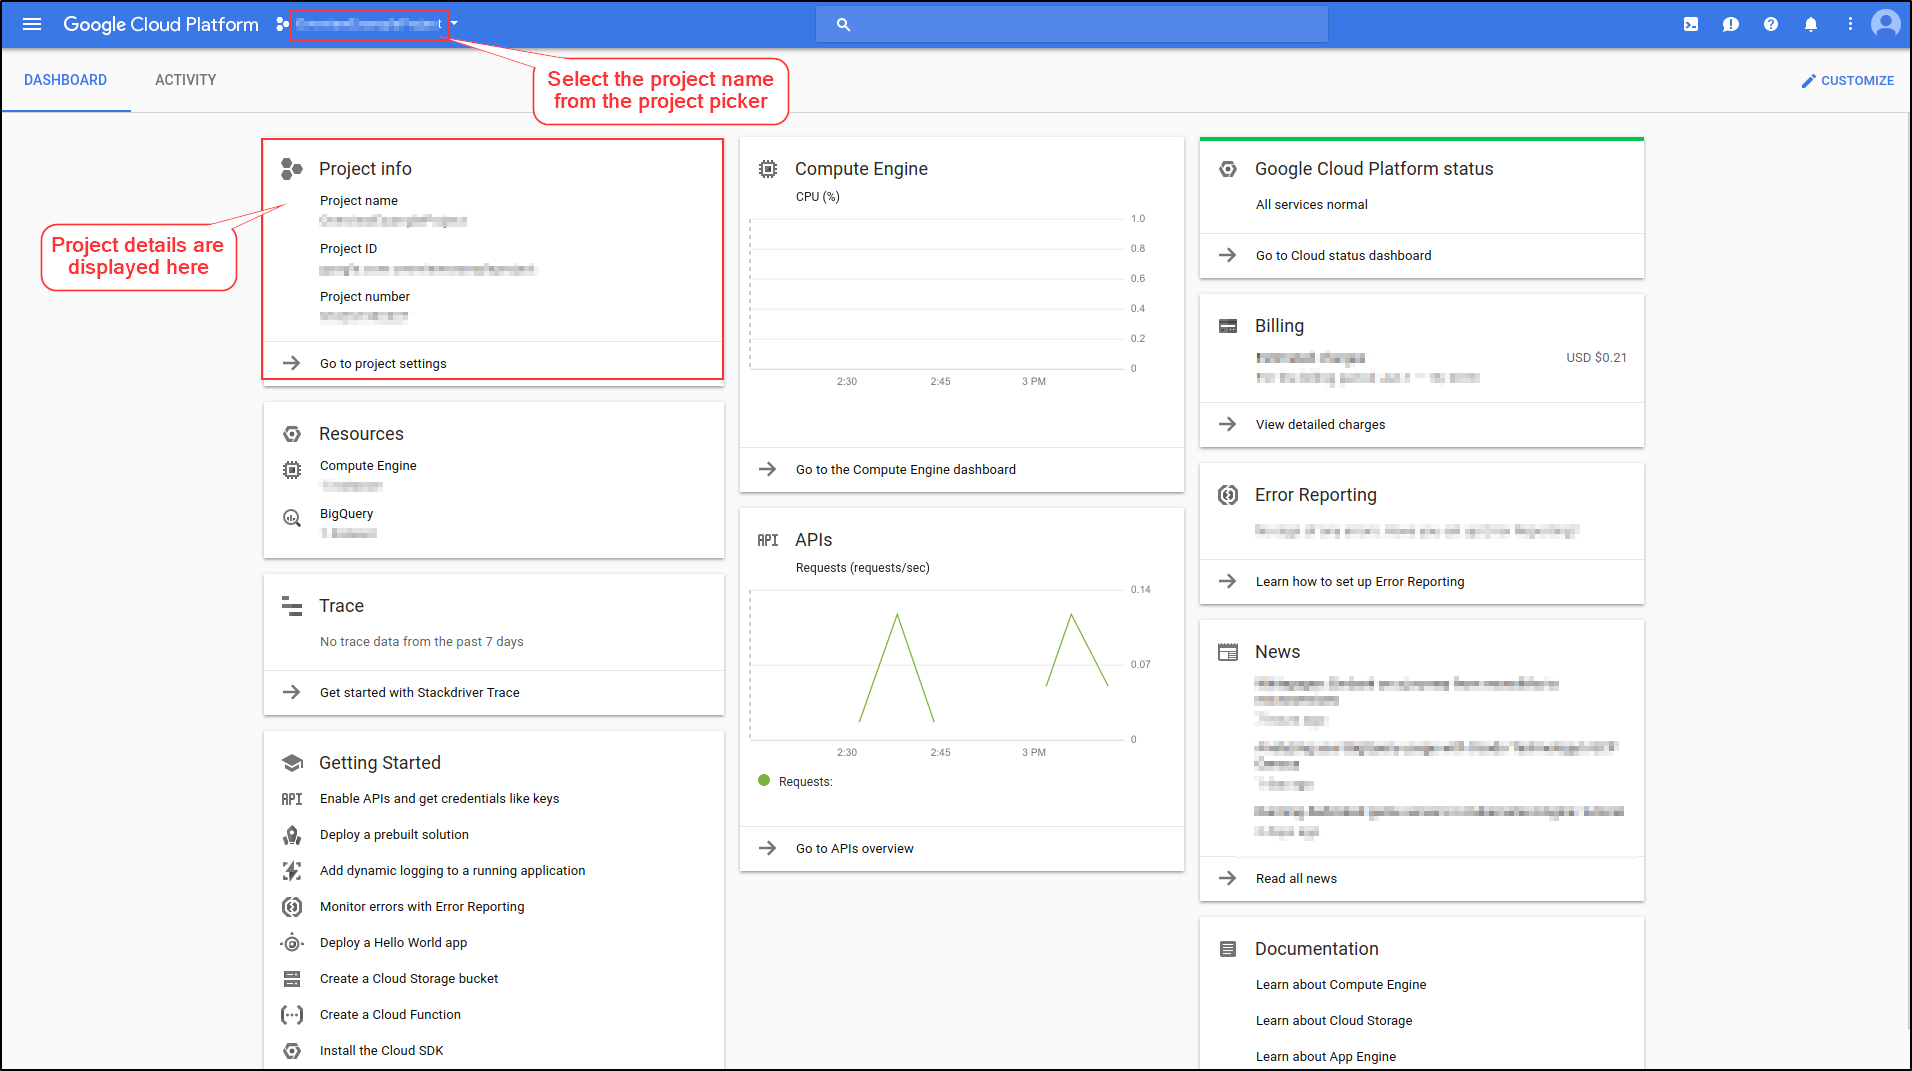
Go to the Welcome page in the Google Cloud console.
-
From the project picker at the top of the page, select your project.
-
The project name, project number and project ID appear after the Welcome heading.
-
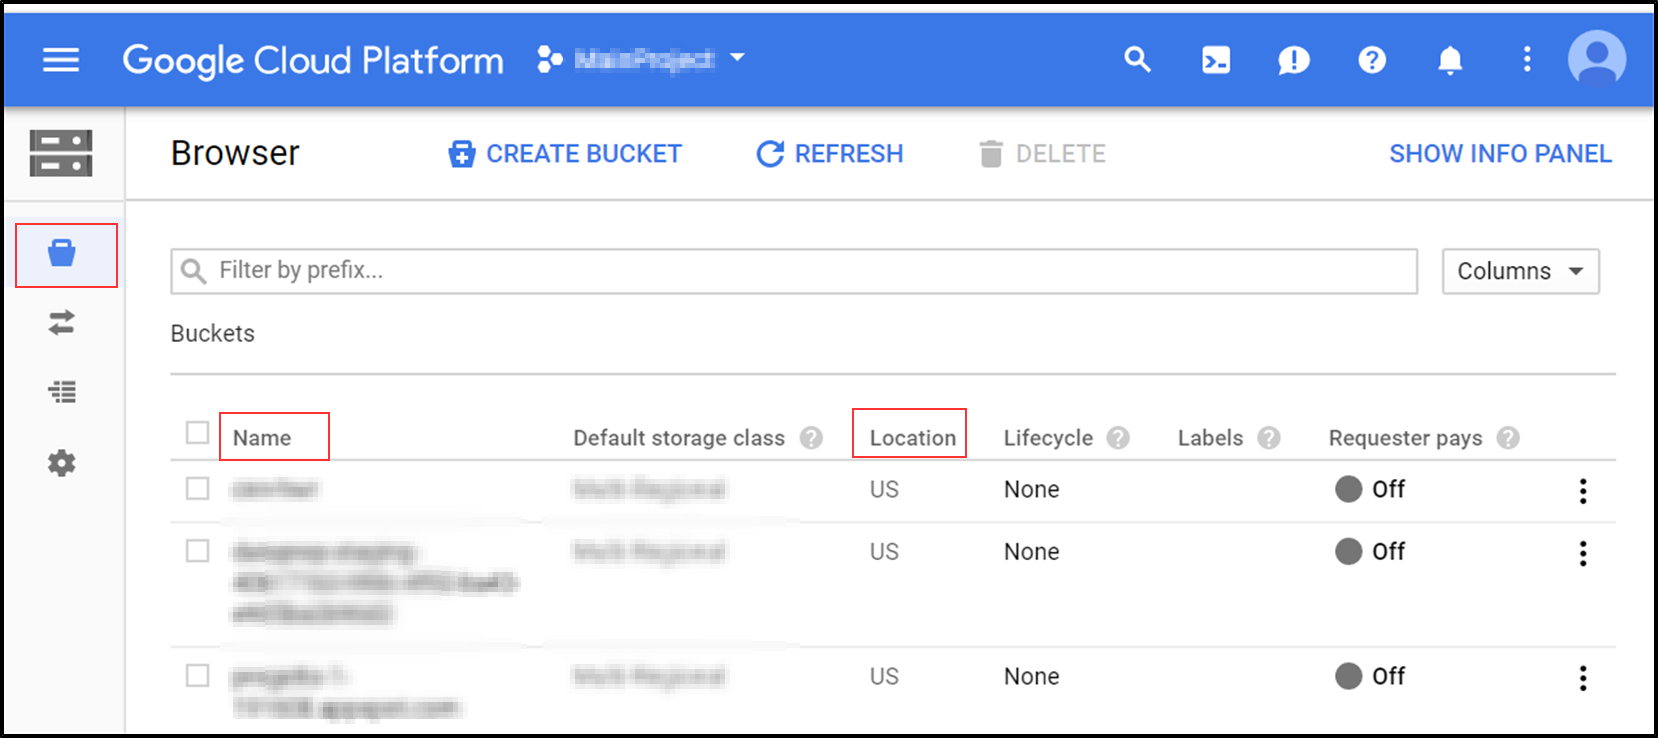
In the Google Cloud console, go to the Cloud Storage Buckets page.
-
In the bucket list, click the name of the bucket whose metadata you want to view.
-
You can now view bucket details such as the bucket name, bucket location etc.
-
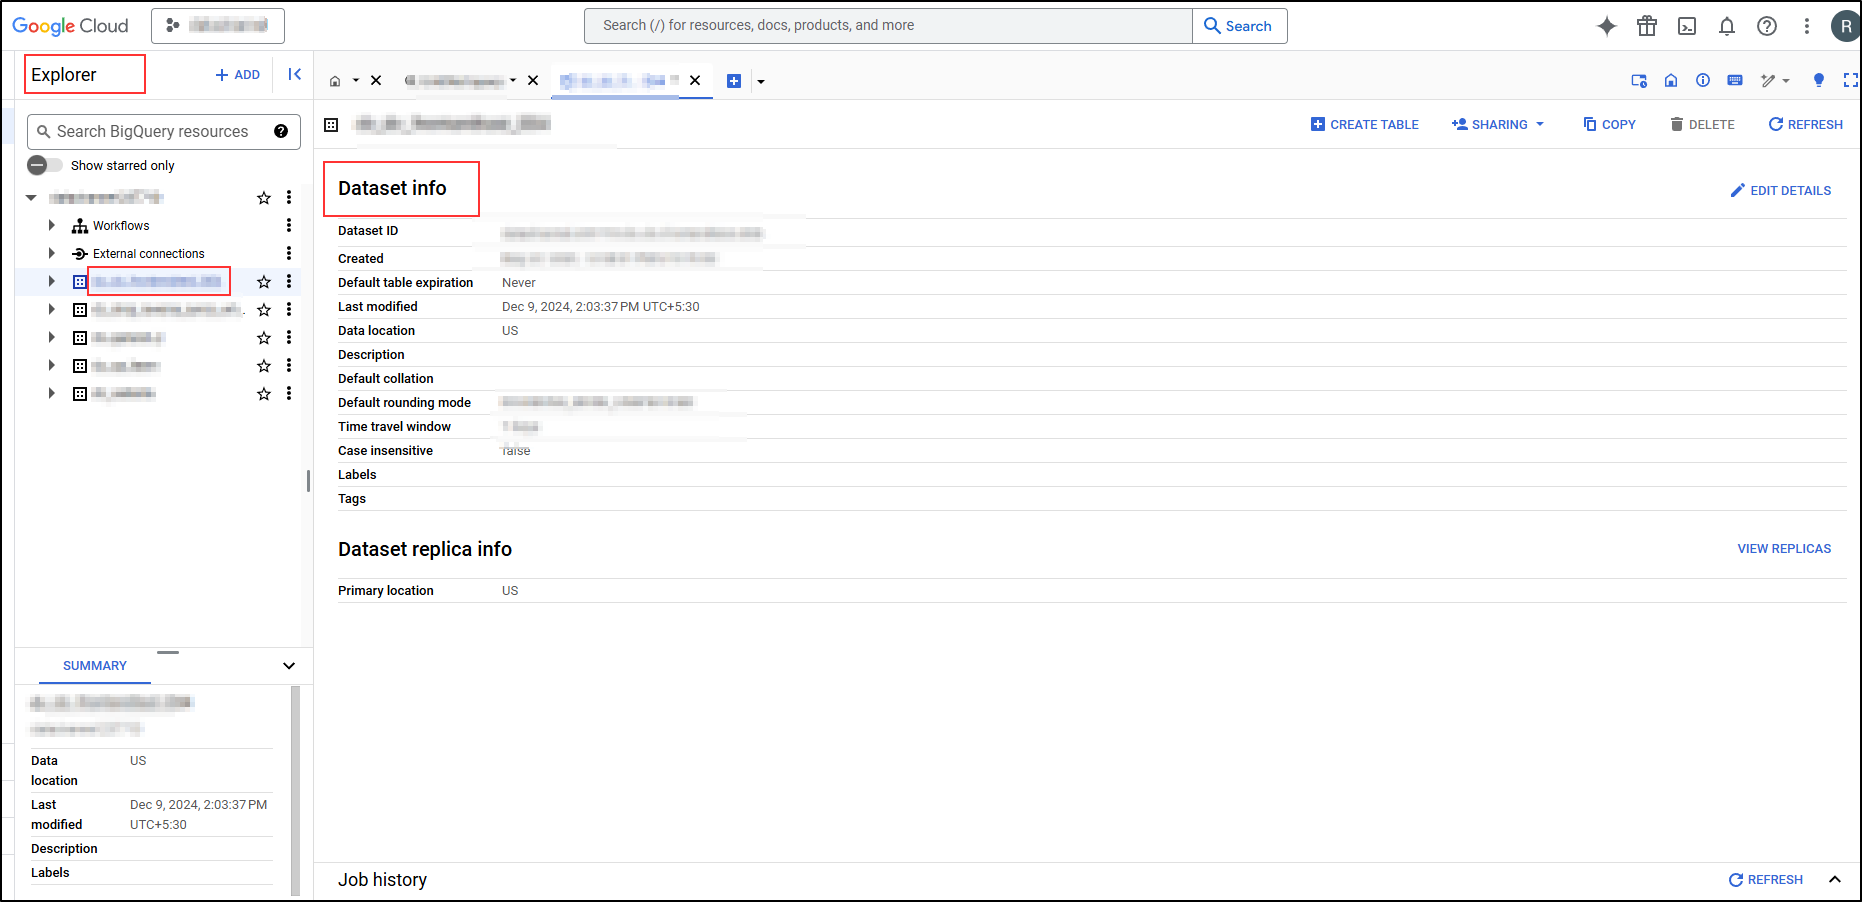
In the Explorer pane, expand your project and select a dataset.
-
In the Details panel, you can view the dataset such as Dataset ID, Dataset name, Dataset location etc.
Permissions
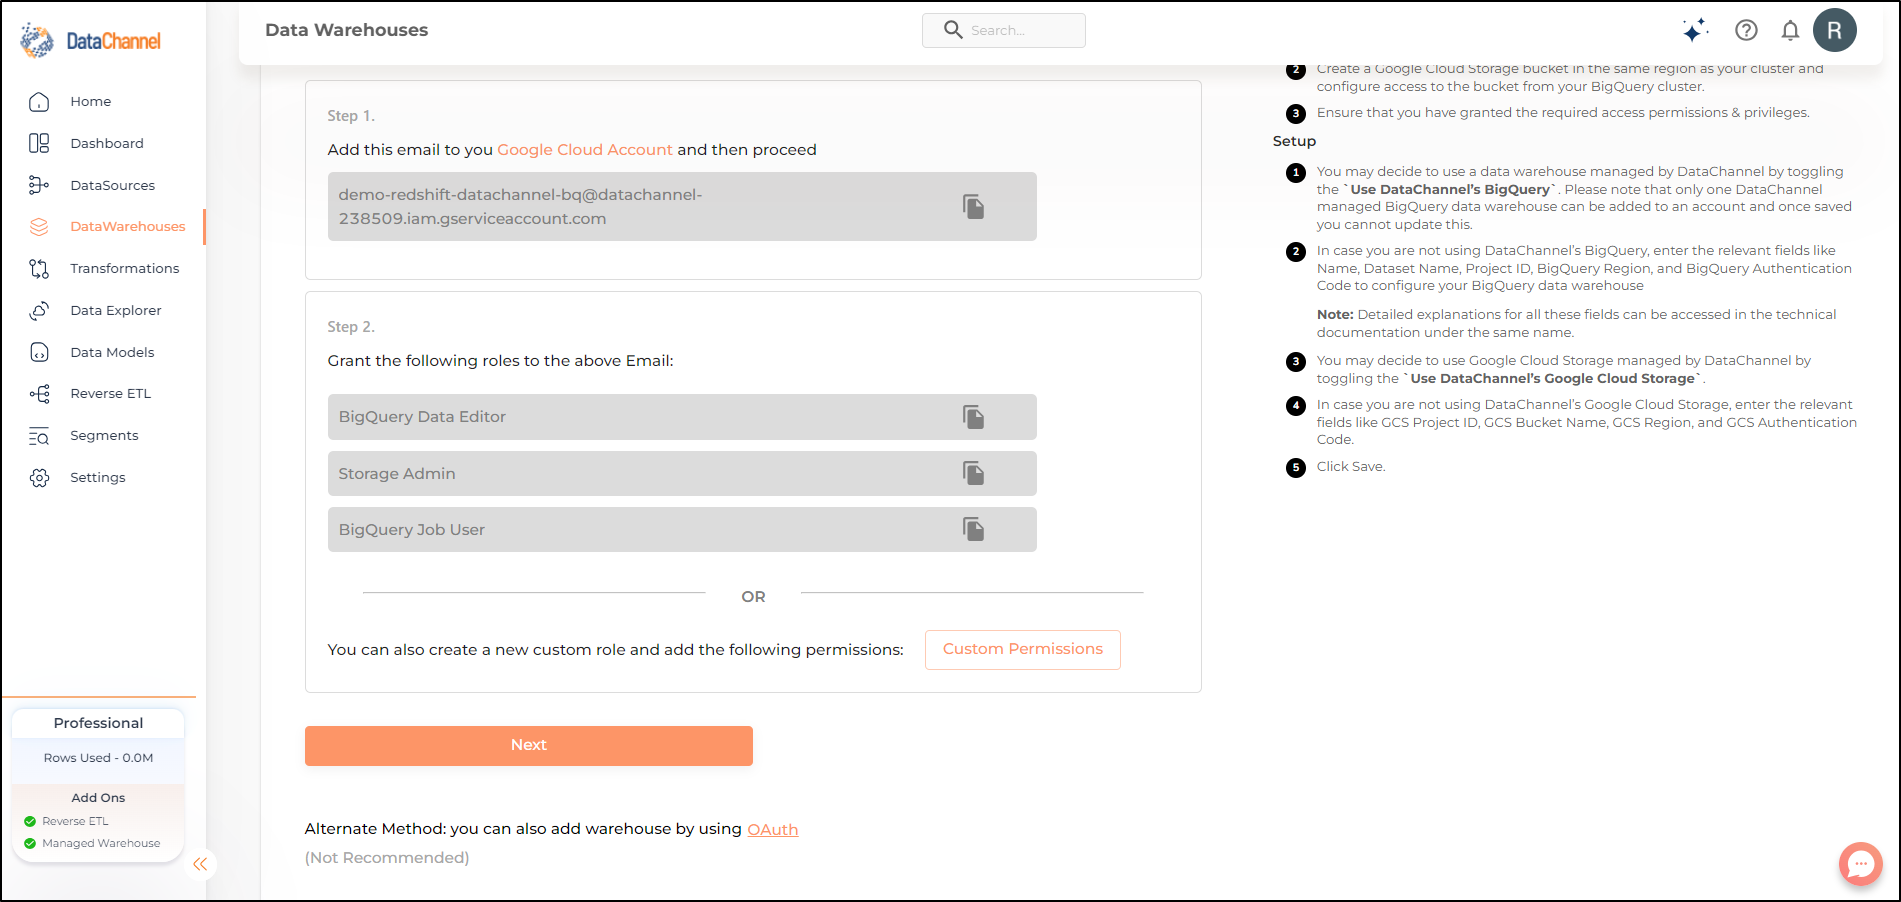
DataChannel will need certain permissions to access your projects, folders and objects in order to write to/ edit them when connecting using pipelines / syncs. Since you are the owner/administrator of your BigQuery Warehouse, you will need to manage access to your resources. You can do this by either of the two ways:
-
Option 1: Grant the following roles to the DataChannel Principal:
-
BigQuery Data Editor
-
Storage Admin
-
BigQuery Job User
-
-
Option 2: You can create a custom role granting the required privileges/ permissions and associate it to the DataChannel Principal. Creating a custom role will help you to ensure that we have only the permissions we need, thus enabling you to control access at a more granular level (rather than the much broader predefined roles).
You can read and understand more about creating custom roles by clicking here. This Video Tutorial by Google Cloud Tech will also prove useful to educate you about Managing access with cloud IAM.
The following permissions are needed by DataChannel. What each permission implies is also given alongside:
-
bigquery.config.get - Get details about a configuration.
-
bigquery.datasets.get - Get metadata about a dataset.
-
bigquery.jobs.create - Run jobs (including queries) within the project.
-
bigquery.tables.create - Create new tables.
-
bigquery.tables.delete - Delete tables.
-
bigquery.tables.get - Get table metadata.
-
bigquery.tables.getData - Get table data. This permission is required for querying table data.
-
bigquery.tables.list - List tables and metadata on tables.
-
bigquery.tables.updateData - Update table data.
-
bigquery.tables.update - Update table metadata.
-
resourcemanager.projects.get - View the name of a project’s Cloud Storage service agent
-
storage.buckets.get - Returns metadata for the specified bucket.
-
storage.multipartUploads.abort - Abort multipart upload sessions.
-
storage.multipartUploads.create - Upload objects in multiple parts.
-
storage.multipartUploads.list - List the multipart upload sessions in a bucket.
-
storage.multipartUploads.listParts - List the uploaded object parts in a multipart upload session.
-
storage.objects.create - Add new objects to a bucket.
-
storage.objects.delete - Deletes an object and its metadata.
-
storage.objects.get - Read object data and metadata, excluding ACLs.
-
storage.objects.list - Retrieves a list of objects.
-
storage.objects.update - Updates the complete metadata of an object.
-
bigquery.routines.get - Get routine definitions and metadata.
-
bigquery.routines.list - List routines and metadata on routines.
You can read more information about what each of these permissions imply by clicking BigQuery permissions and IAM permissions .
Steps to Create a Custom Role and Assign Permissions to it
-
Go to Google Cloud Console and sign in using your work account credentials.
-
From the list, select the name of the Project where your data resides . This is where you want to create a Custom role.
-
If your warehouse contains data of more than one organization and the project is not visible in the list, you may be looking in the wrong organization. You can change the name of the organization from the dropdown.
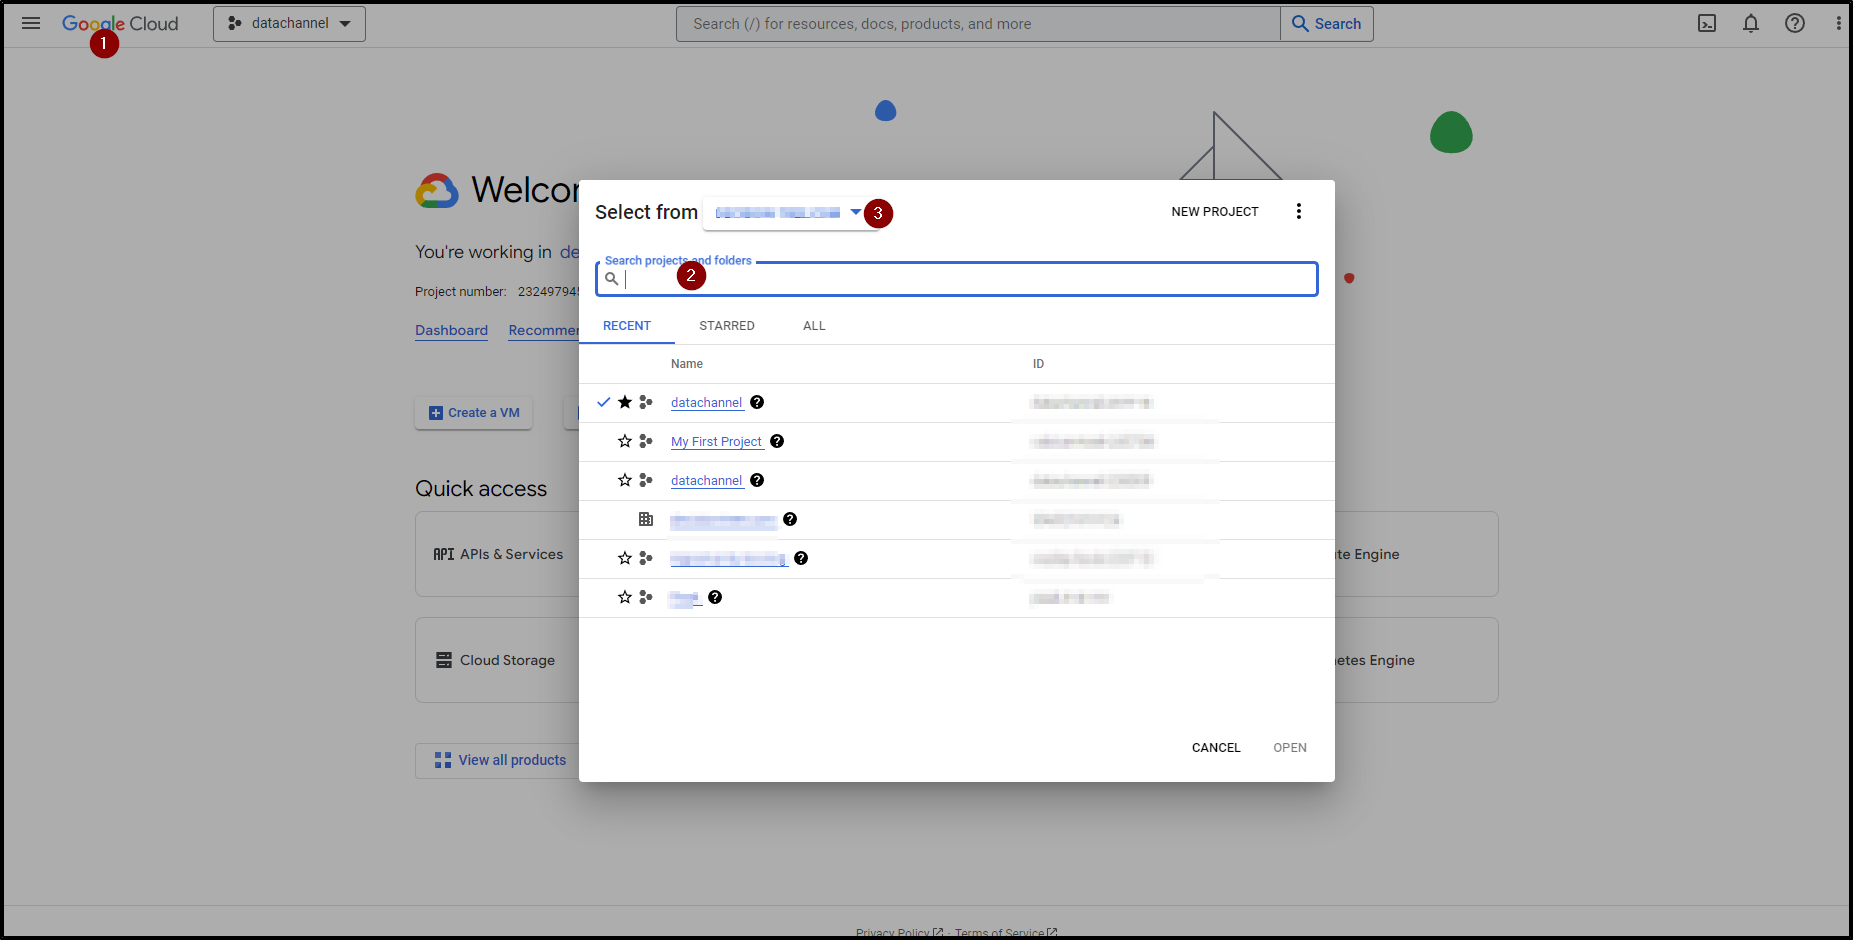
-
In the Google Cloud console, navigate to IAM & Admin menu and go to the Roles page.
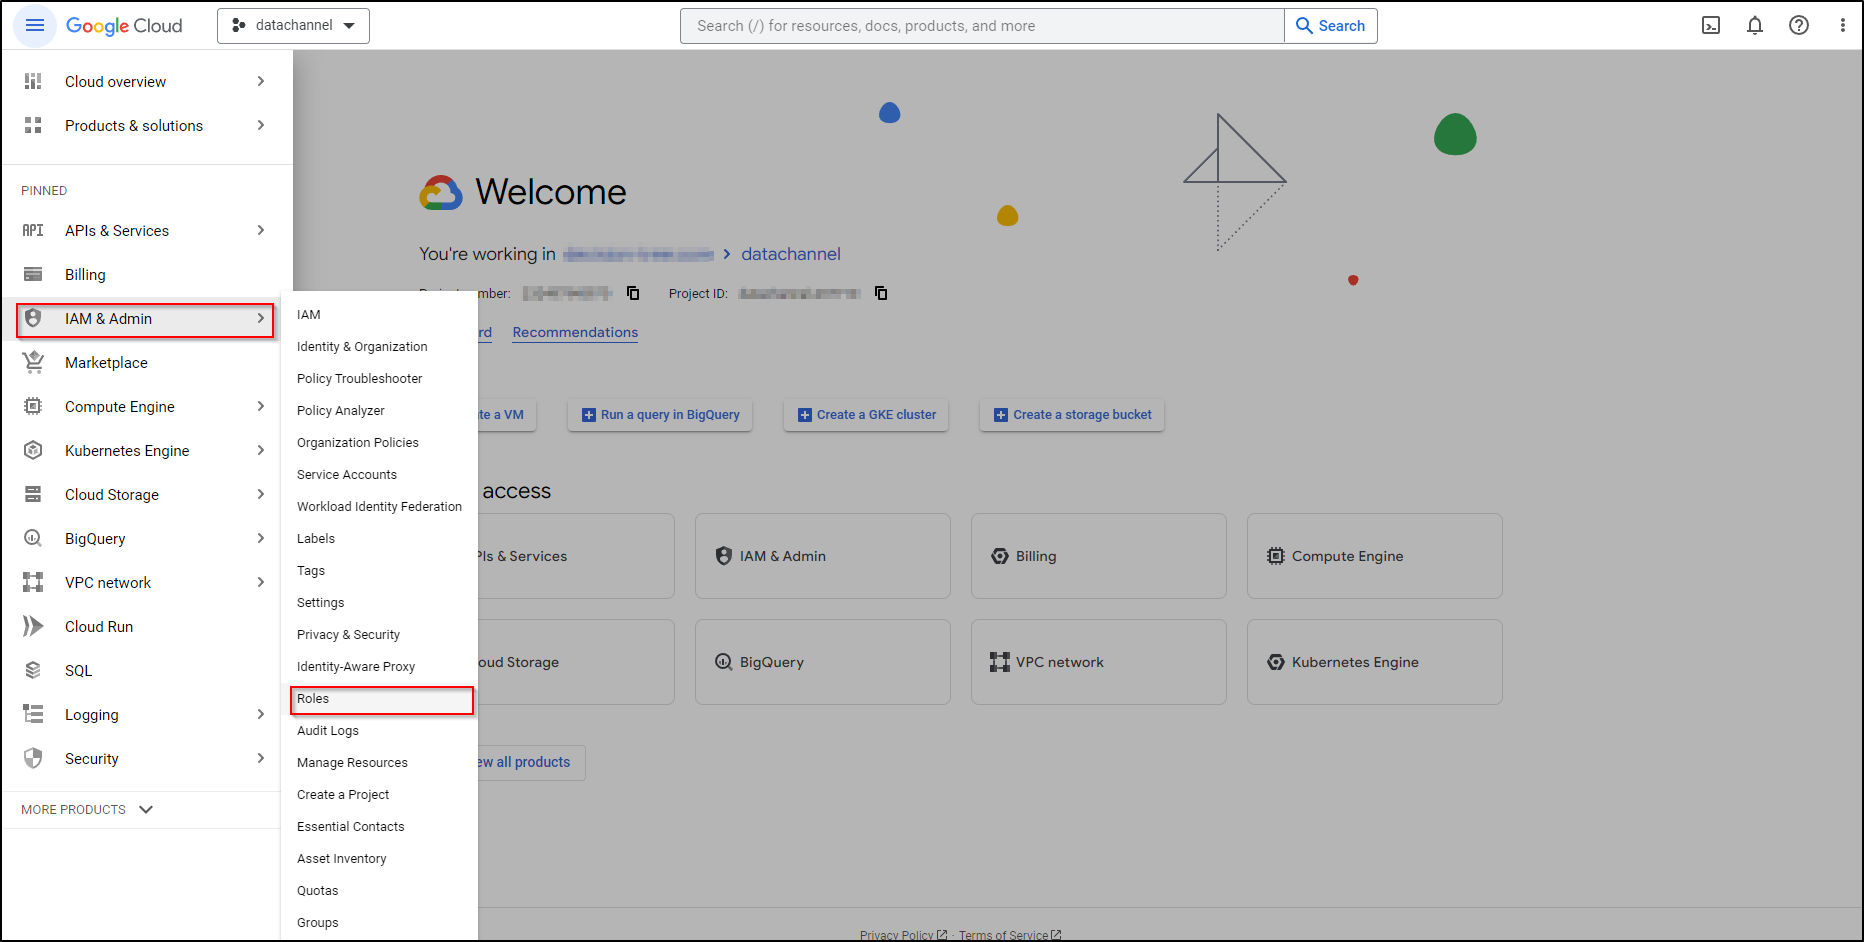
-
Click on +Create Role.
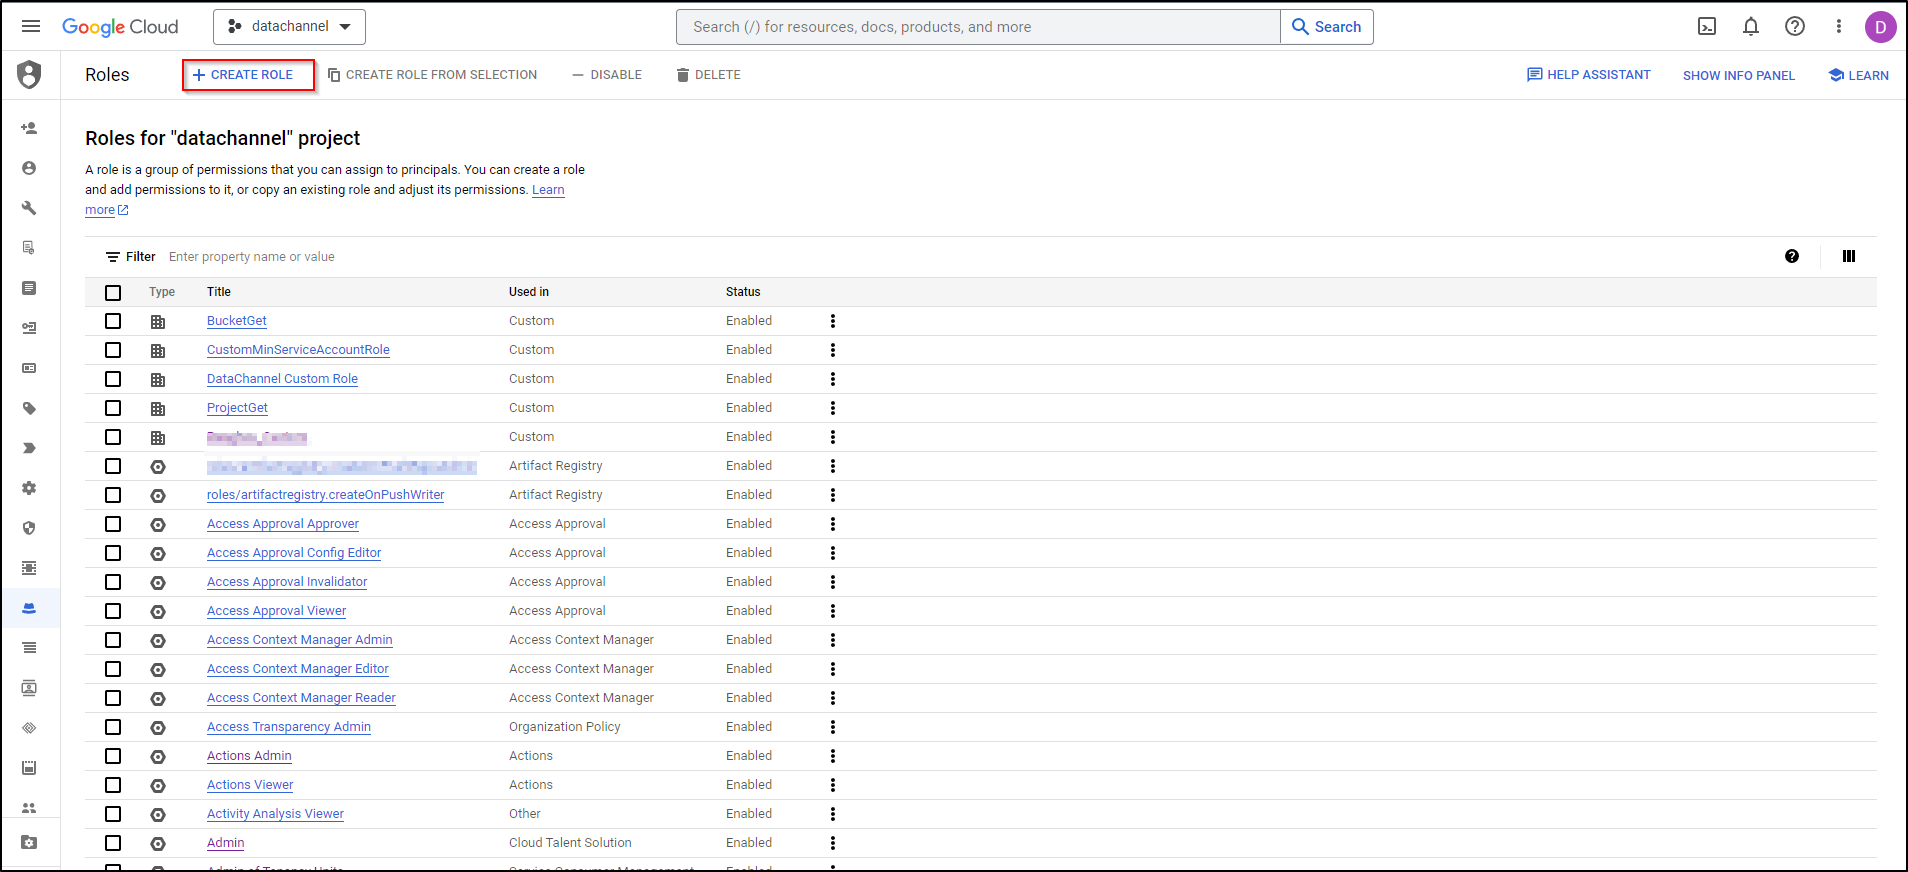
-
Enter a Name, Title, Description, and Role launch stage for the role. The role name cannot be changed after the role is created. It is advisable to choose a role title that you will recognise easily later For example: “Datachannel_custom_access”. Role Titles can contain uppercase and lowercase alphanumeric characters and symbols. Also, give a description of the role that helps you understand the privileges provided to the custom role. We recommend that you use the Default Role launch stage.
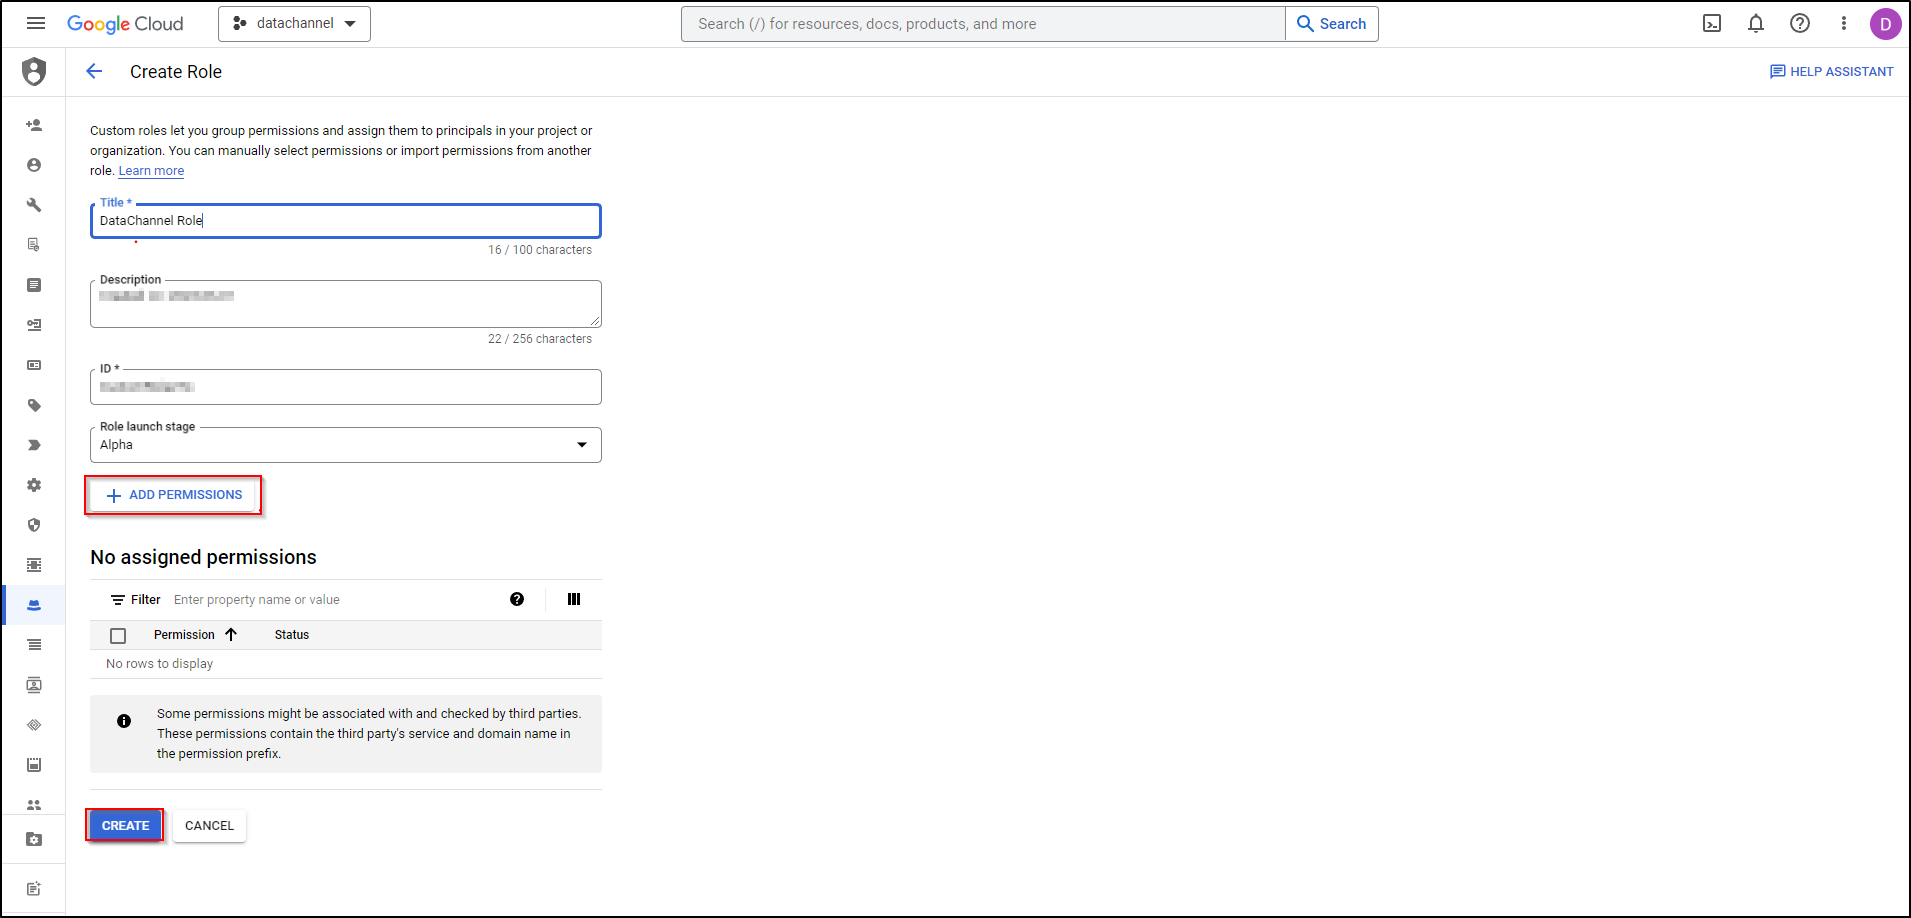
-
Click on +Add Permissions.
-
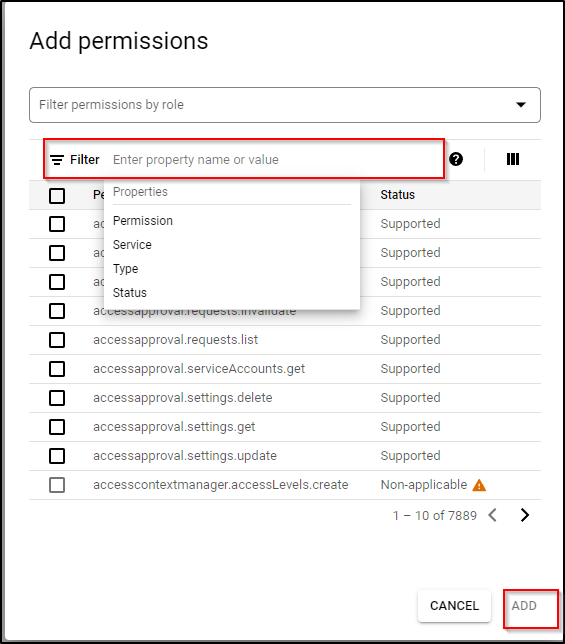
Select the permissions you want to include in the role(as listed above) and click Add. To search a particular permission, use the ‘Filter by property name or value’ box as shown. Select using the checkbox on the left.
-
Once completed, click on Add.
-
Make sure that you have added all 23 permissions required by DataChannel Finish creating the role, by clicking on Create.
Grant the Custom Role to the DataChannel Principal
You need to associate the newly created custom role (with the required privileges) with this email:
Use the following steps to do so:
-
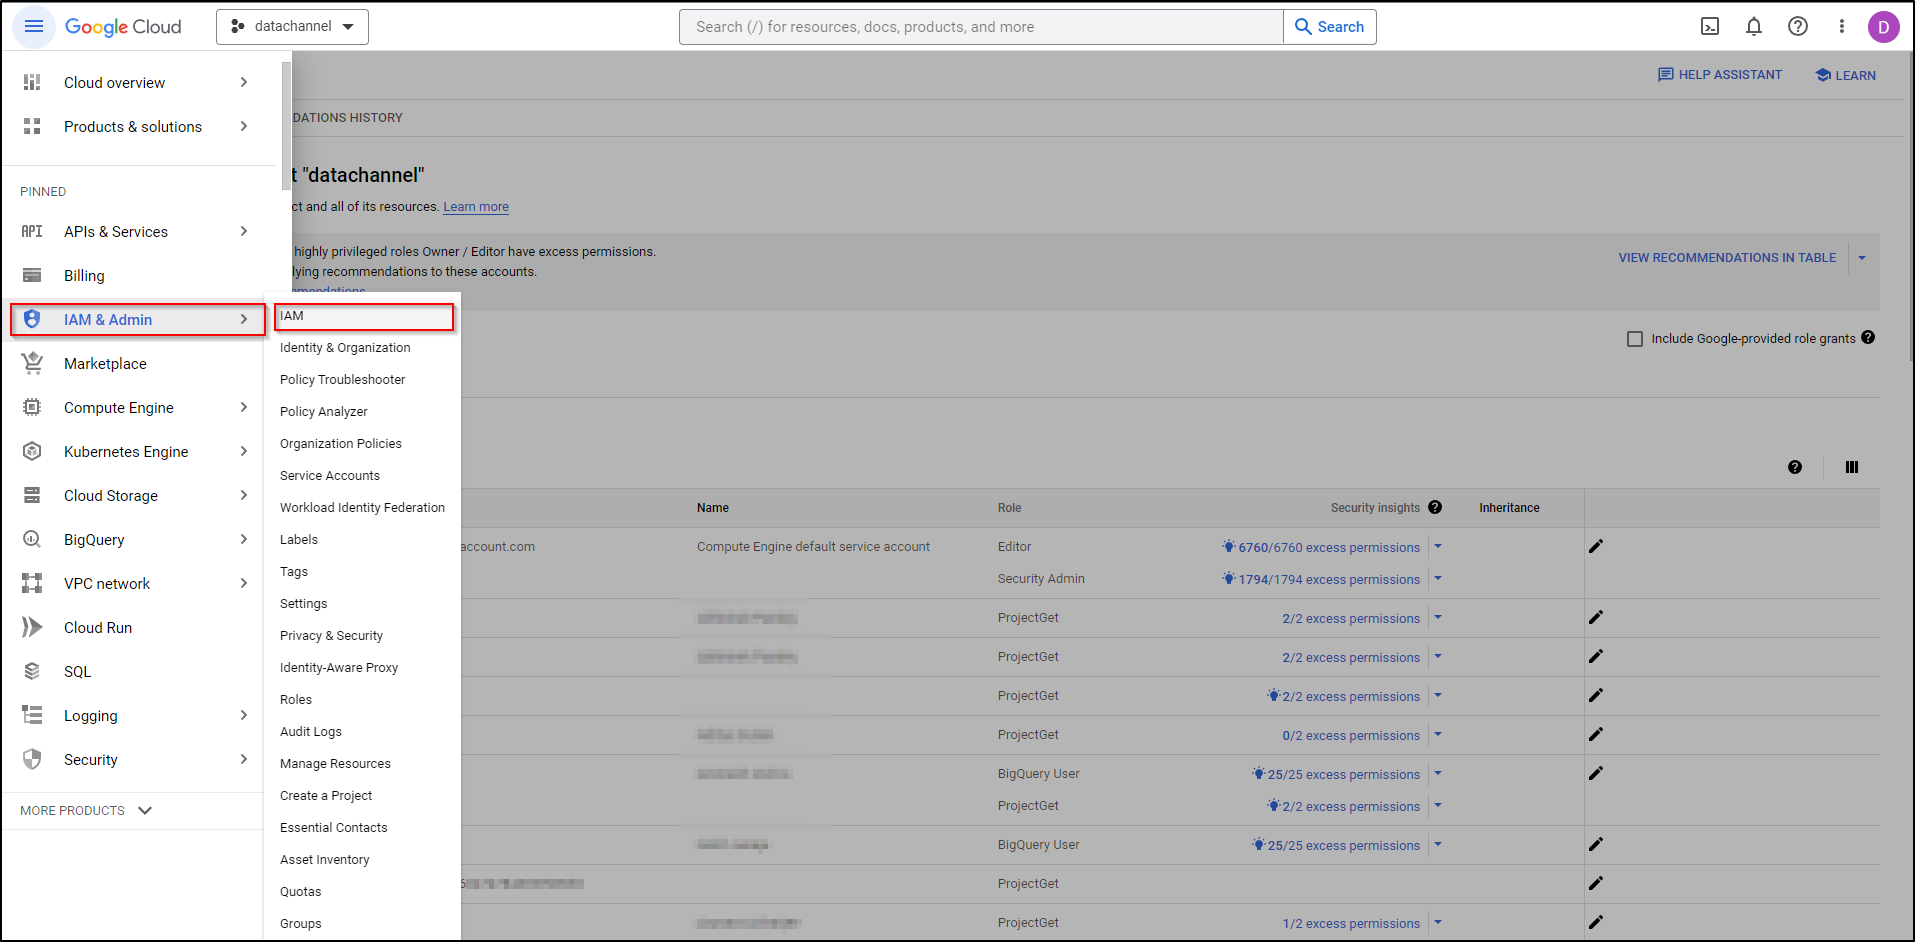
In the Google Cloud console, navigate to IAM & Admin menu and go to the IAM page.
-
Select the name of the Project where your data resides.
-
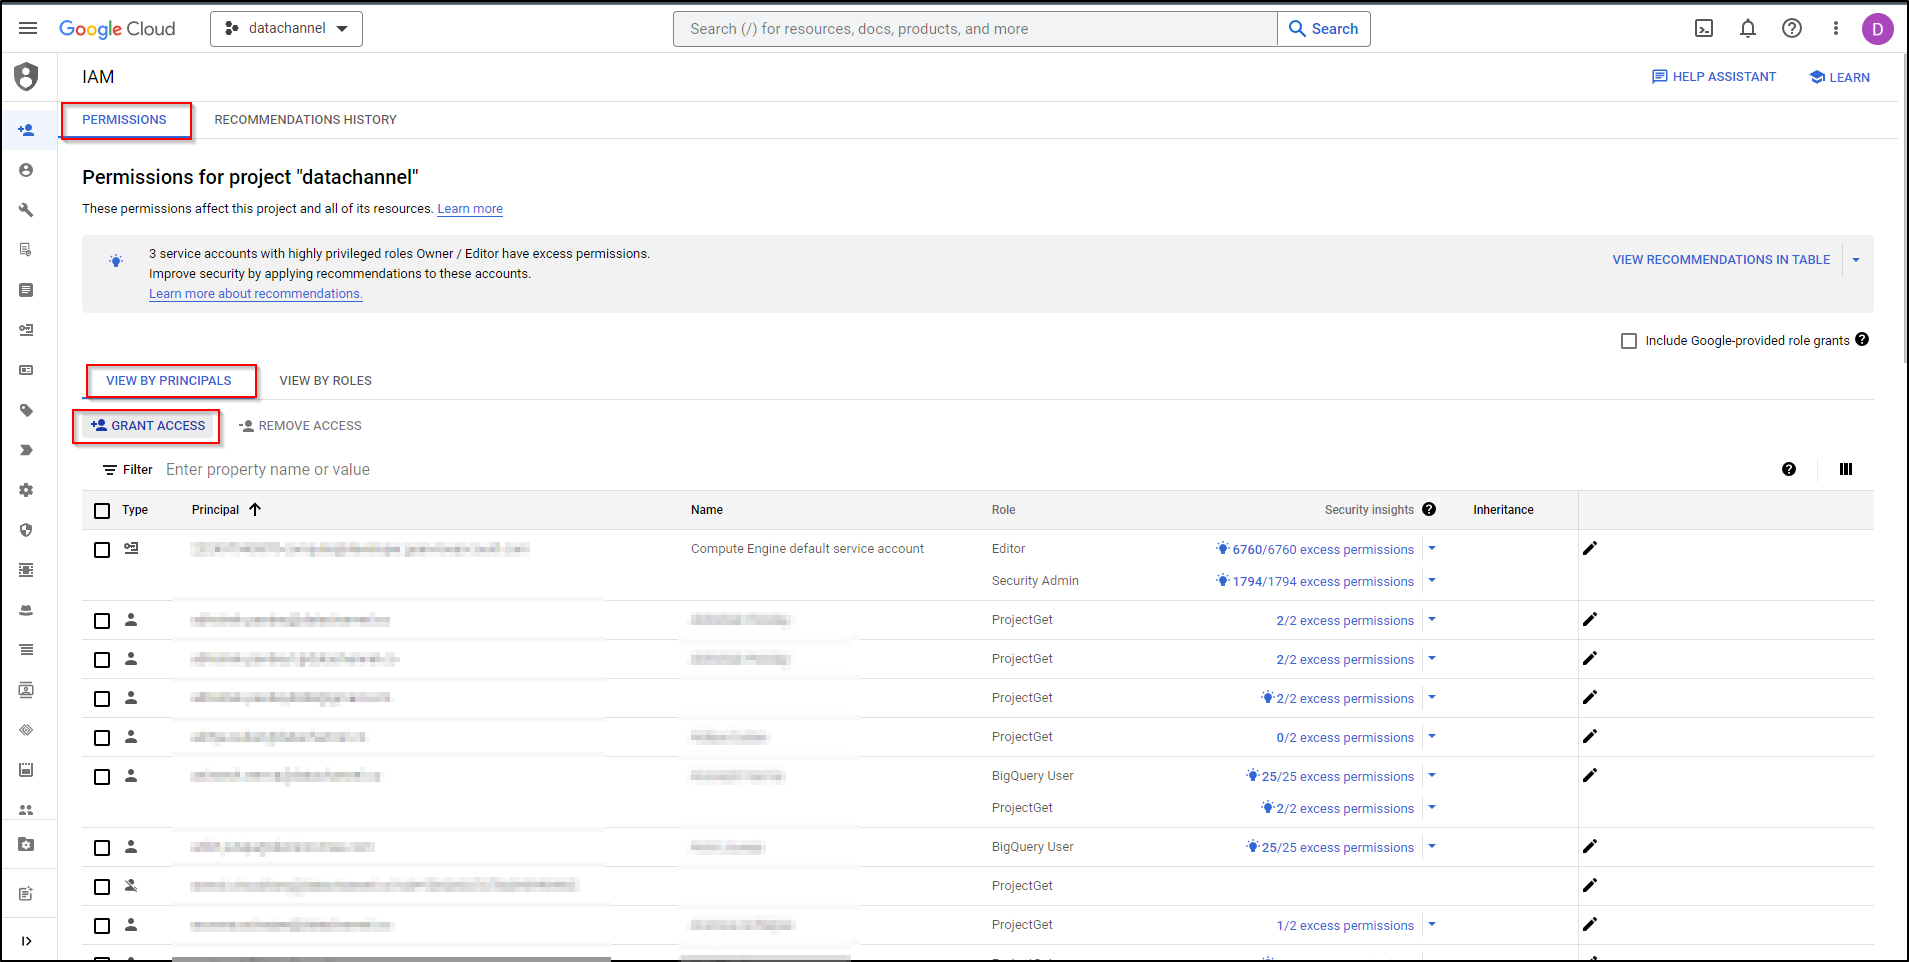
In the ‘Permissions’ page, go to ‘View by Principals’ Page.
-
To grant a role to the DataChannel Principal, click Grant Access.
-
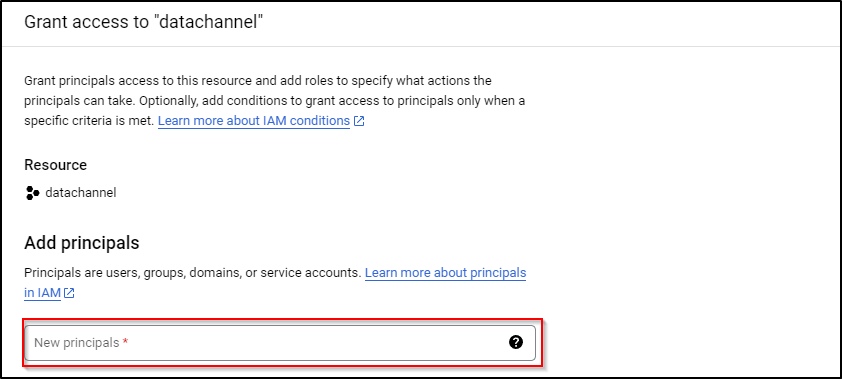
Enter the DataChannel principal’s email address:
-
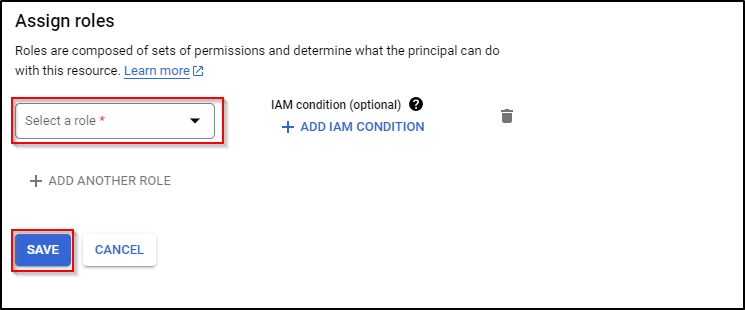
Assign the custom role (created in the previous section) to this Principal.
-
Thereafter, click on Save to finish. The principal is granted the selected role on the selected Project.
Step By Step Guide for adding a new BigQuery Data warehouse to your DataChannel Account
- Step 1
-
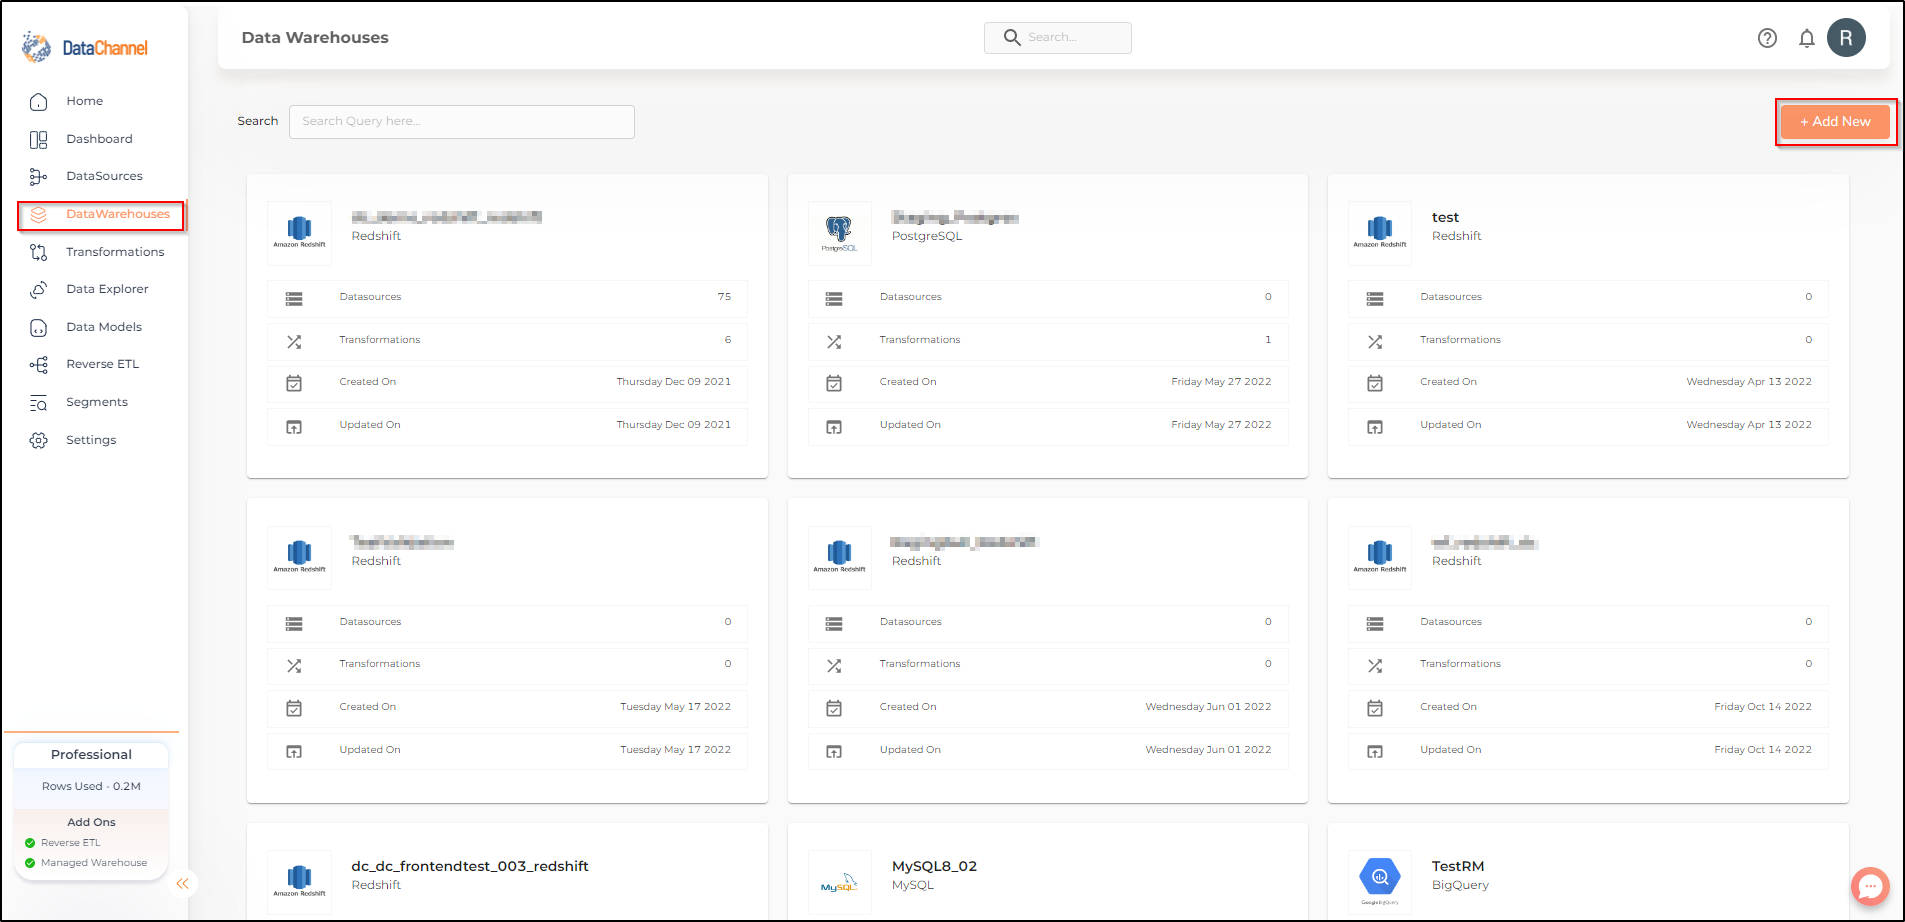
Click on the Data Warehouses tab in the left side bar navigation to reach the Data Warehouses Module as shown below.
- Step 2
-
Click on Add New to add a new Data Warehouse to your account.
- Step 3
-
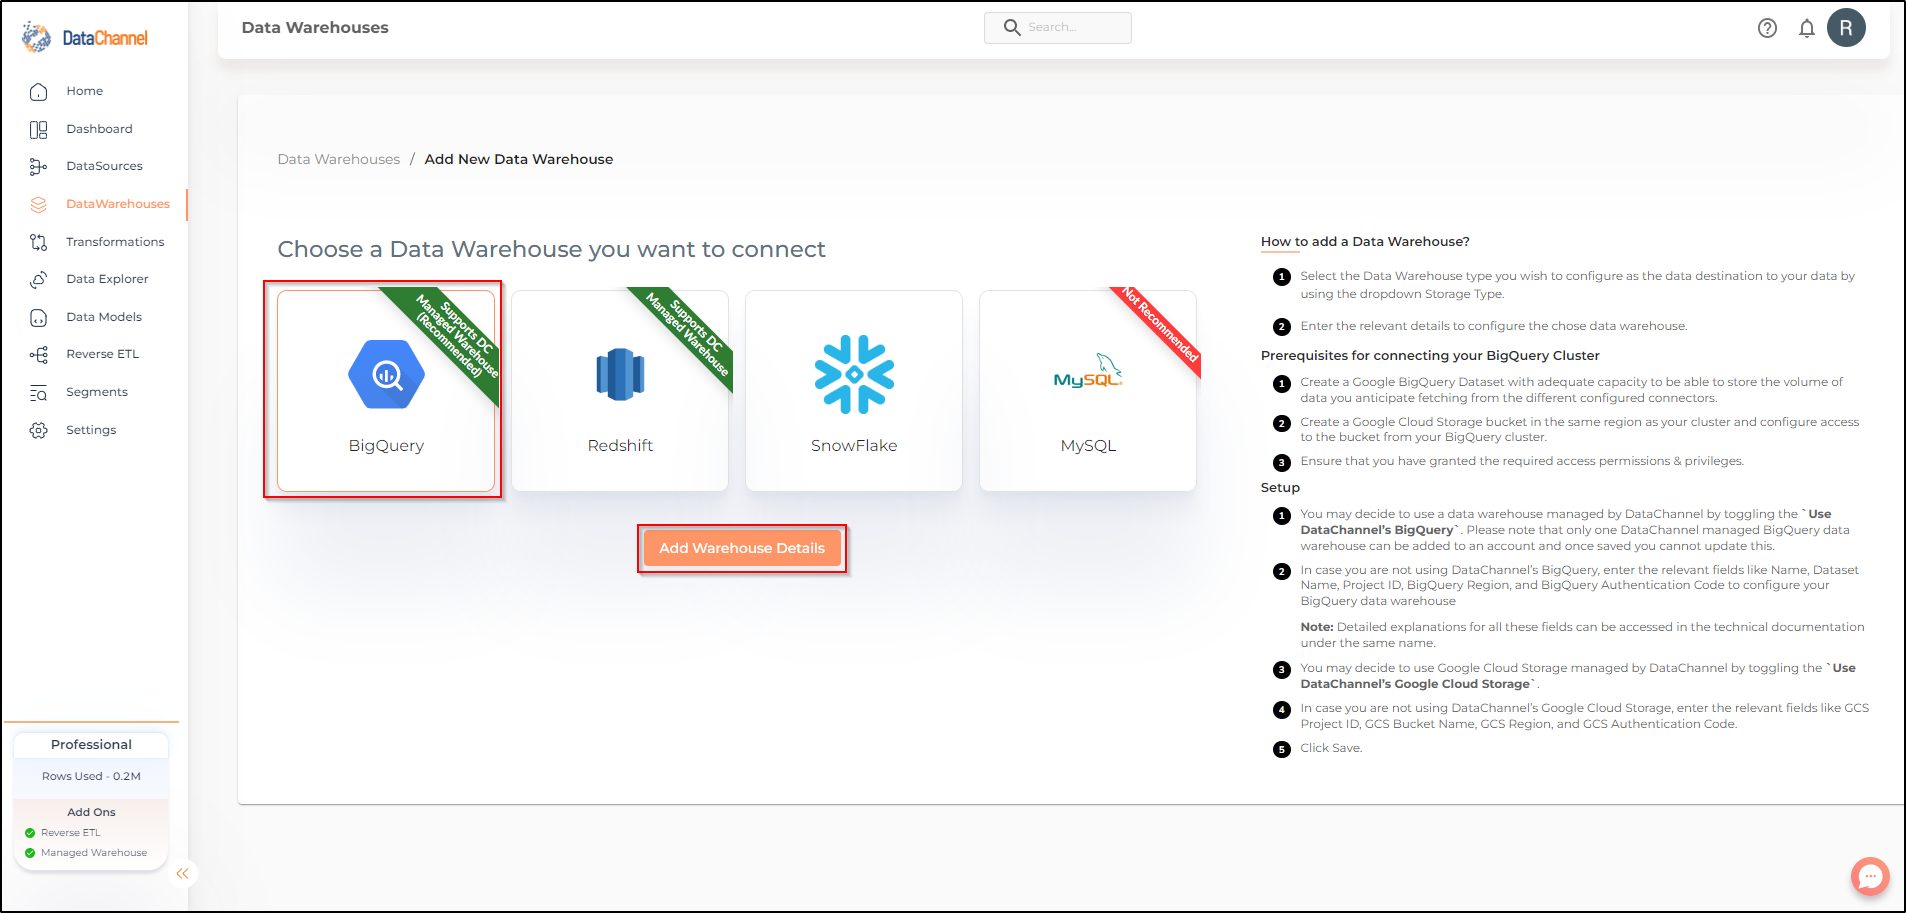
Select BigQuery from the listed Warehouse options.
- Step 4
-
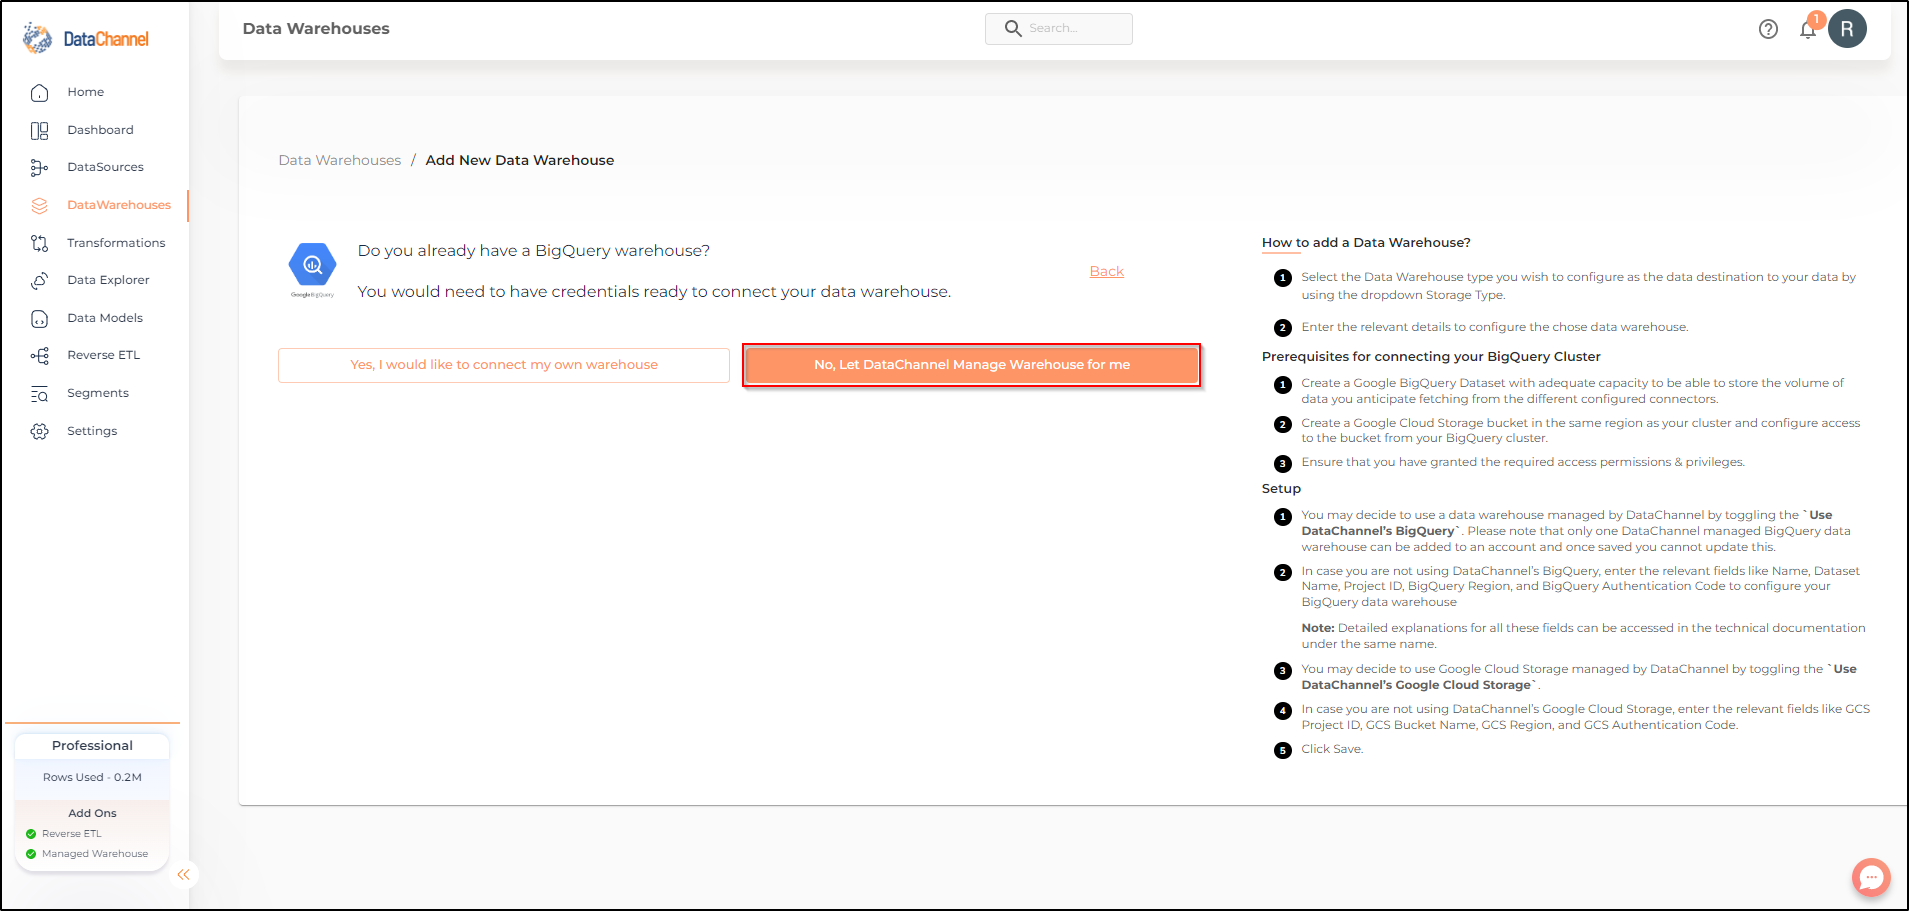
You may choose to opt for a DataChannel Managed warehouse.
- Step 5
-
Else, you may choose to connect your own warehouse.You would need to have credentials ready to connect your data warehouse.
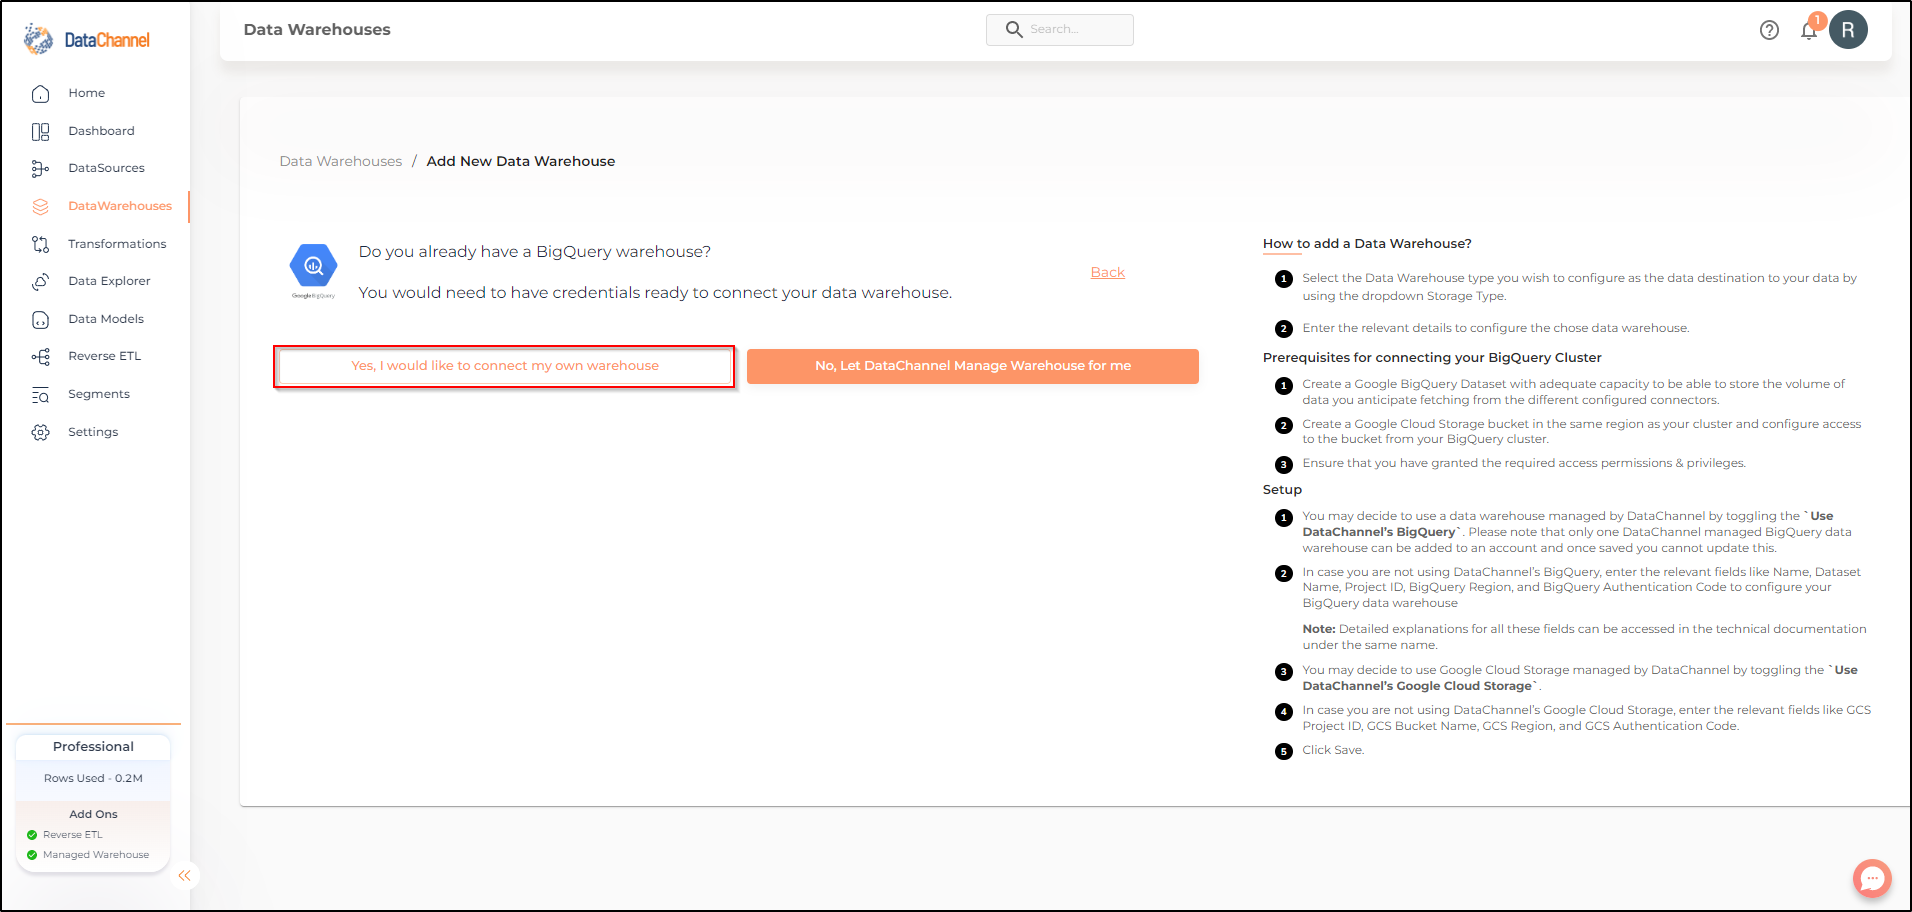
Option 1 : Adding your own BigQuery Data warehouse to your DataChannel Account
- Step 6
-
Add the given email to your google cloud account and ensure that you have granted the permissions listed. Click on Next
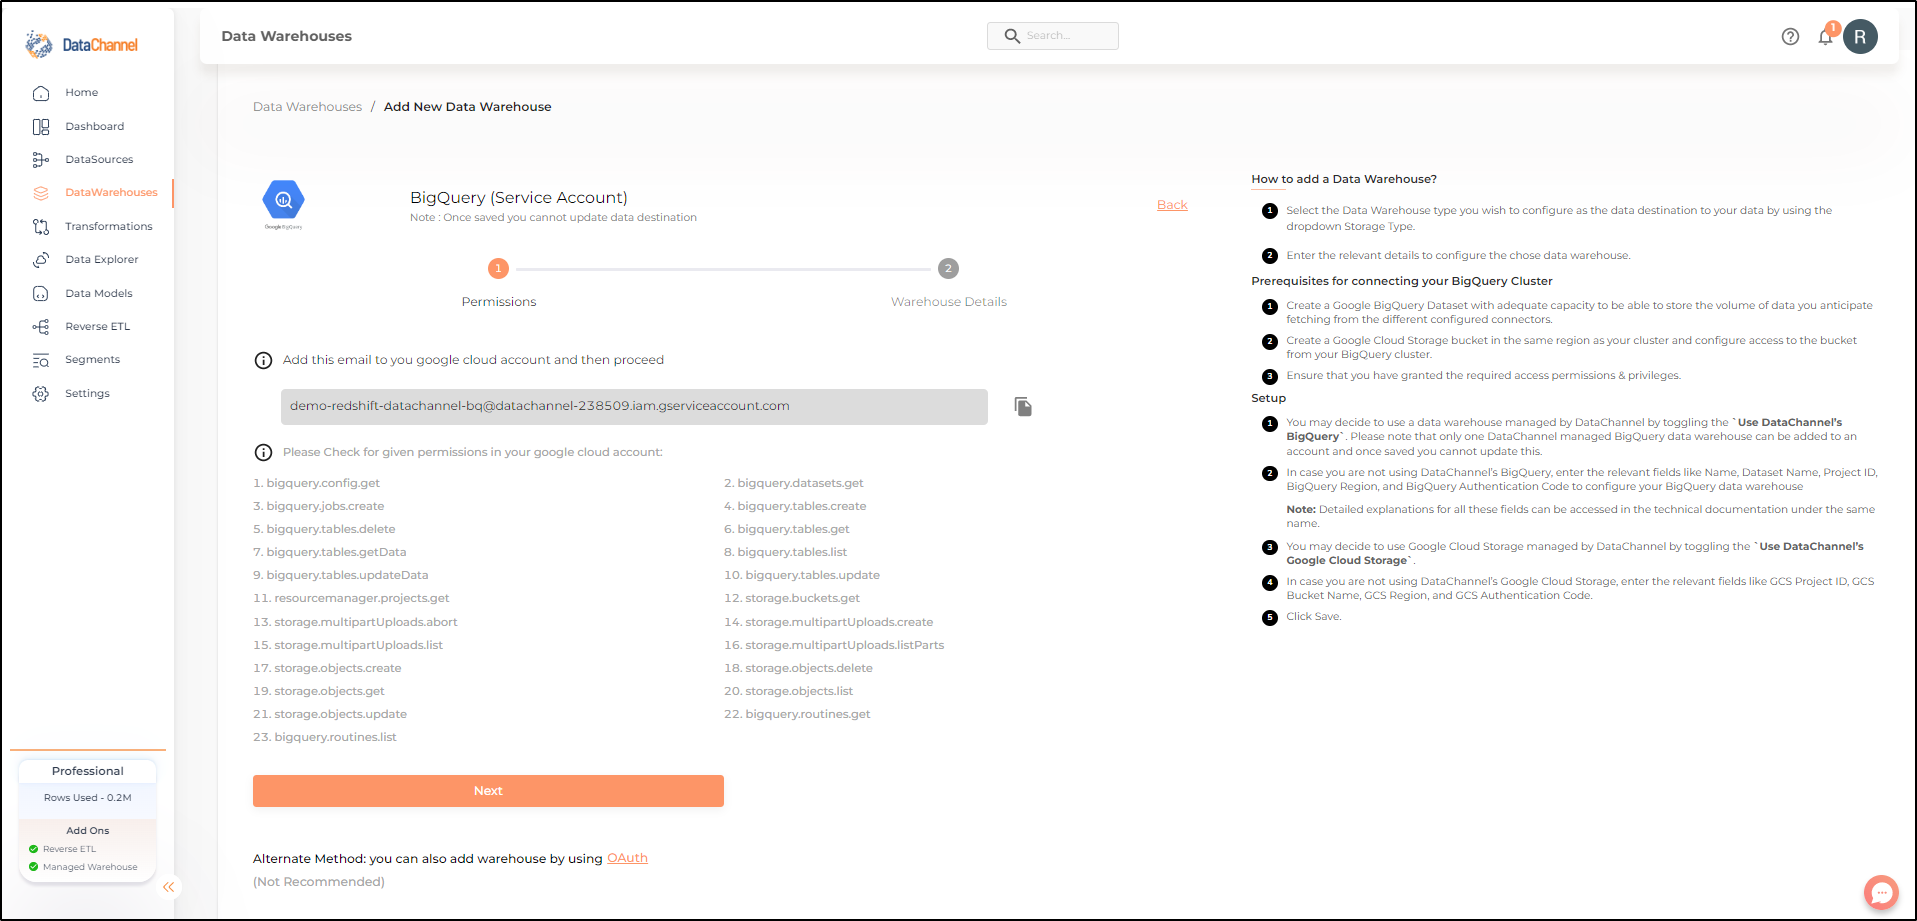
- Step 7
-
Enter the details for your BigQuery Dataset in the form and click on Validate Configuration to add the warehouse. An explanation of each of the fields in the form is given in the table below. Refer to the presetup documentation above to know how to get this information for your project.
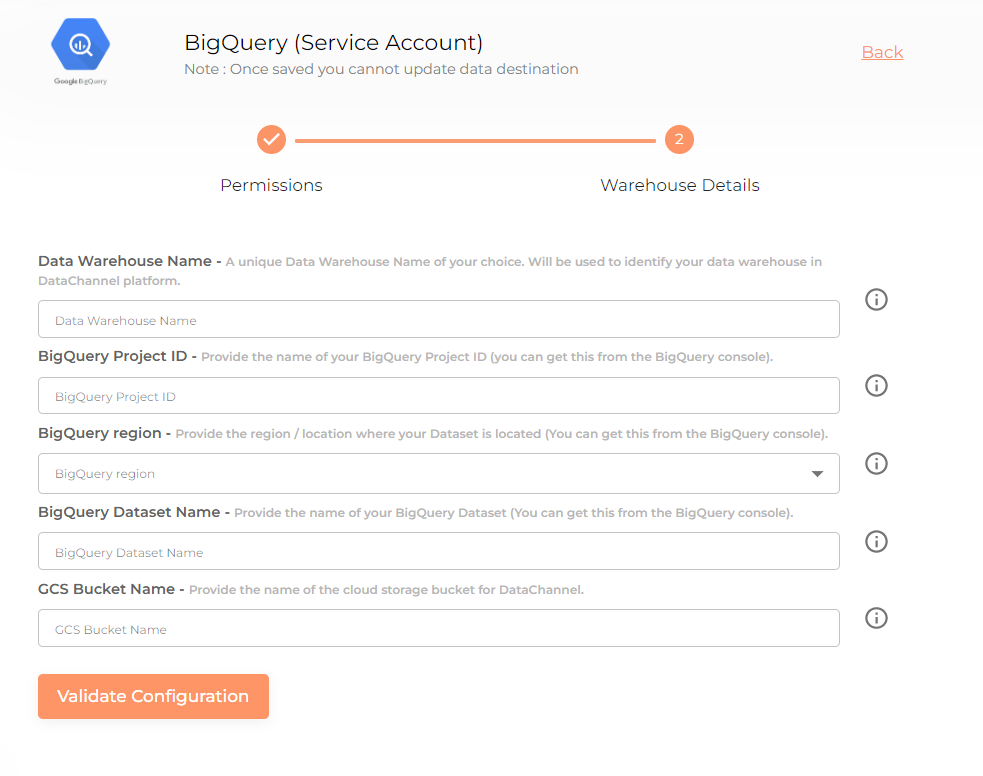
| Field | Description |
|---|---|
Name |
Required Provide a name for your warehouse. It needs to be unique across your account. |
Dataset Name |
Required Provide the name of your BigQuery Dataset (you can get this from the BigQuery console). |
Project ID |
Required Provide the project ID for the cloud project which has the BigQuery Dataset. |
BigQuery Region |
Required Provide the region / location where your Dataset is located. |
BigQuery Authentication Code |
Required Click on the link Generate Authentication Code and follow the process given here to generate a code using OAuth2 |
Use DataChannel GCS |
Required Leave this toggle off so that you can specify your own GCS bucket. |
GCS Project ID |
Required Provide the project ID where you have created the Google Cloud Storage Bucket to store the raw data files. Note that DataChannel does not remove the files after they have been copied into GCS so it is advisable to use life cycle properties to manage the removal / archival of the raw files to manage GCS costs. |
GCS Bucket Name |
Required Provide the name of the cloud storage bucket you have created for DataChannel. |
GCS Region Name |
Required Provide the name of the region where your GCS Bucket is stored. Note:- This should be same as the region for your BigQuery Dataset. |
GCS Authentication Code |
Required Click on the link Generate Authentication Code and follow the process given here to generate a code using OAuth2 |
Option 2: Adding a DataChannel Managed BigQuery Data warehouse to your DataChannel Account
- Step 6
-
In case you choose that DataChannel manage a BigQuery warehouse for you, the process to add a DataChannel managed warehouse is very simple. Just fill in your Google Account email and Region and click on save.
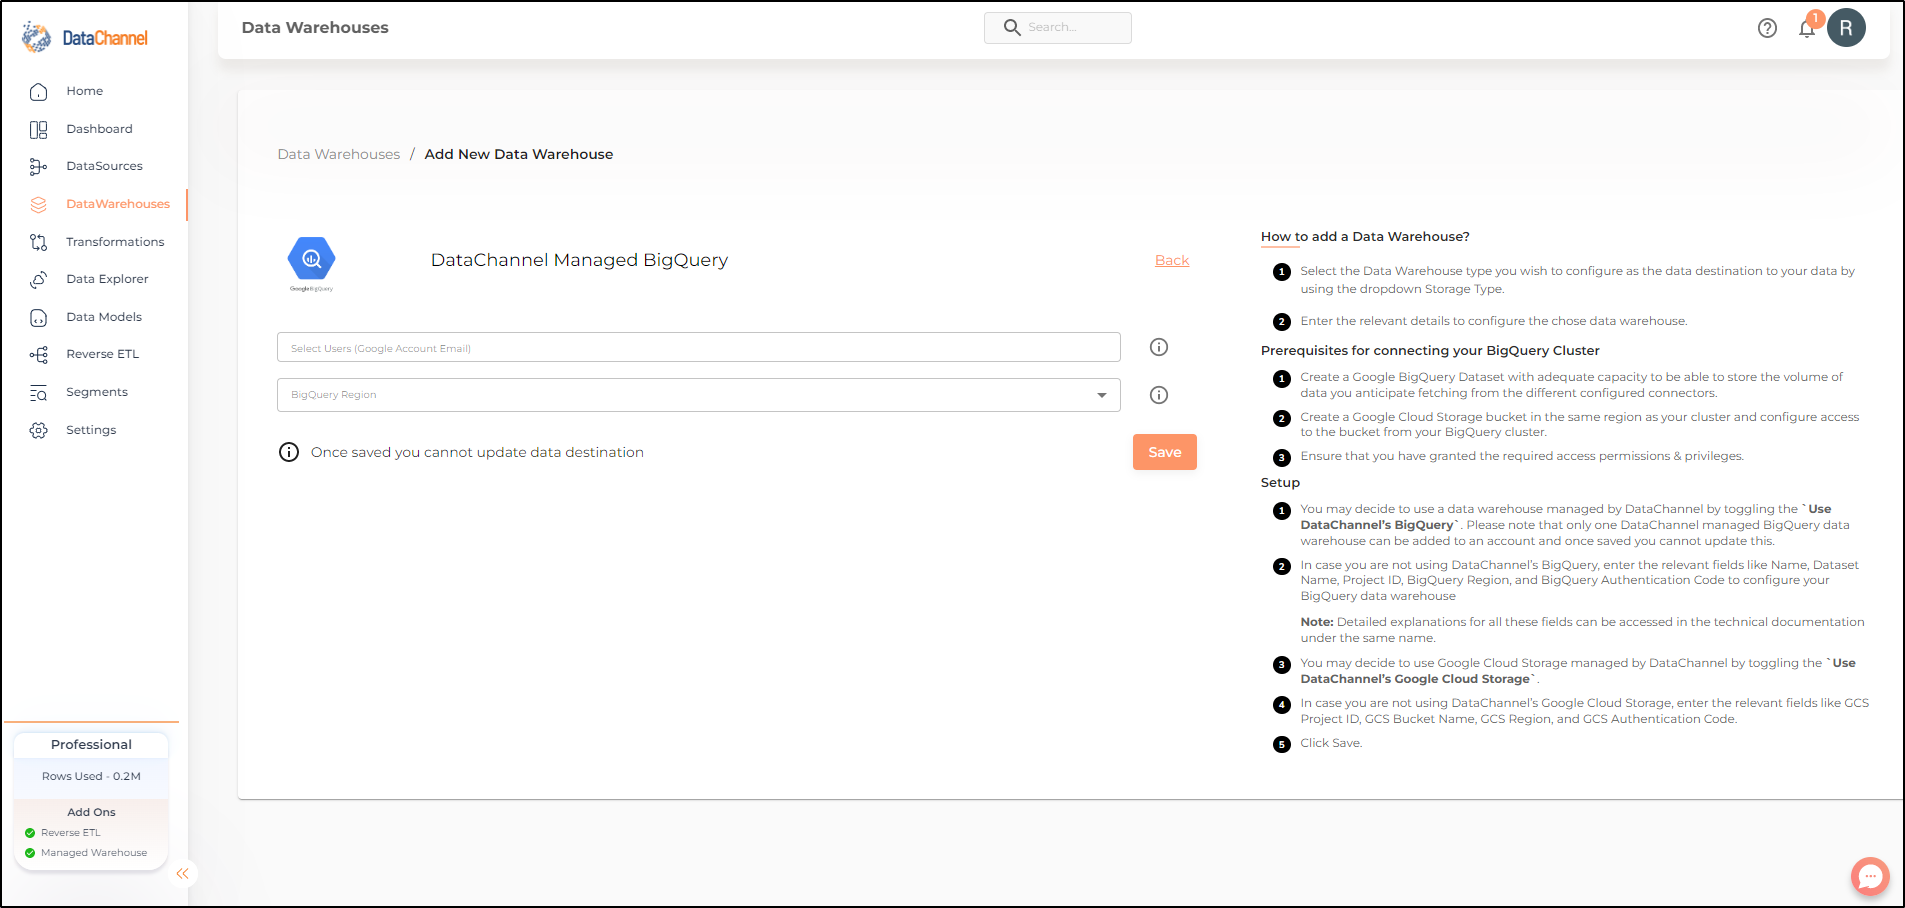
Still have Questions?
We’ll be happy to help you with any questions you might have! Send us an email at info@datachannel.co.
Subscribe to our Newsletter for latest updates at DataChannel.