Familiarisation with the User Interface
Settings
Overview
This section will help to familiarize you with the layout on the Settings page of the DataChannel Console. You can access the settings page by clicking on the Settings Tab which is the bottommost icon on the sidebar, right below the Segments Tab. The Settings Tab allows you to view your profile, add multiple users, manage credentials, API keys, set the timezone, view your usage, choose your notification settings and more such functions through this tab.
View Profile
-
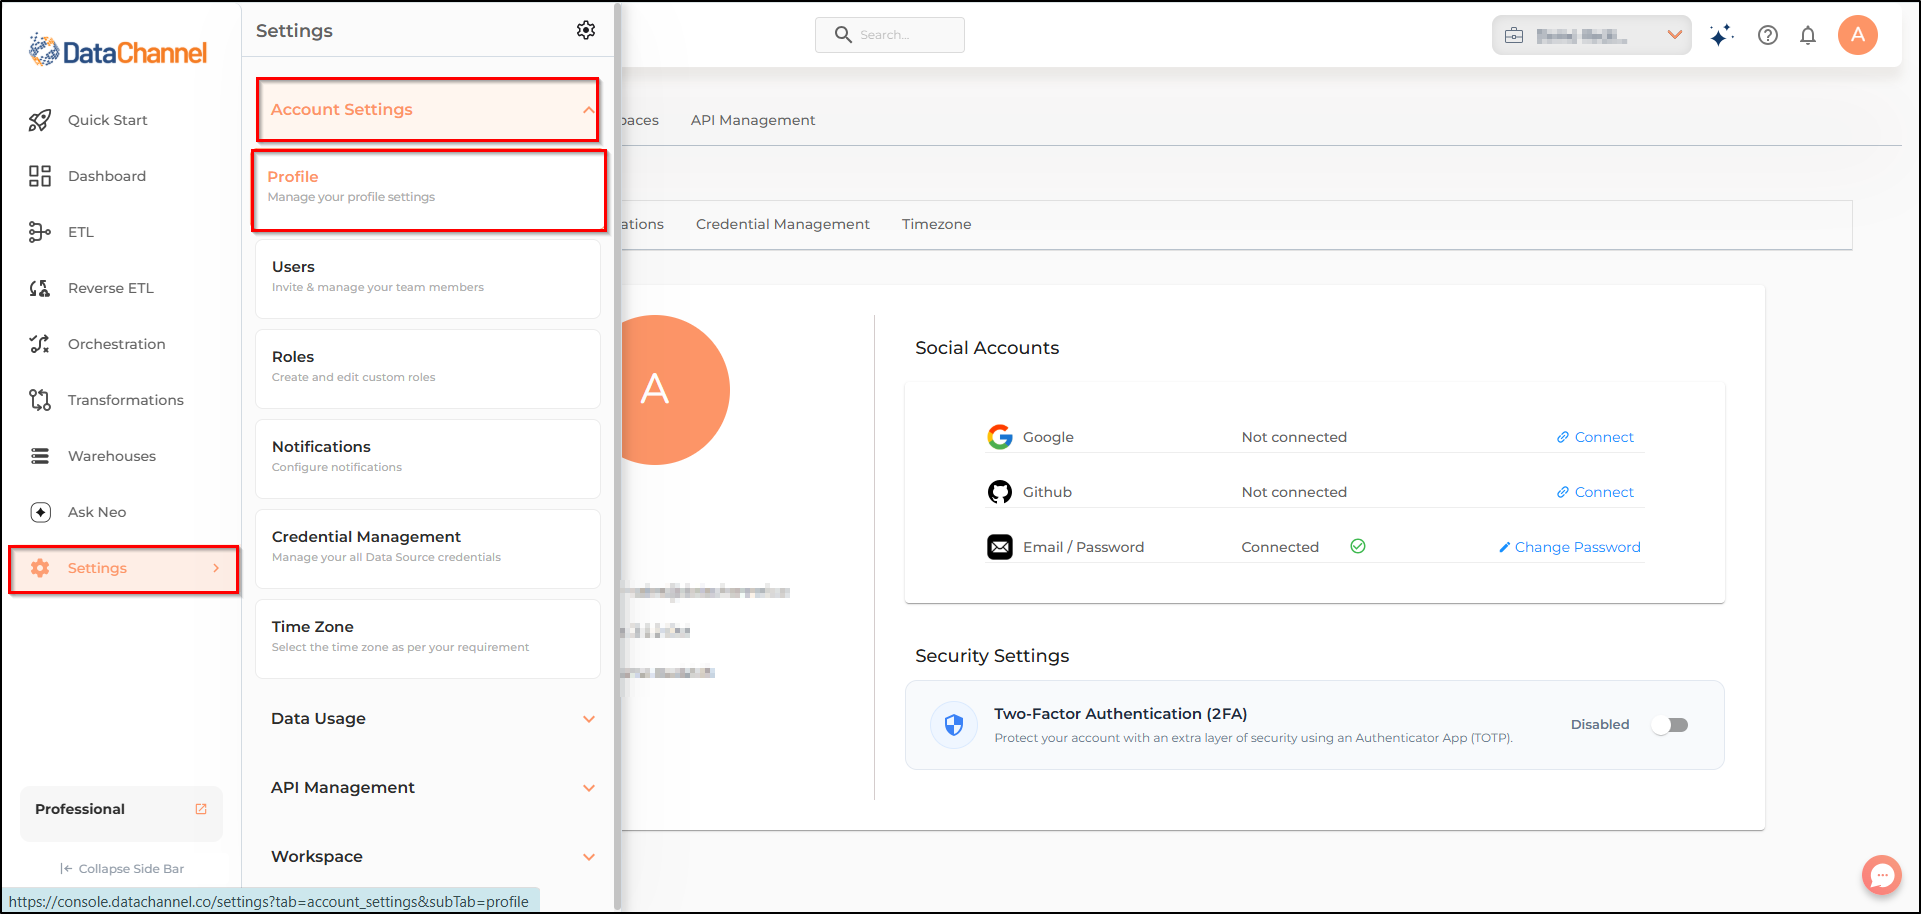
Go to the Settings tab which is the bottommost icon on the sidebar. It will open a side menu.
-
Click the Account Settings tab and then choose Profile.
-
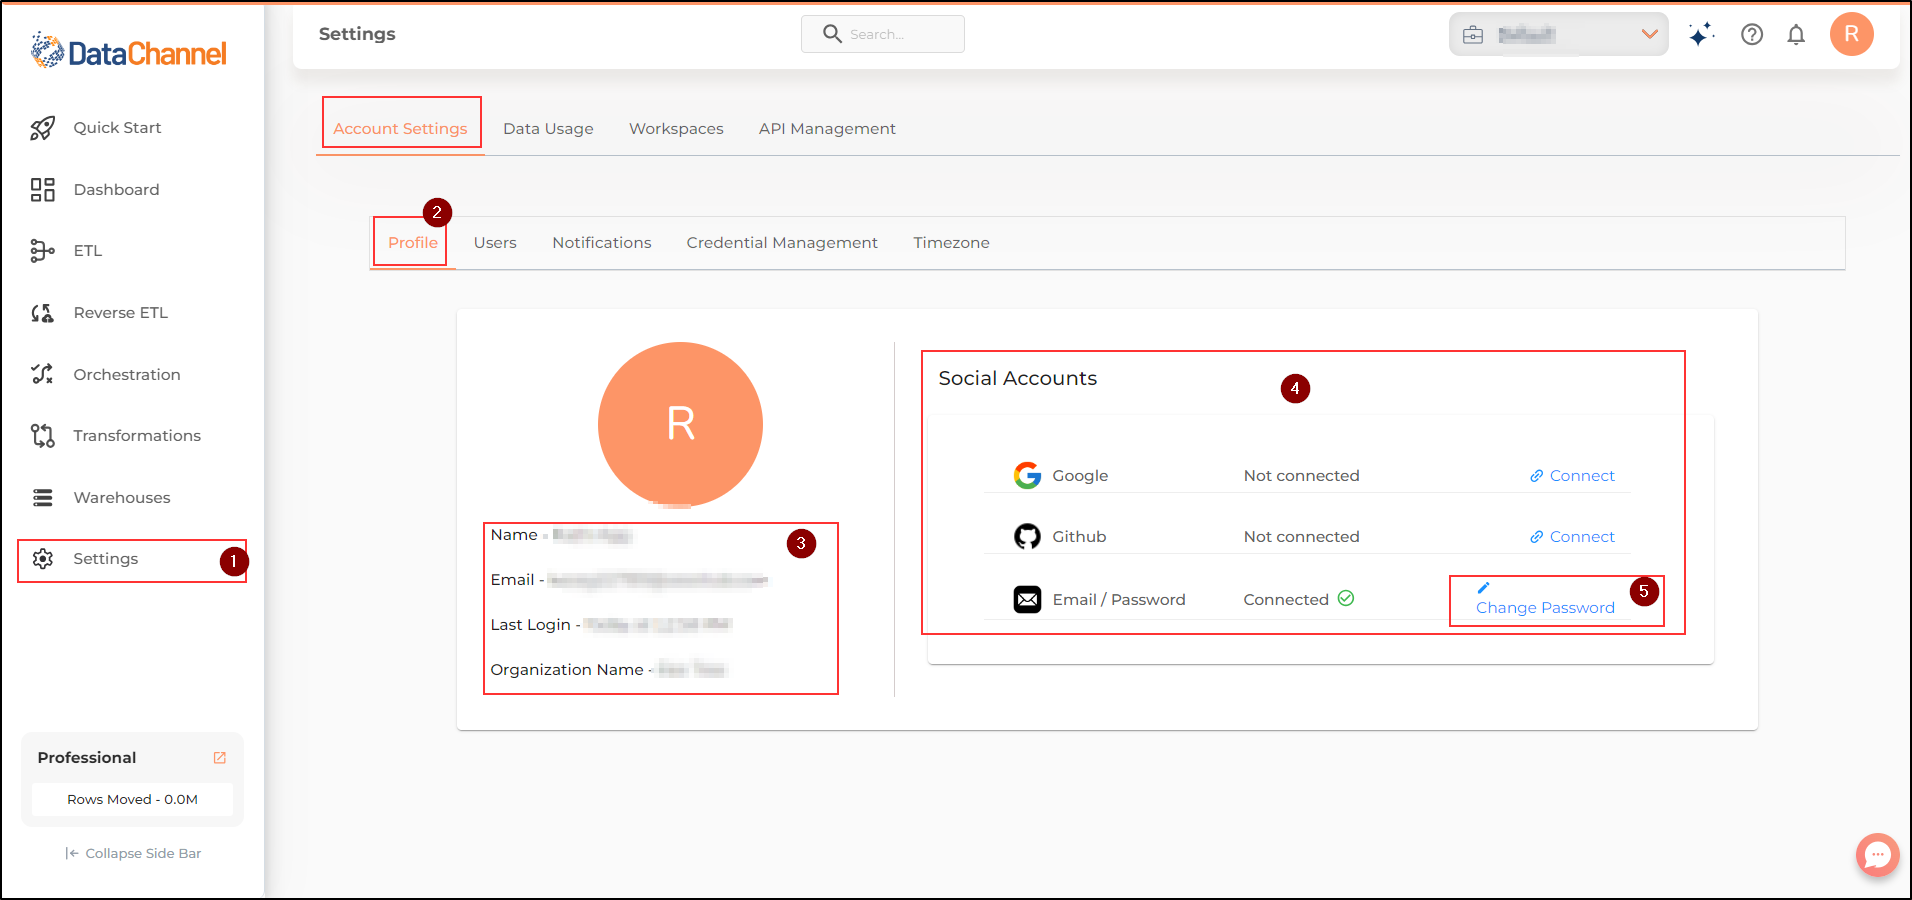
You’ll see that the pane below the Top Banner is divided into two. The left pane consists of details such as Profile picture, Name, email, Last Login details and Organisation Name.
-
The right pane lists all the social accounts connected to DataChannel.
-
You can connect or disconnect any account with the help of the links on the right.
-
You can also connect your email with password and later change password as well.
-
Next, you will find a two-factor authentication card. It is an additional layer of account security to your account.
-
The two-factor authentication is disabled by default. You can click on the toggle icon to enable it.
Managing Users
-
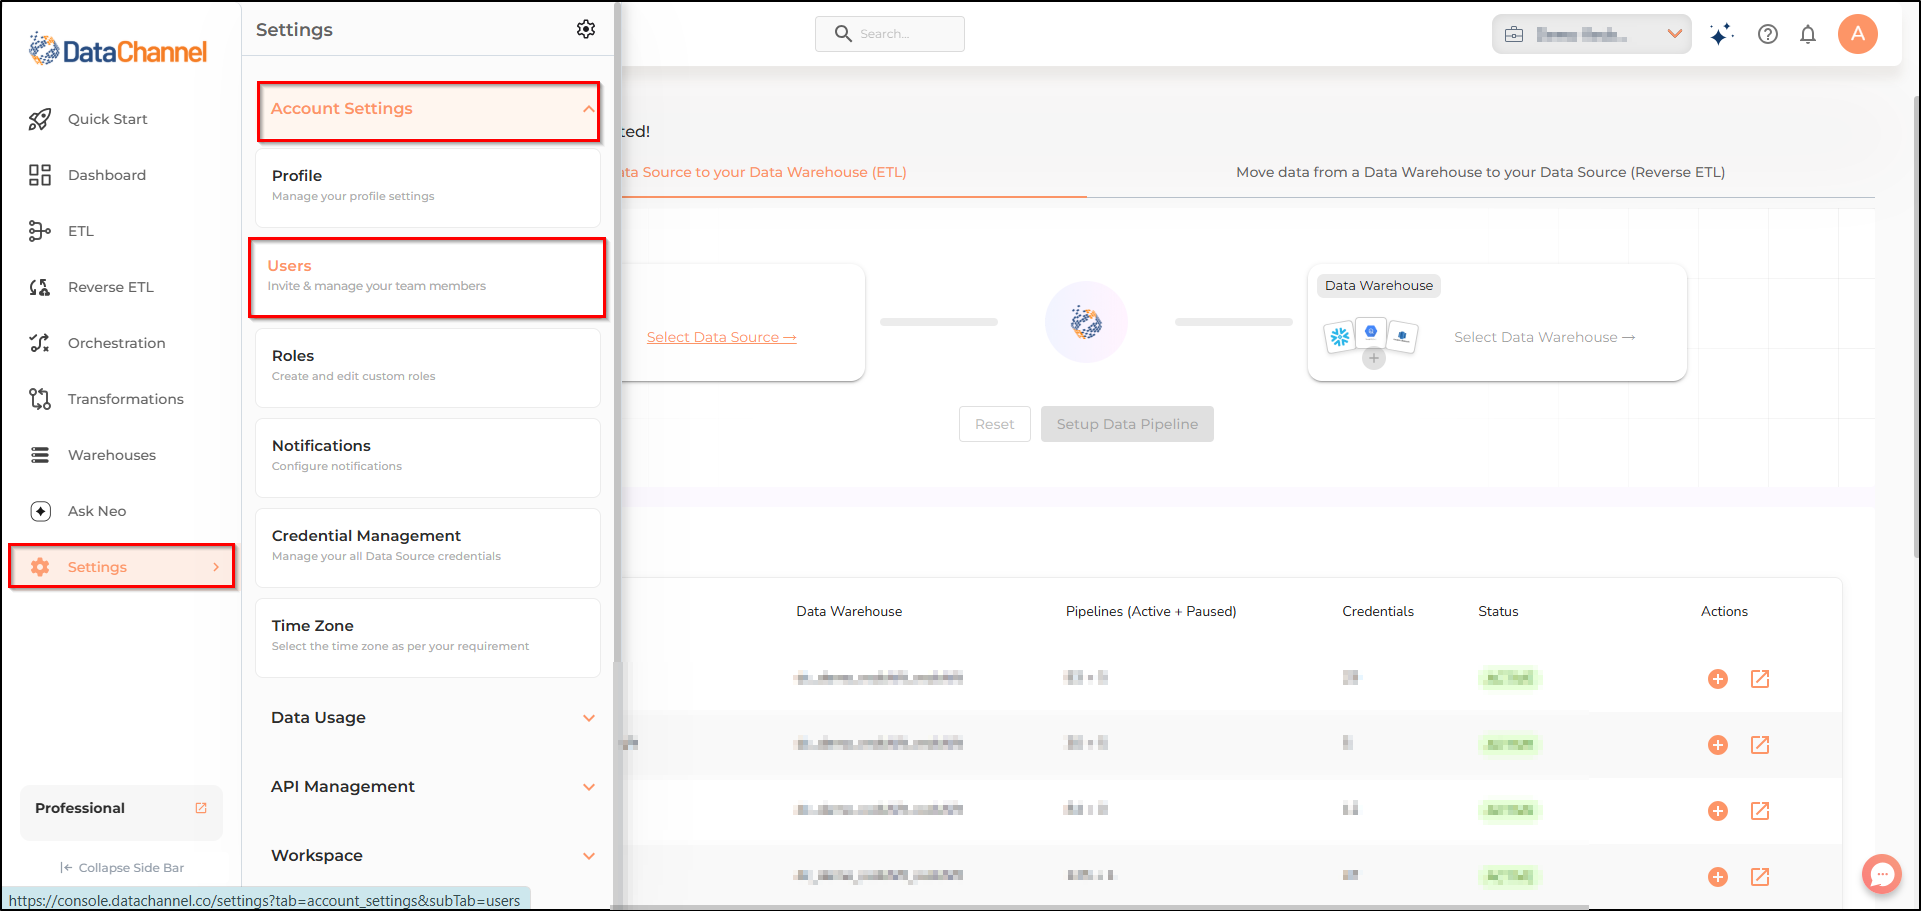
Go to the Settings tab which is the bottommost icon on the sidebar. It will open a side menu.
-
Click the Account Settings tab and then choose Users.
-
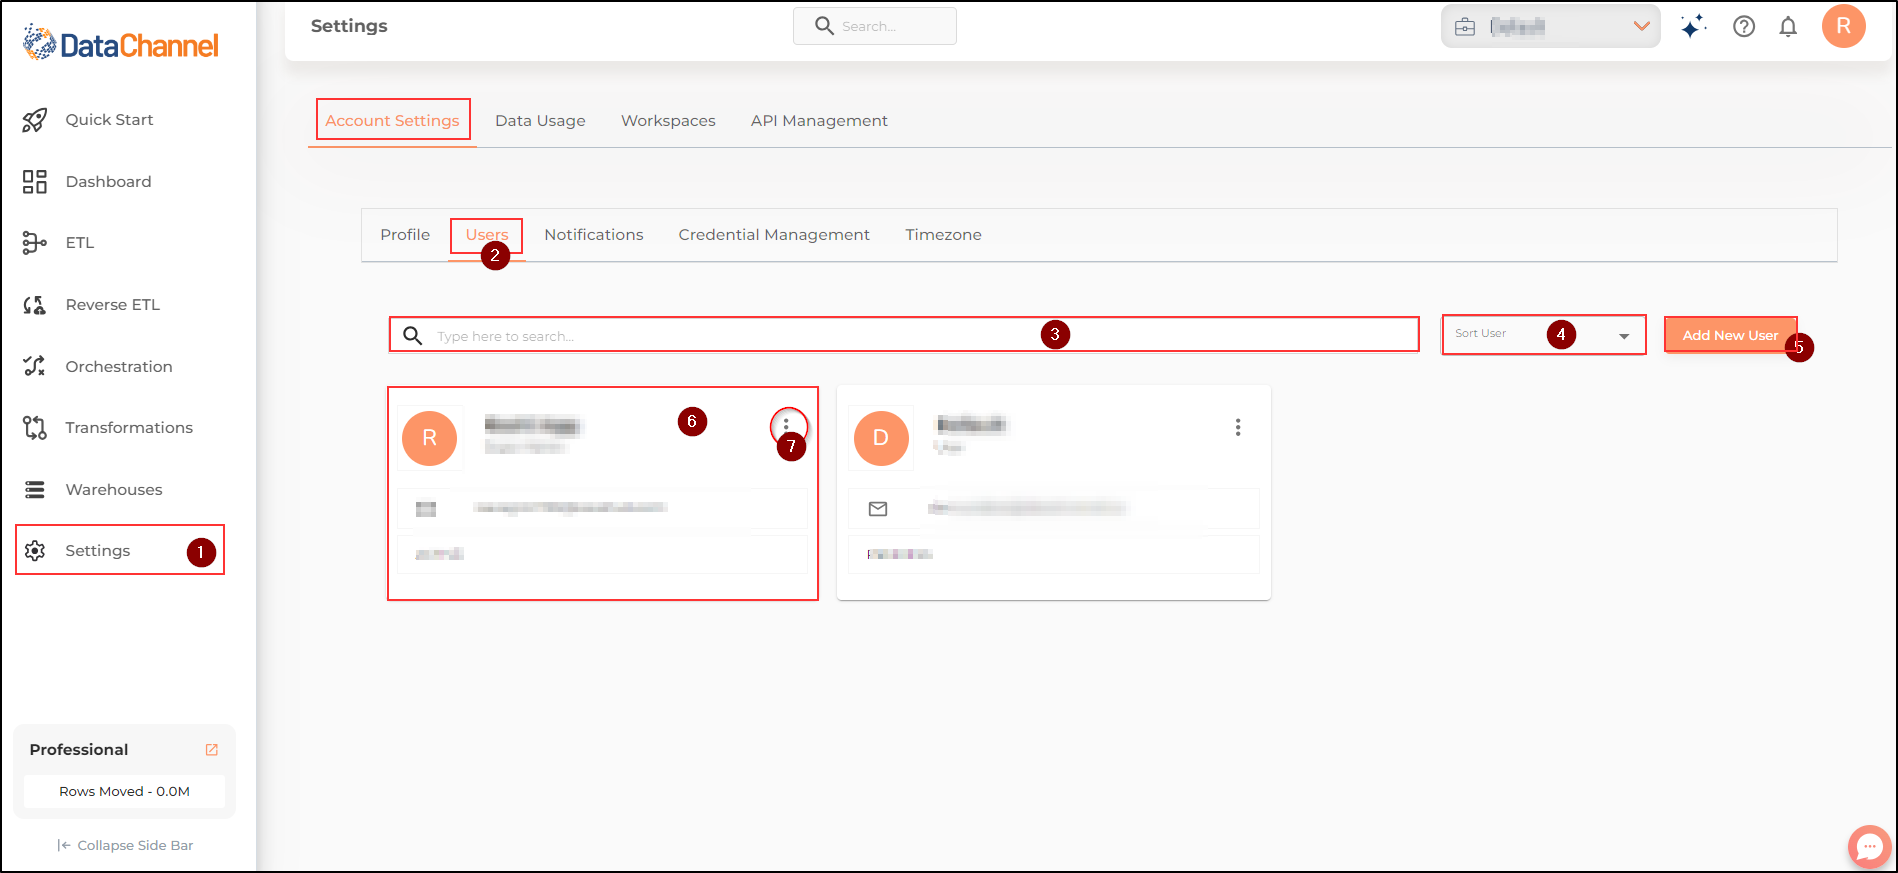
The search box inside the Users Tab allows you to quickly find a specific User added by you.
-
The sort dropdown inside the Users tab allows you to quickly sort the Users added by you alphabetically.
-
The Add New button, located on the top right corner of the Main UI Screen, allows you to add a new user to your DataChannel Account.
-
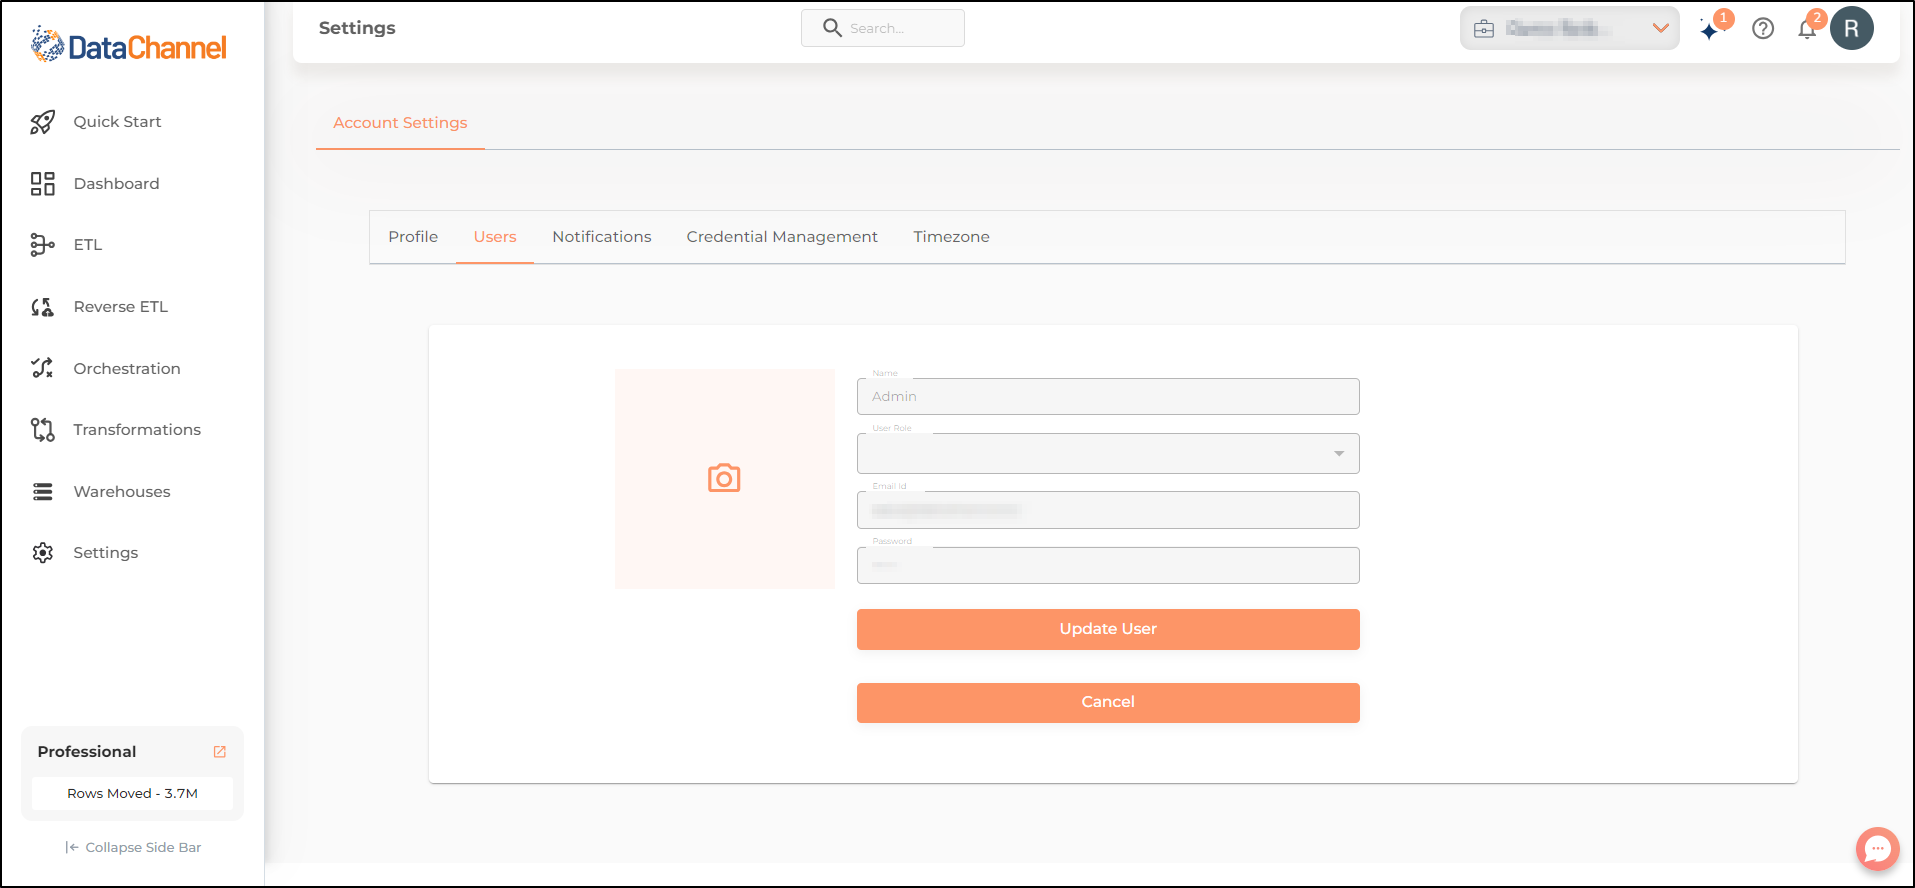
Below the search and sort boxes the main UI screen inside the Users tab contains a carousel of individual cards for each of the users added by you. Clicking on the card opens up a screen as below to allow you to update the details of the user.
-
Clicking on the three dots located on the top right corner of each card allows you to delete that user.
Custom Roles
-
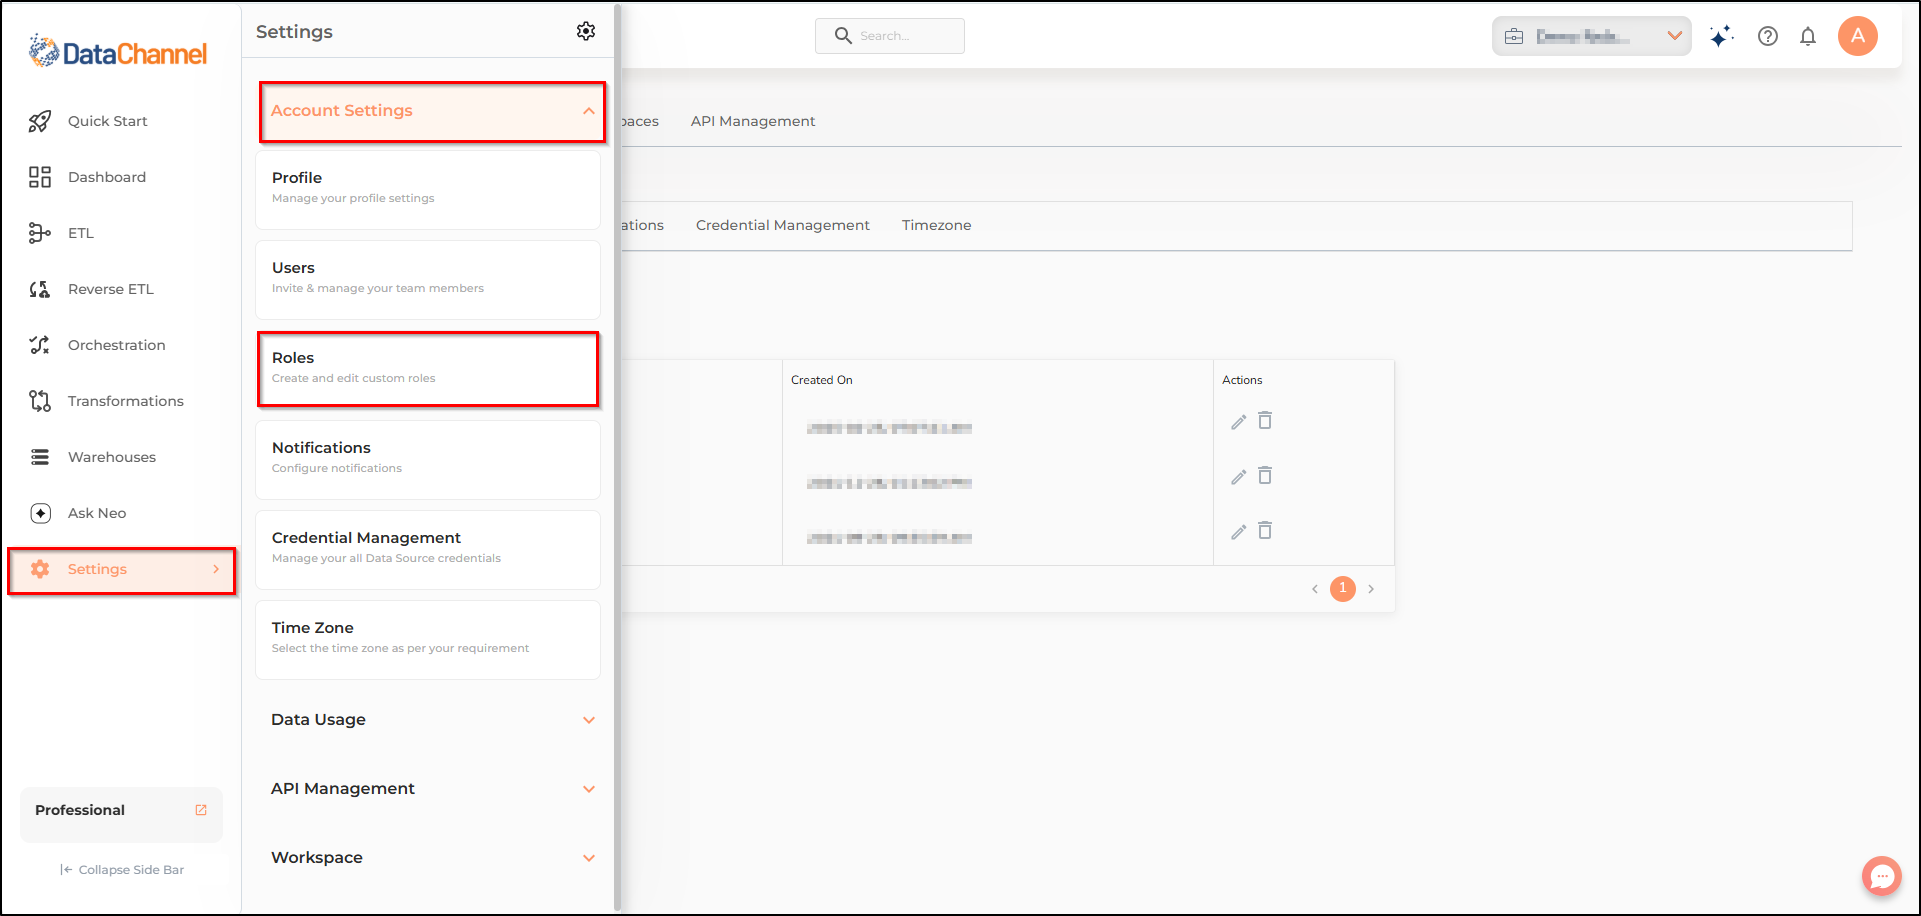
Go to the Settings tab which is the bottommost icon on the sidebar. It will open a side menu.
-
Click the Account Settings tab and then choose Users.
-
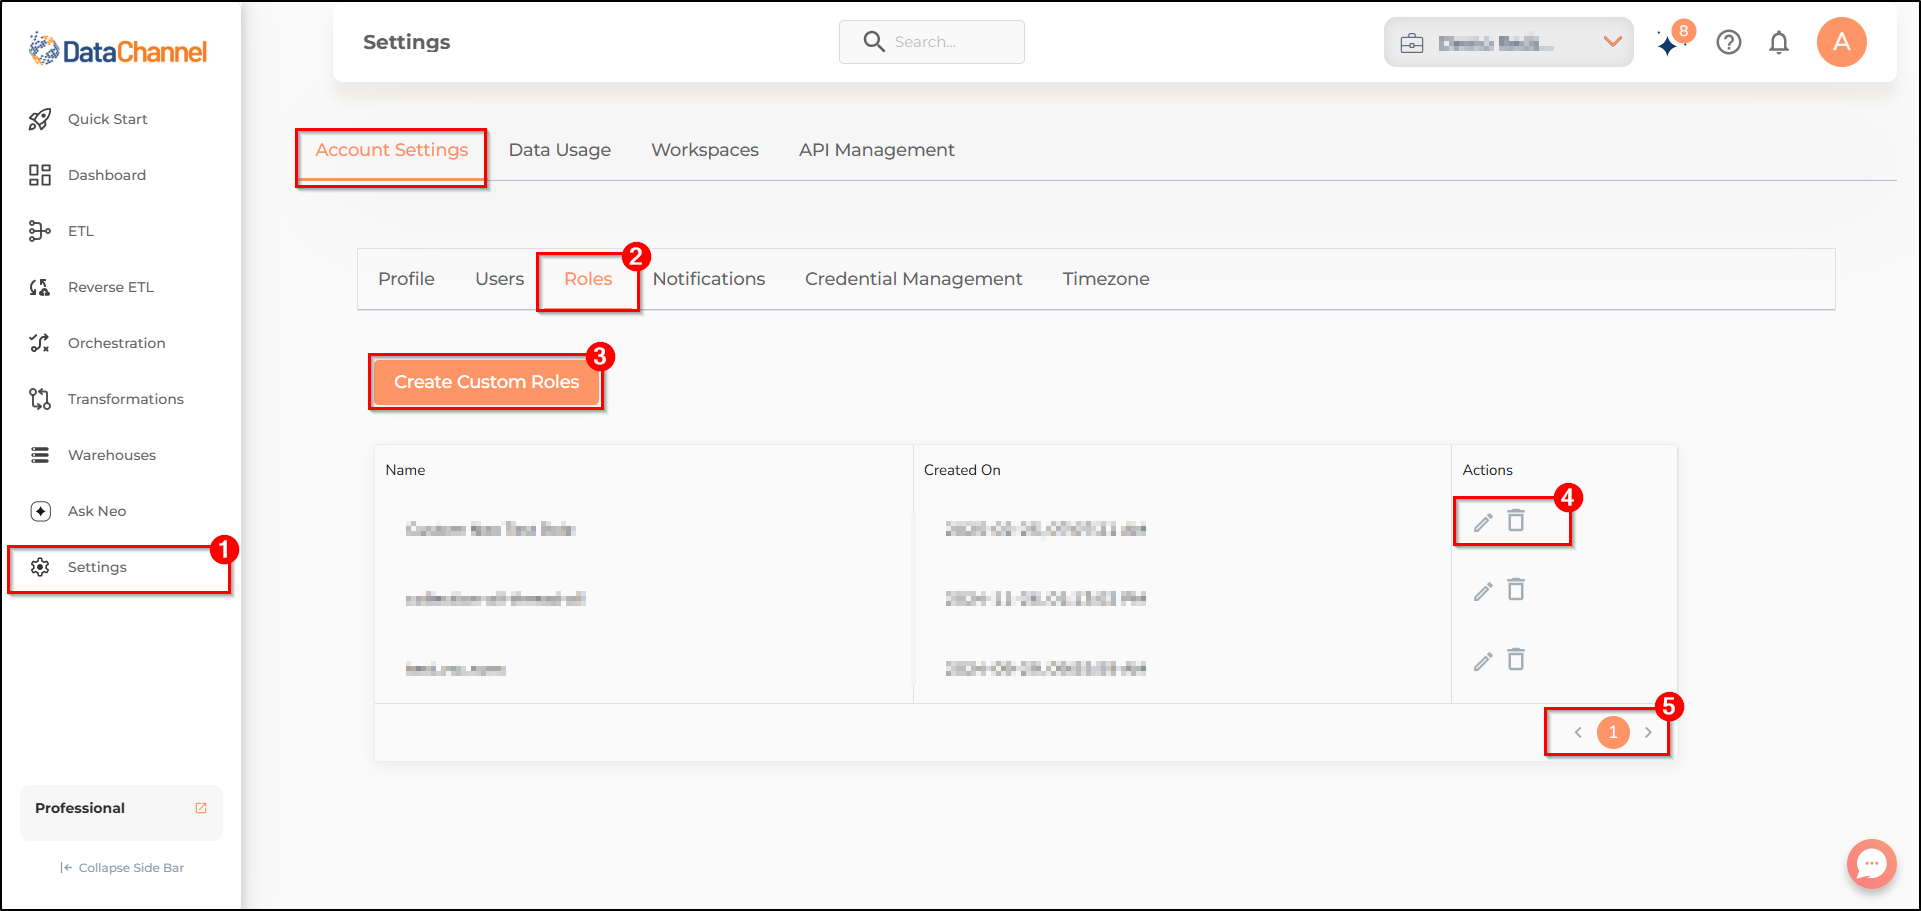
The Create Custom Roles button, located on the top left corner of the Main UI Screen, allows you to add a new user to your DataChannel Account.
-
The icons in the actions column of the Table allow you to Delete/Edit a specific custom role.
-
Navigating between different pages of the Custom Roles list pane is possible through the page numbers on the navigation bar, near the bottom right corner of the pane.
Receiving Notifications
-
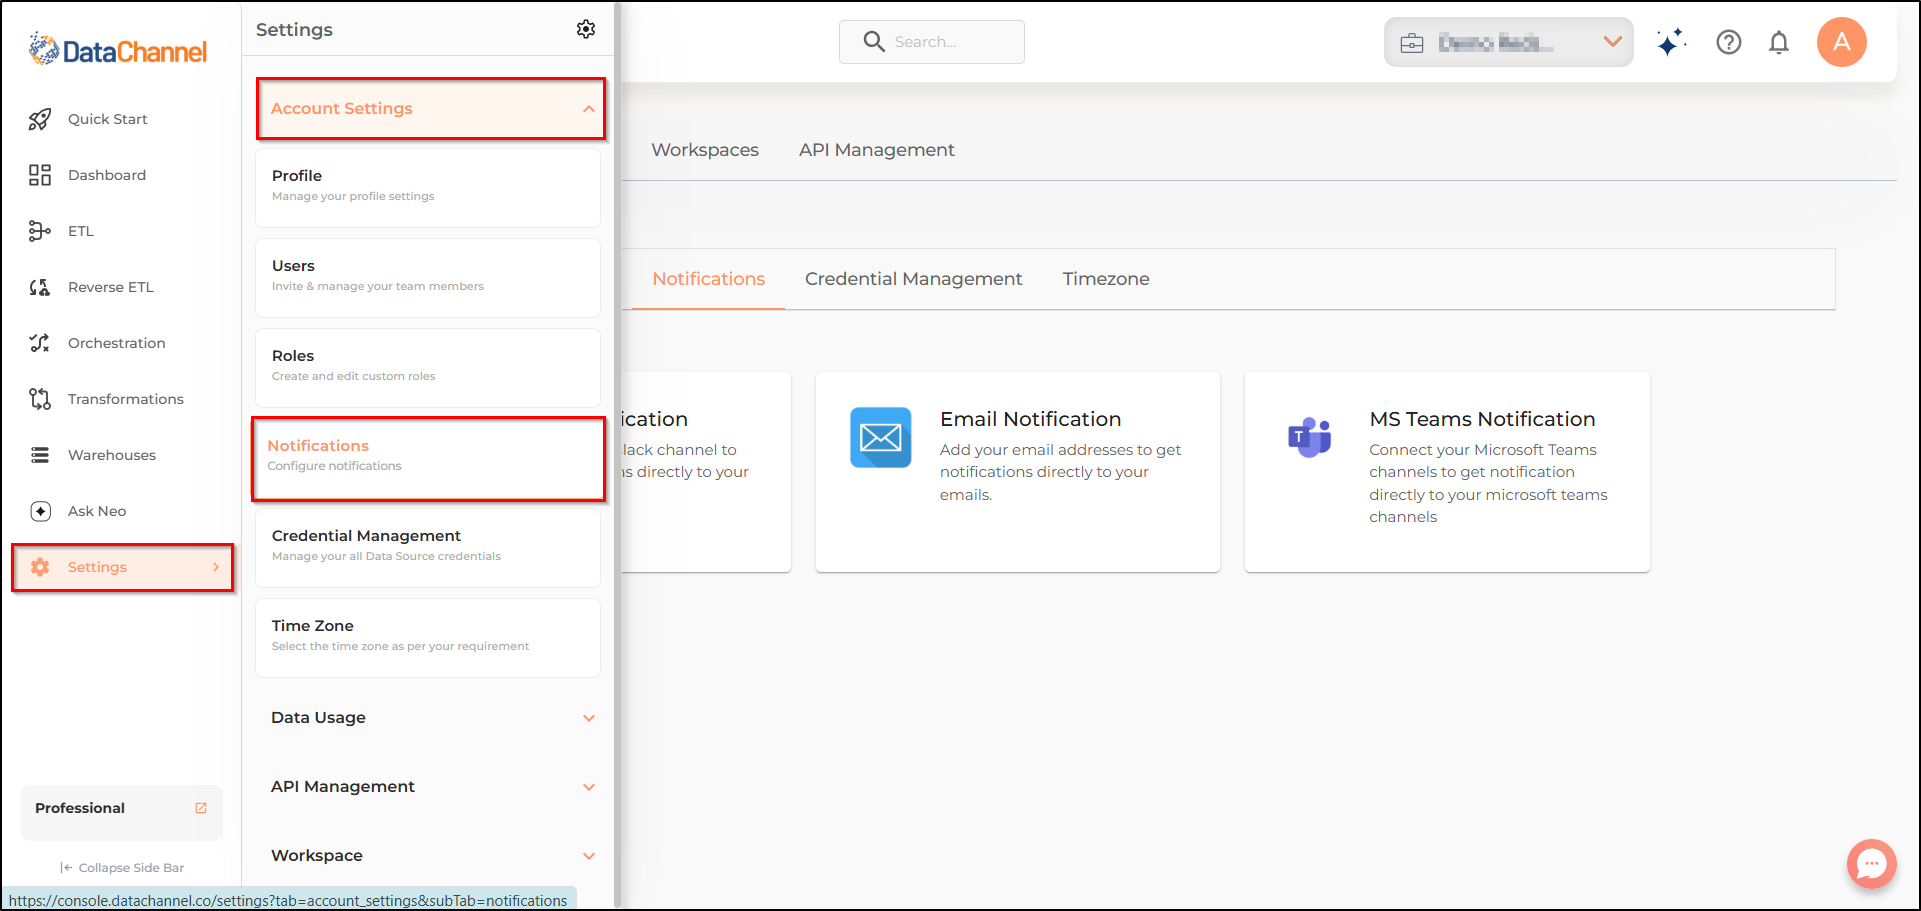
Go to the Settings tab which is the bottommost icon on the sidebar. It will open a side menu.
-
Click the Account Settings tab and then choose Notifications.
-
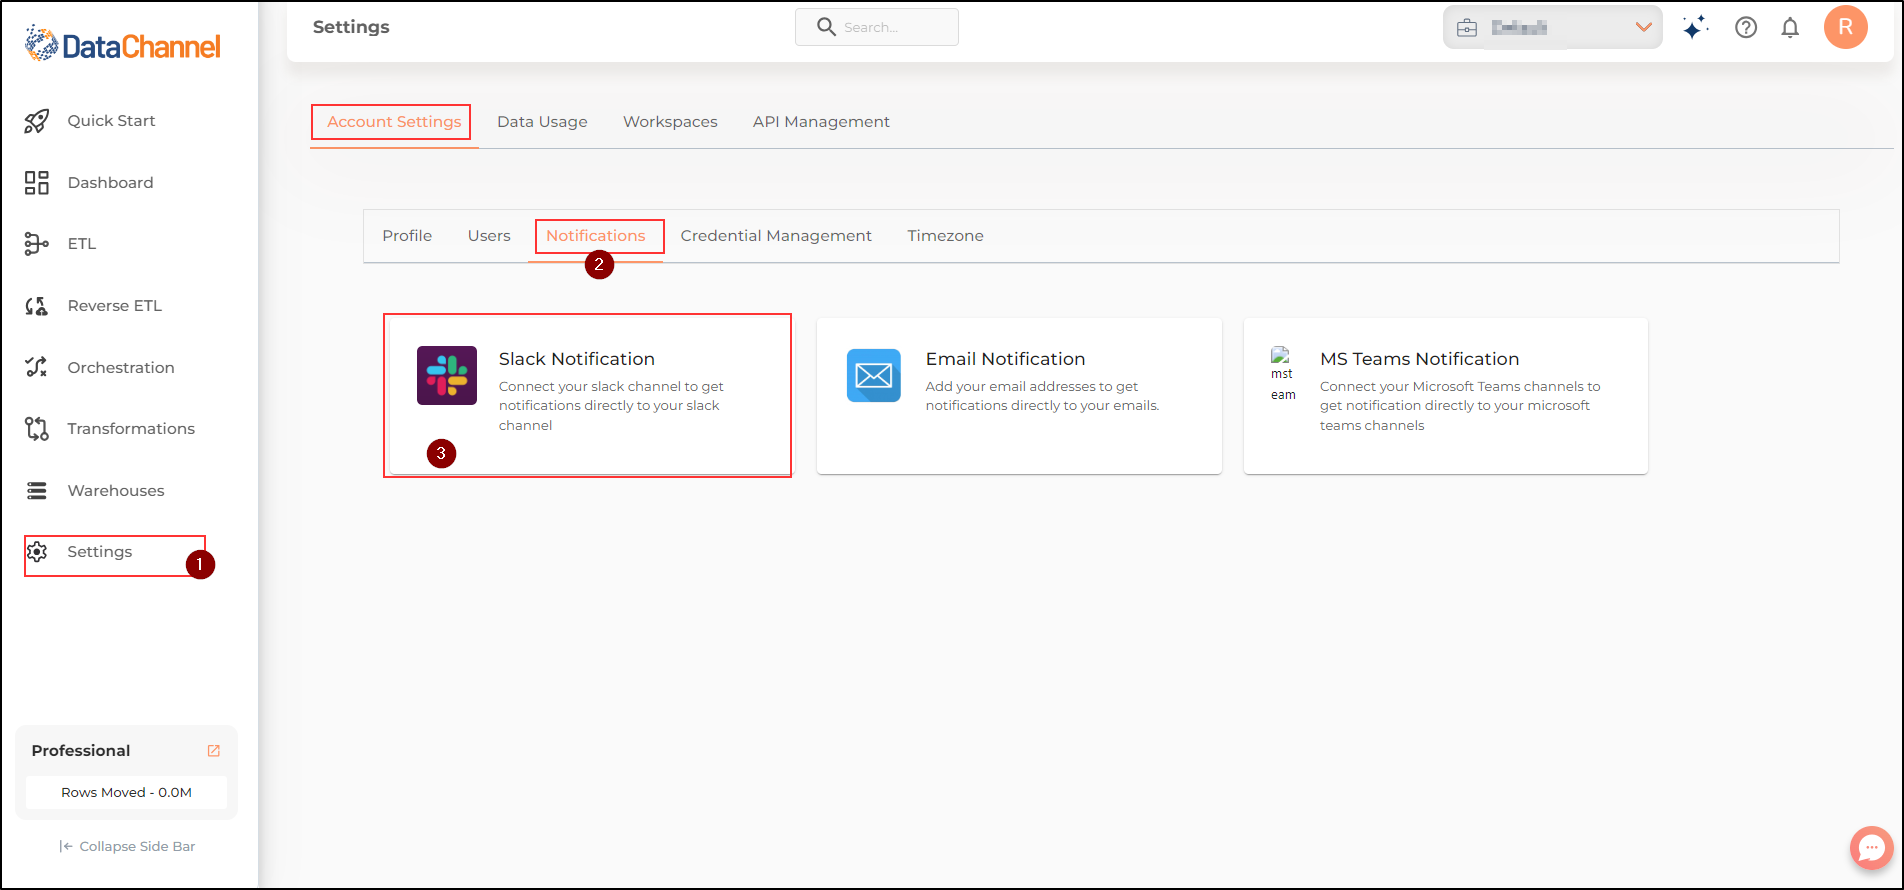
The Slack Notification button, located on the top left corner of the Main UI Screen, allows you to connect your Slack Channel to your DataChannel Account. This helps you to directly receive notifications from Datachannel in your Slack Channel. Once you click on the button the page is divided into two side-by-side panes which allow you to access the Setup and Configure Tabs.
-
The Email Notification button, located on the middle of the Main UI Screen, allows you to connect your Email to your DataChannel Account. This helps you to directly receive notifications from Datachannel in your Email. Once you click on the button the page is divided into two side-by-side panes which allow you to access the Setup and Configure Tabs.
-
The MS Teams Notification button, located on the top right corner of the Main UI Screen, allows you to connect your MS Teams to your DataChannel Account. This helps you to directly receive notifications from Datachannel in your Teams account. Once you click on the button the page is divided into two side-by-side panes which allow you to access the Setup and Configure Tabs.
-
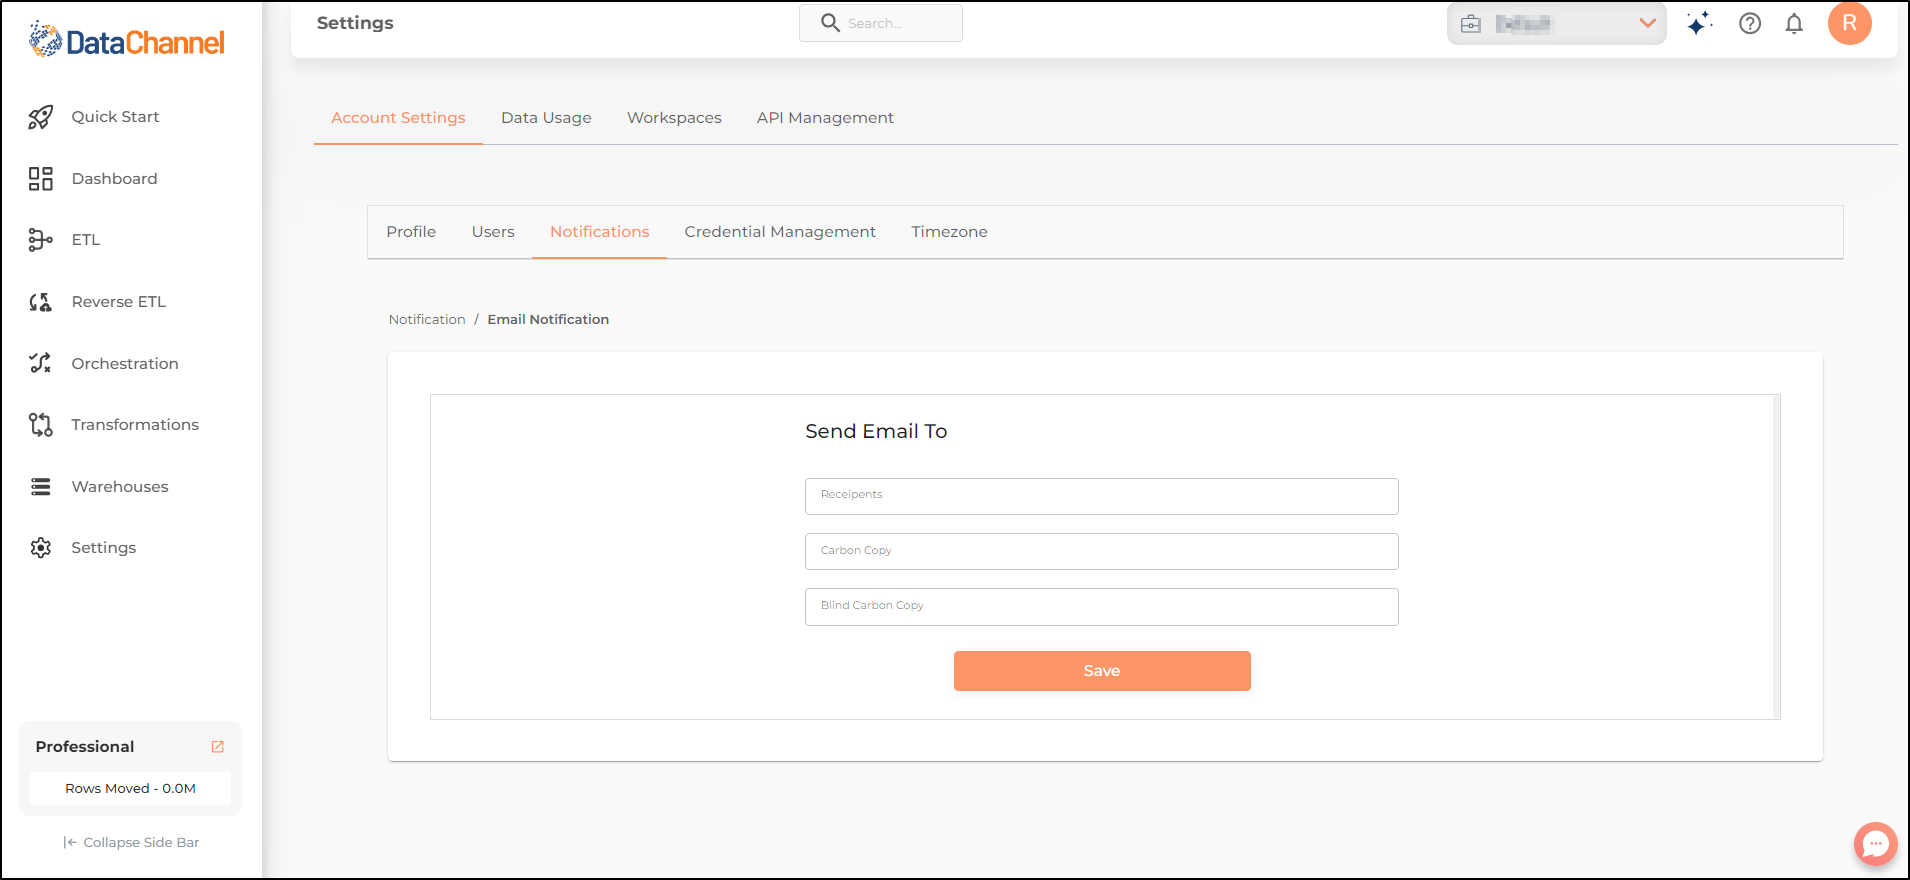
Setup -
6.1 Click on the Setup Tab.
6.2 Click on the Edit Slack Notification button to add a Slack Channel to receive DataChannel Notifications.
-
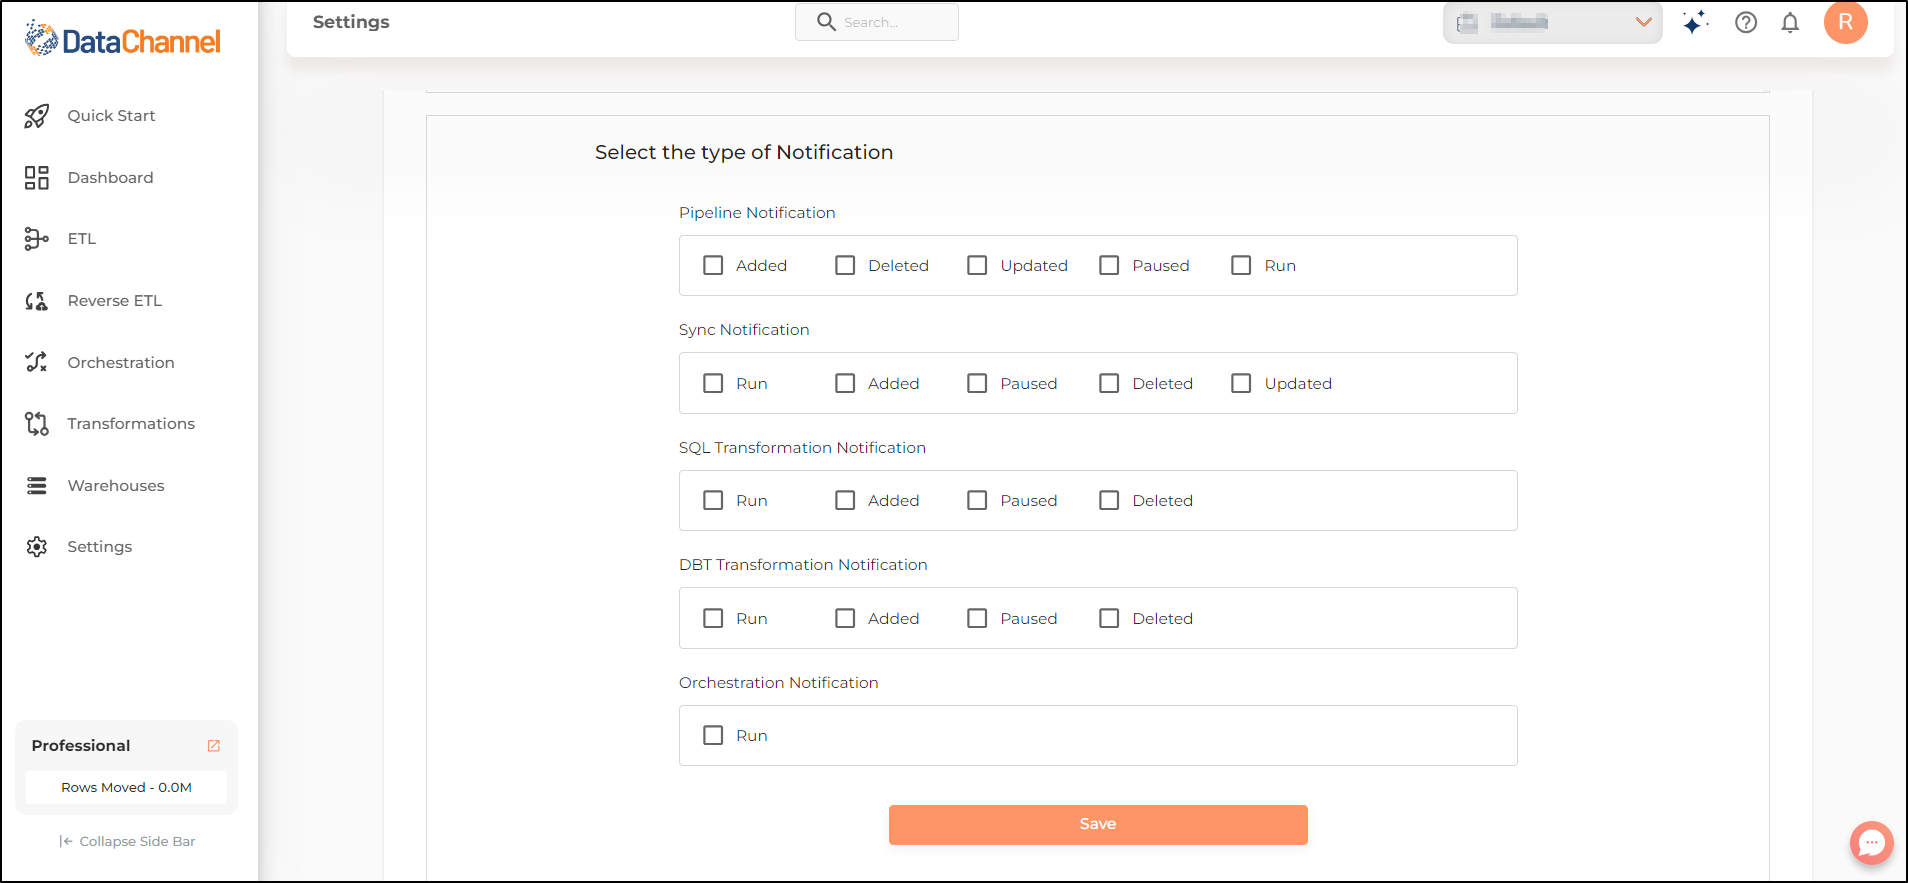
Configure -
7.1 Click on the Configure Tab.
7.2 Use the toggle buttons to select the occurrences for which you would like to receive notifications on your Slack Channel.
7.3 Once completed, Click on Save.
Managing Credentials
-
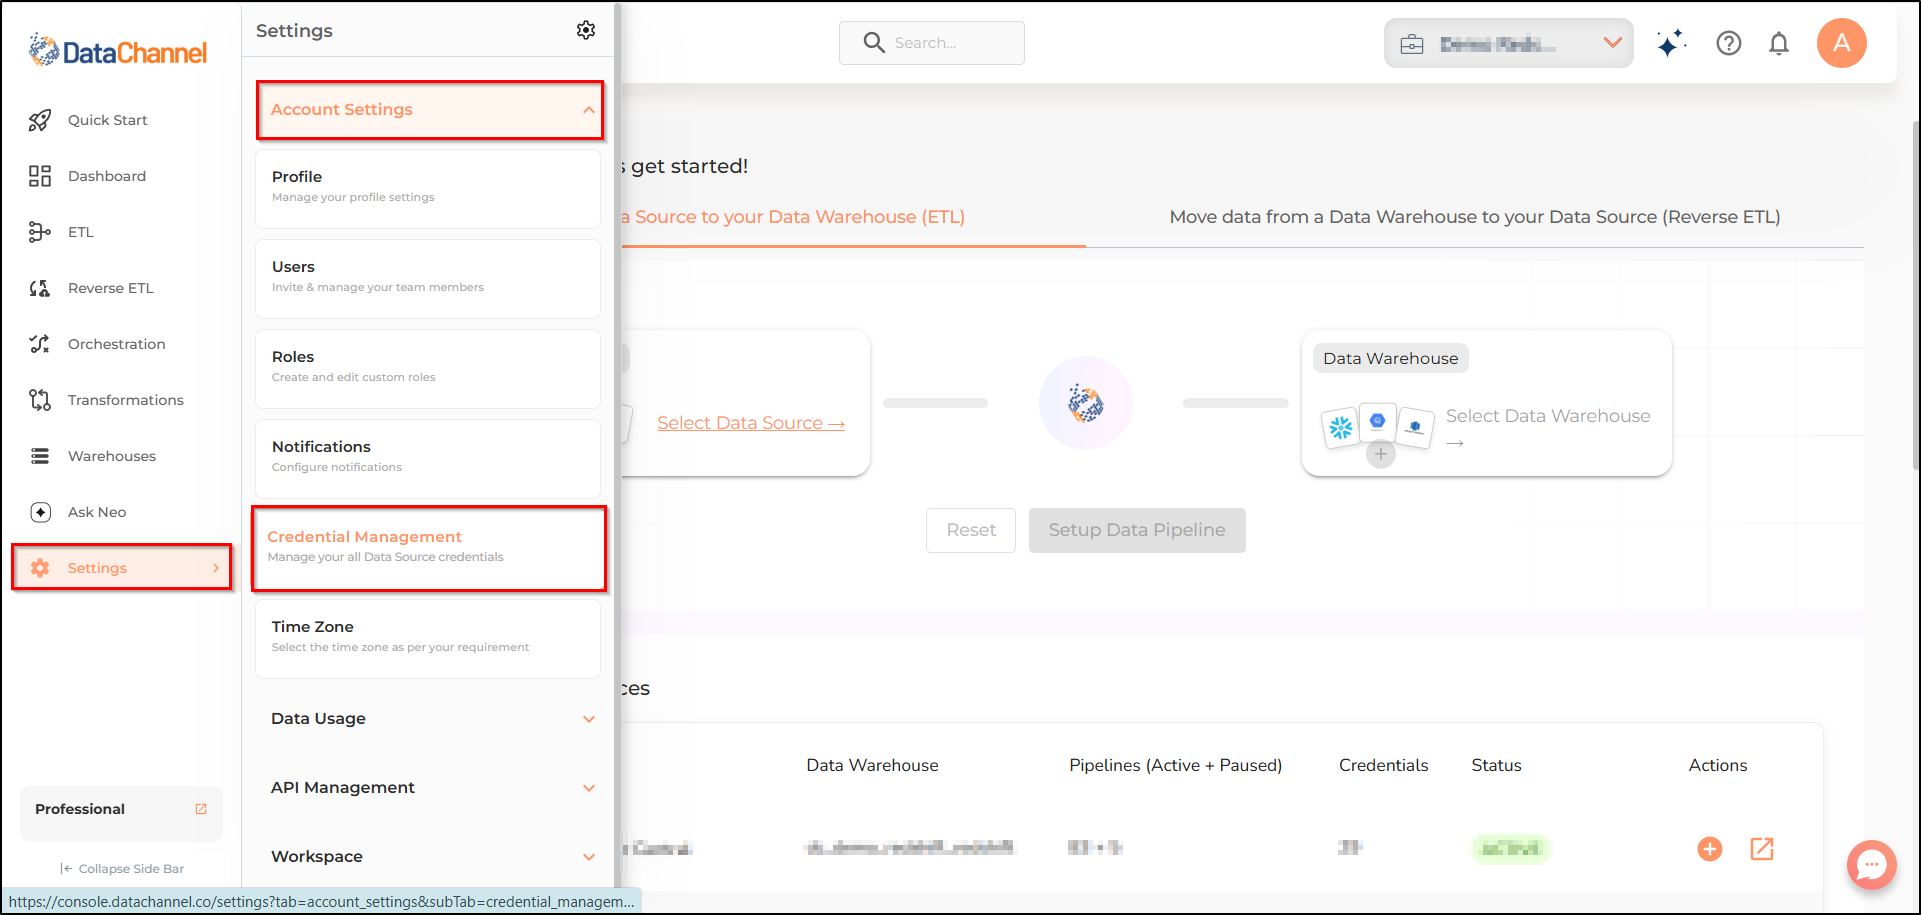
Go to the Settings tab which is the bottommost icon on the sidebar. It will open a side menu.
-
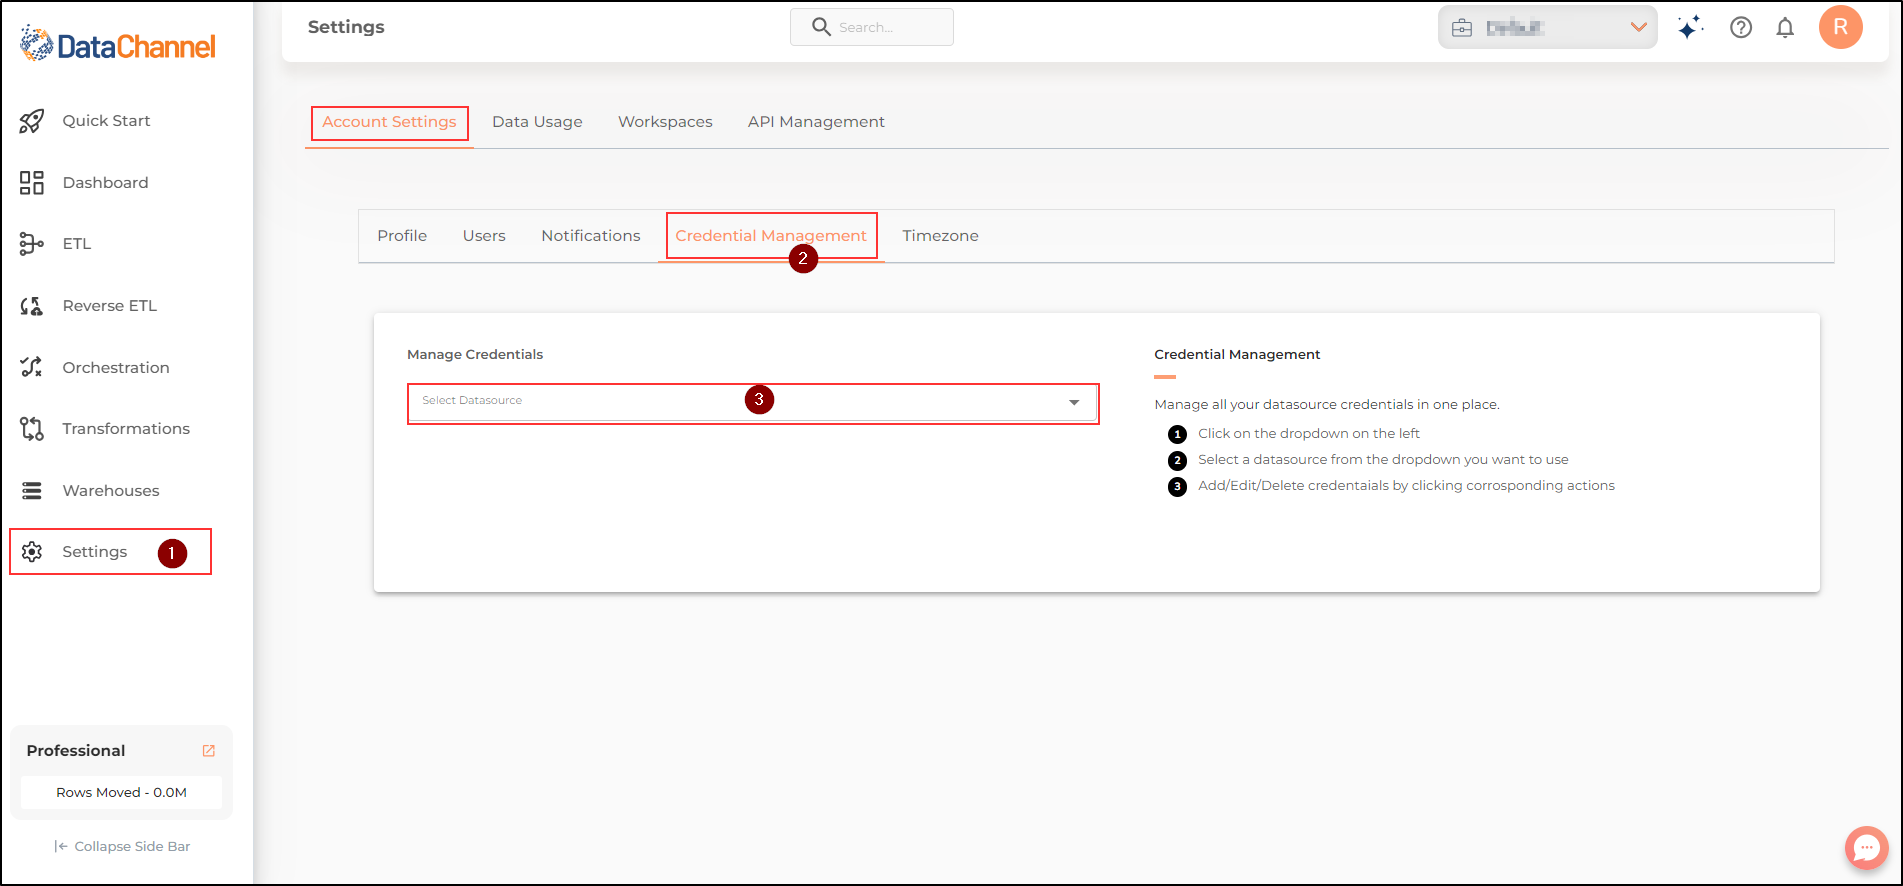
Click the Account Settings tab and then choose Credential Management.
-
On the Main UI screen, select the name of the datasource from the dropdown. You will be able to view a list of all the previously added credentials for that particular Data Source.
|
Selecting a Timezone
-
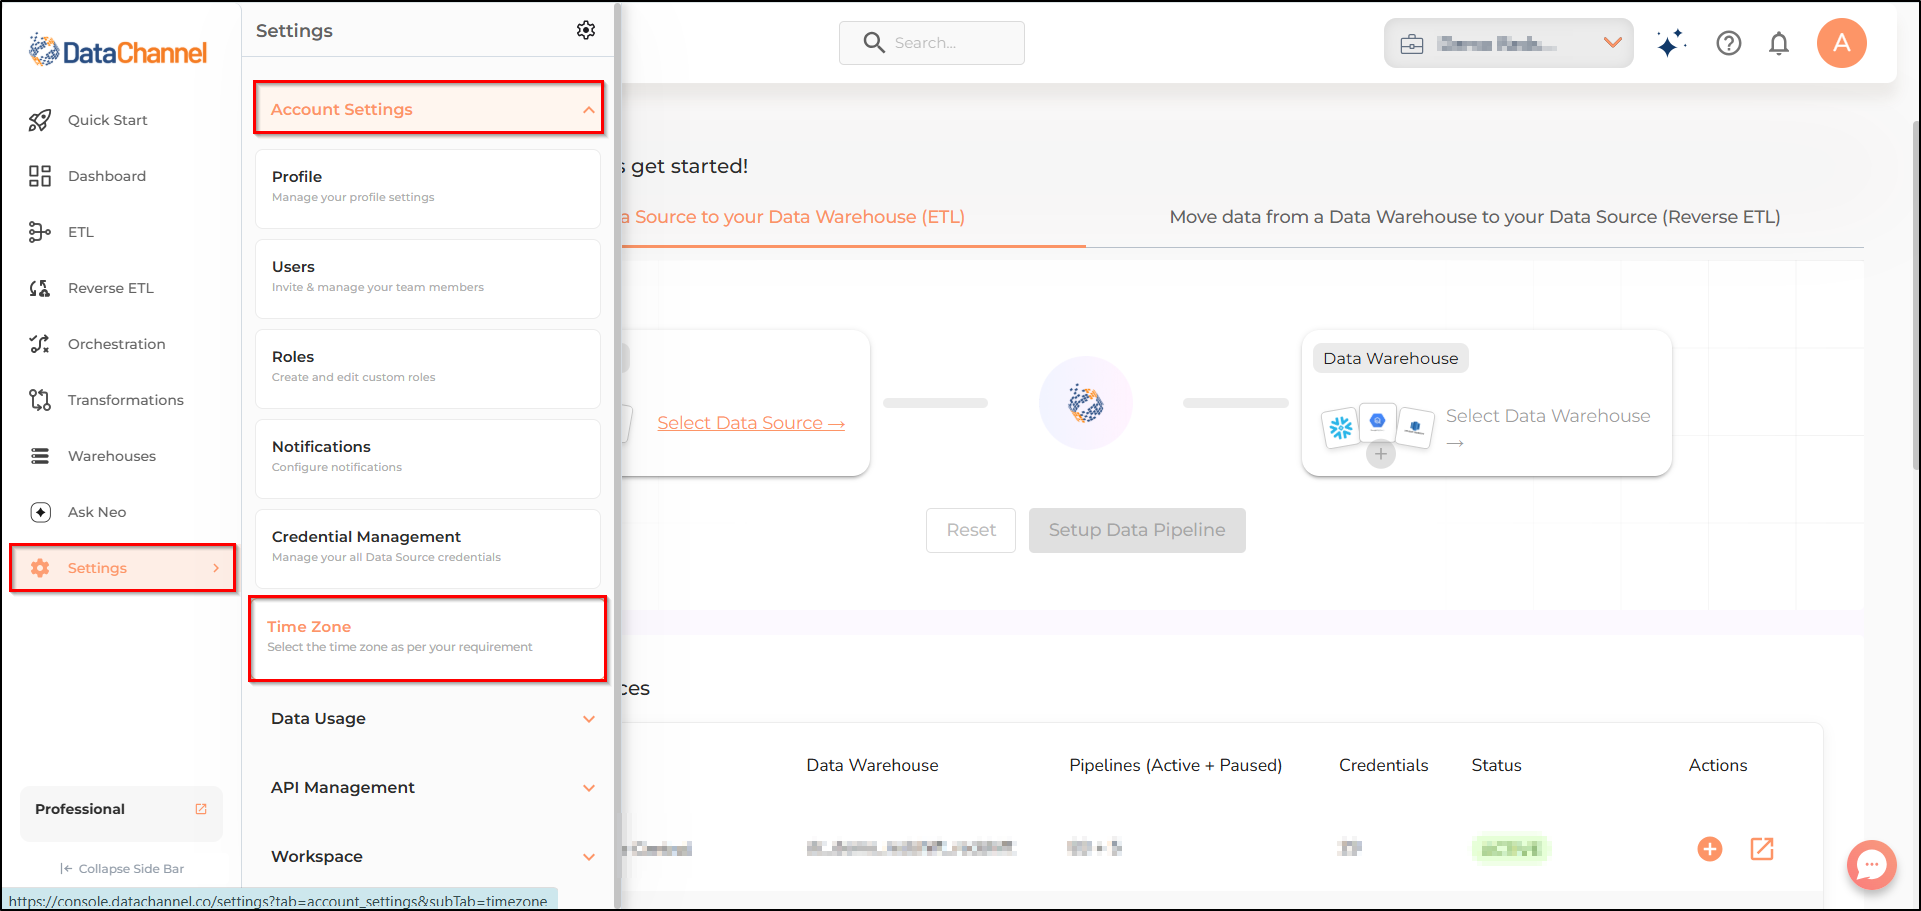
Go to the Settings tab which is the bottommost icon on the sidebar. It will open a side menu.
-
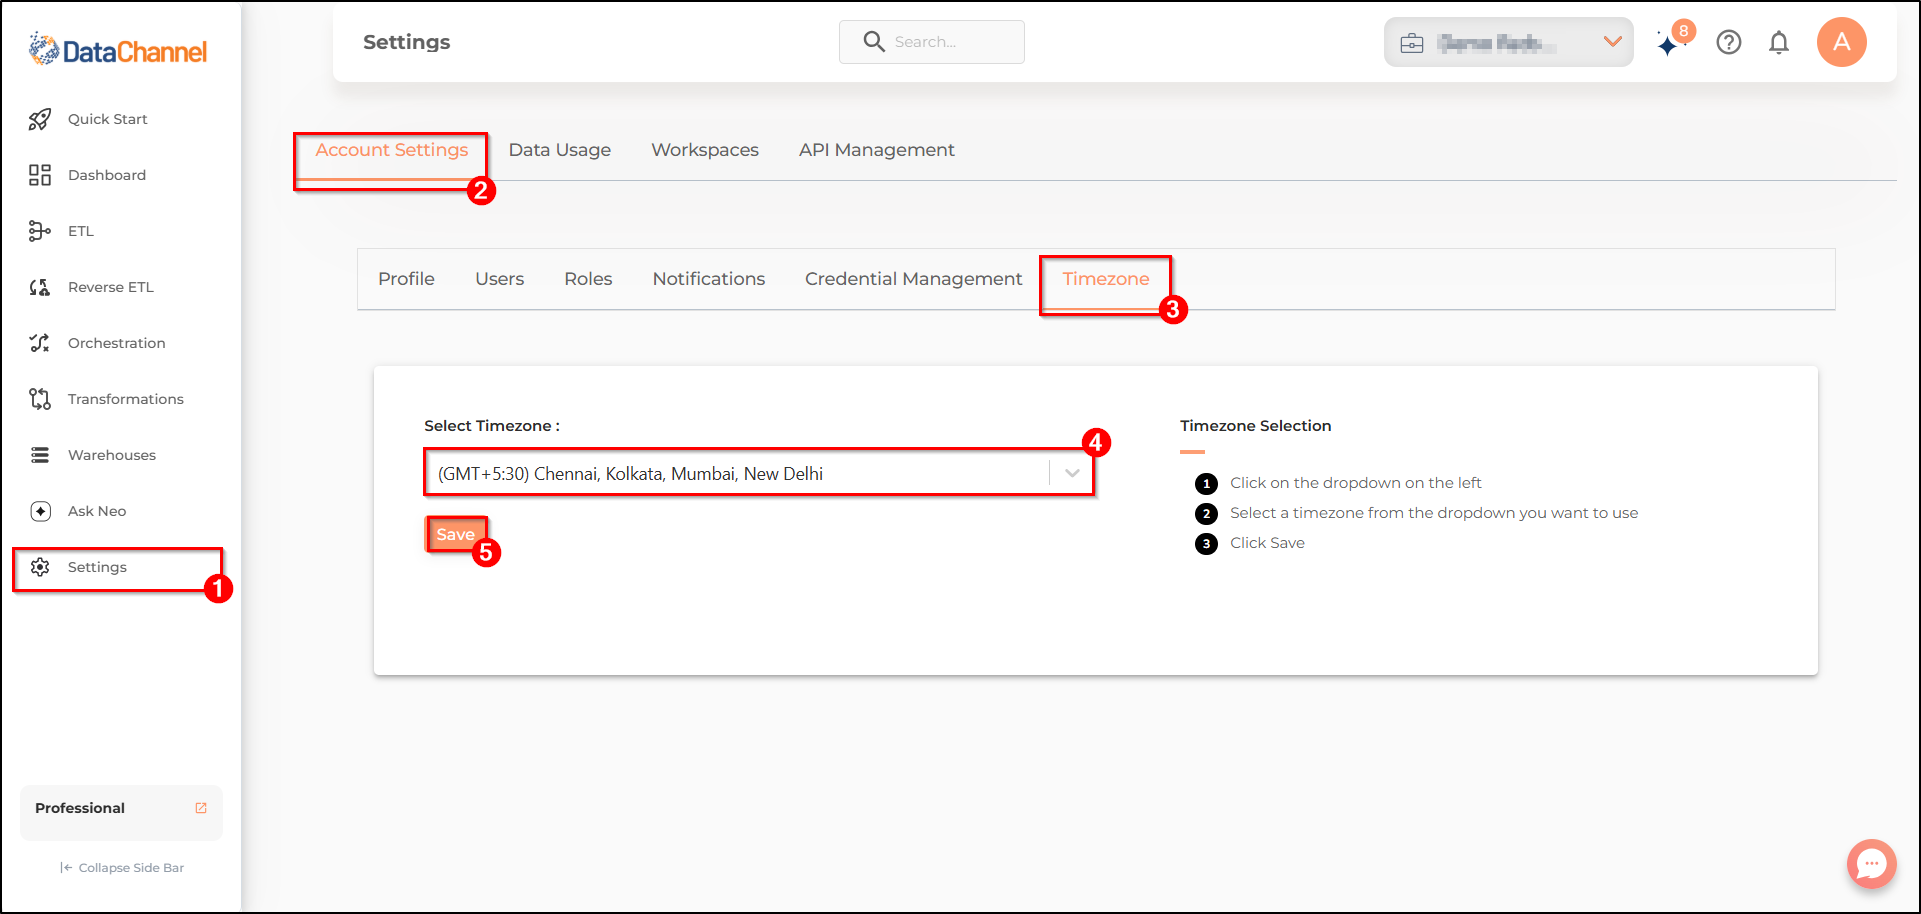
Click the Account Settings tab and then choose Timezone.
-
Select the timezone tab
-
Select the required timezone from the dropdown.
-
Click on Save.
|
Keep in mind that the timestamps for the scheduling of pipelines/ reverse syncs/ transformations will be visible according to the selected timezone. For example, if your location is Sydney, but you have selected Arizona as the Timezone, the timestamps for the scheduling of pipelines/ reverse syncs/ transformations will be visible according to the Arizona Timezone. |
View Data Usage Summary
-
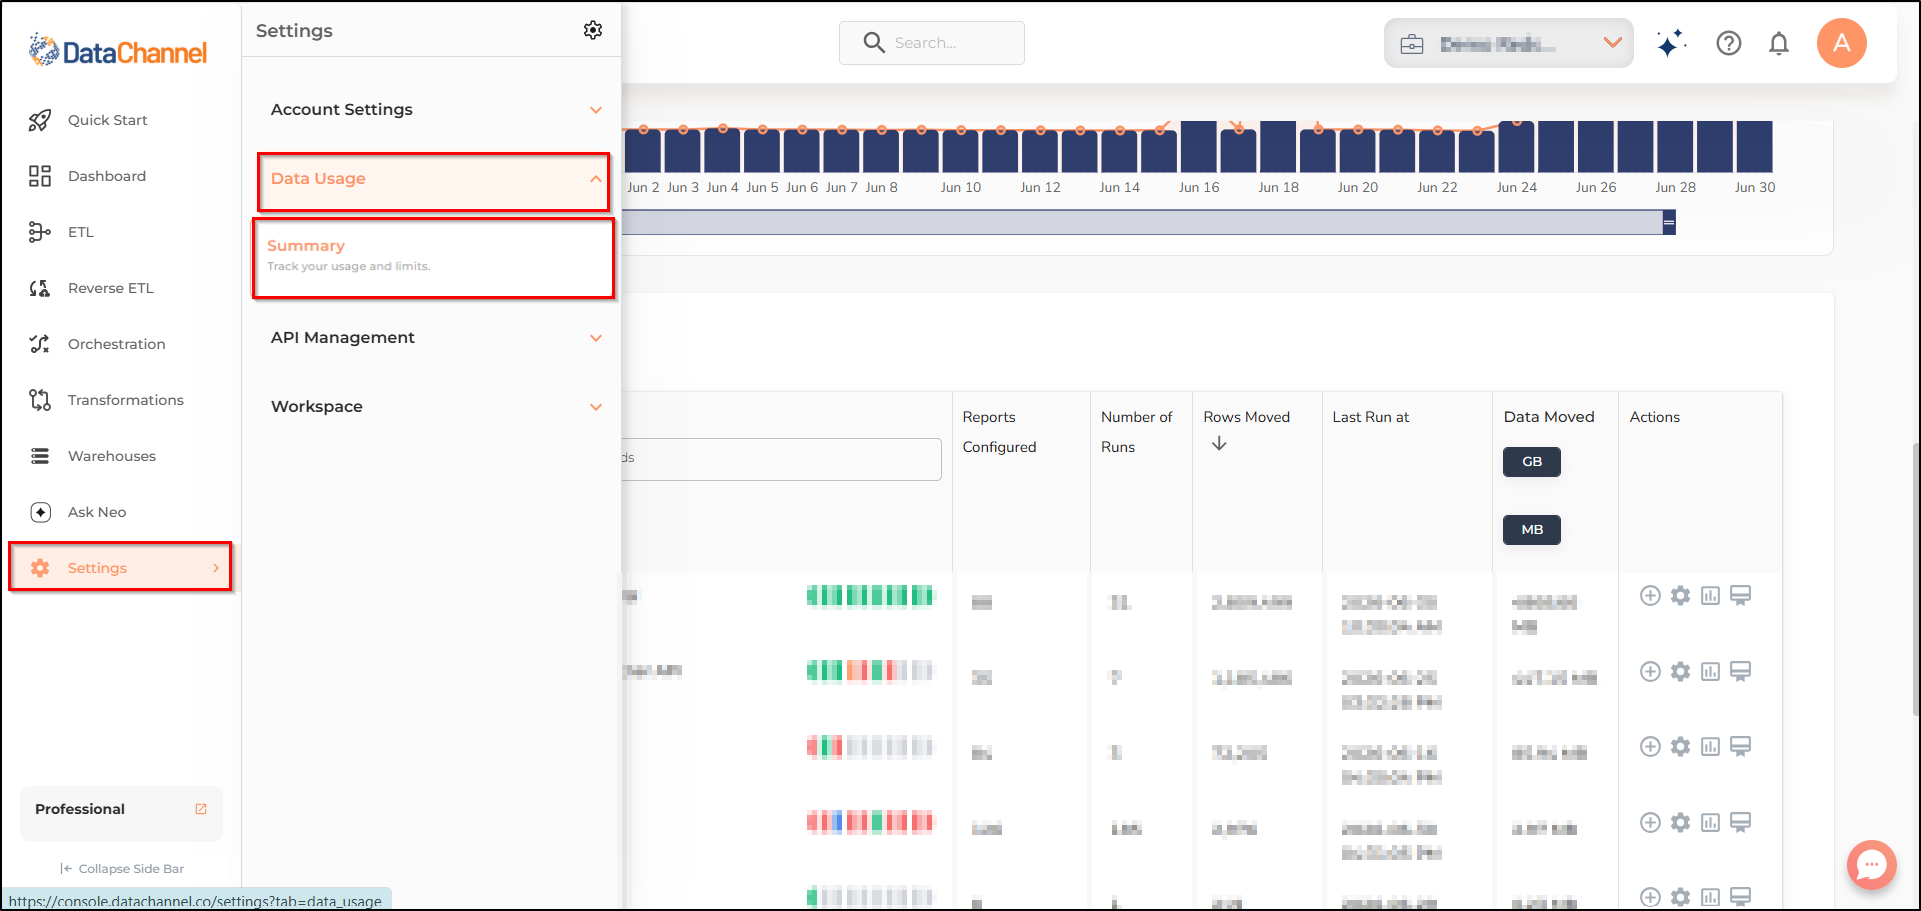
Go to the Settings tab which is the bottommost icon on the sidebar. It will open a side menu.
-
Click the Data Usage tab and then choose Summary.
-
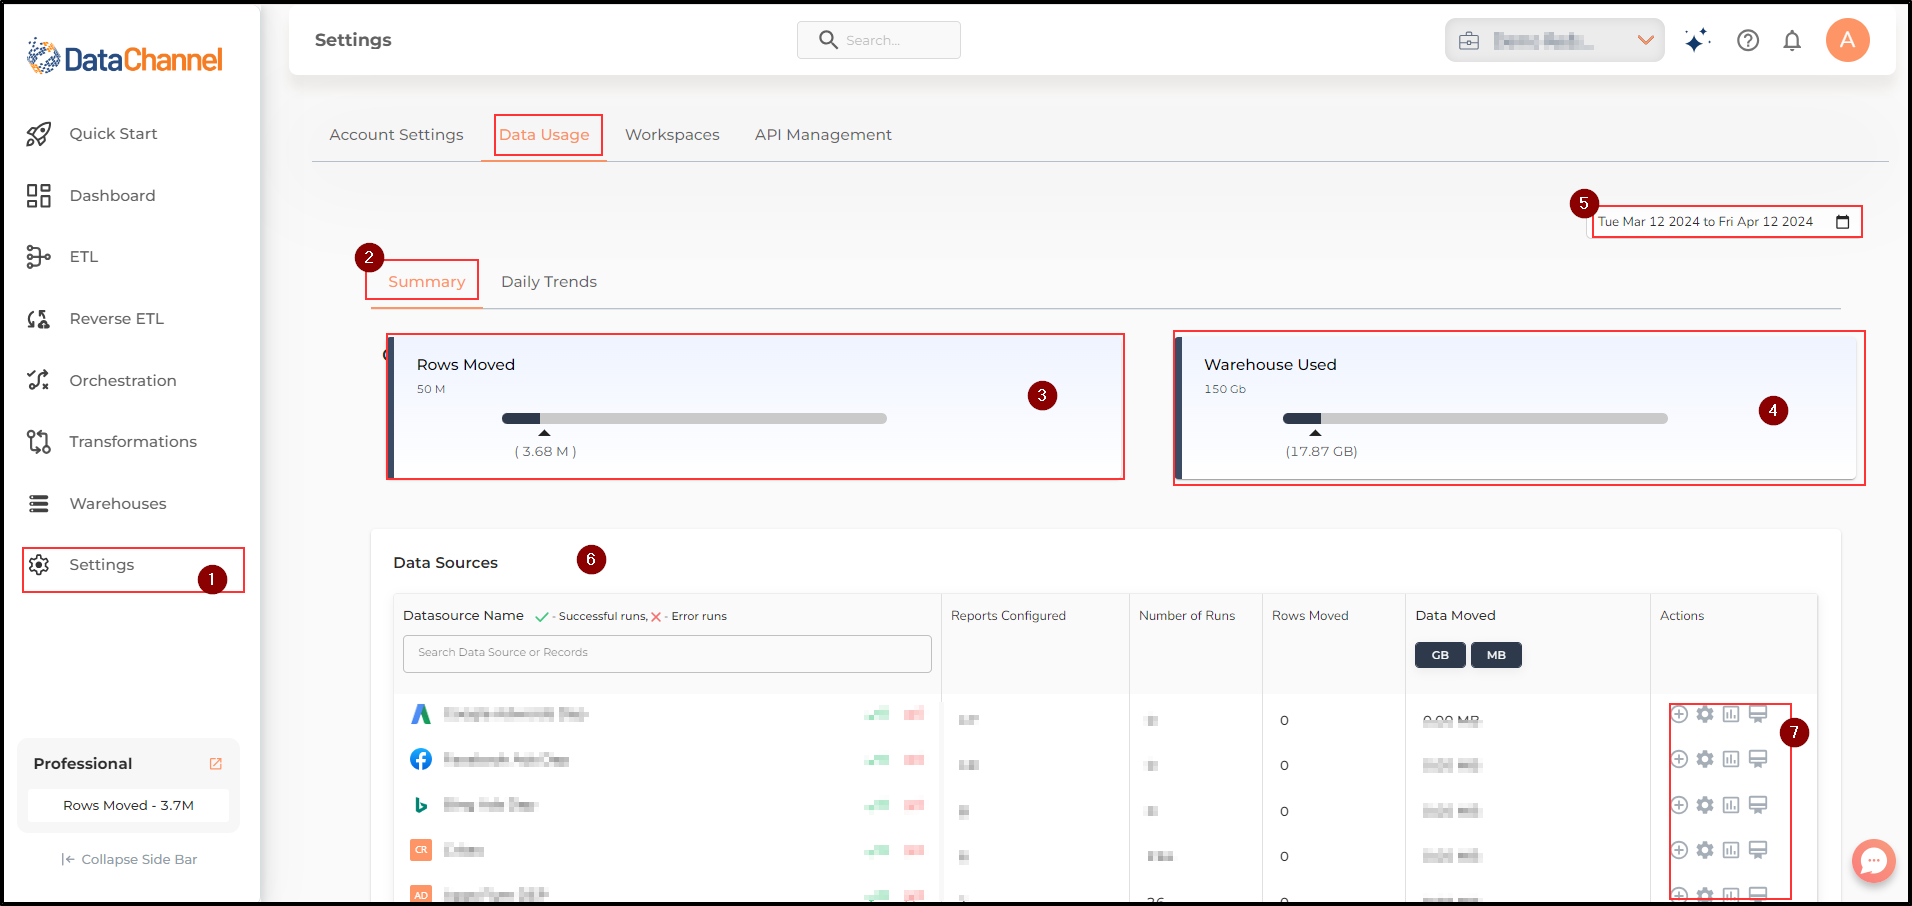
The top right corner of the Data Usage Analytics card has a filter option which allows you to filter the analytics by the day. You can filter the data usage analytics by clicking on MTD, Last 24 hours, and Last 7 days tabs. You can also filter the data usage by selecting a custom data range.
-
You can also filter the data usage by selecting Time Wise Usage and Data Source Usage.
-
Next, you can find graphical metrics for daily data usage where you can analyze and compare daily rows moved in the plaform.
-
At the bottom of the page, we have a data sources card where you can analyze the metrics for every data source or record.
Manage API Key
-
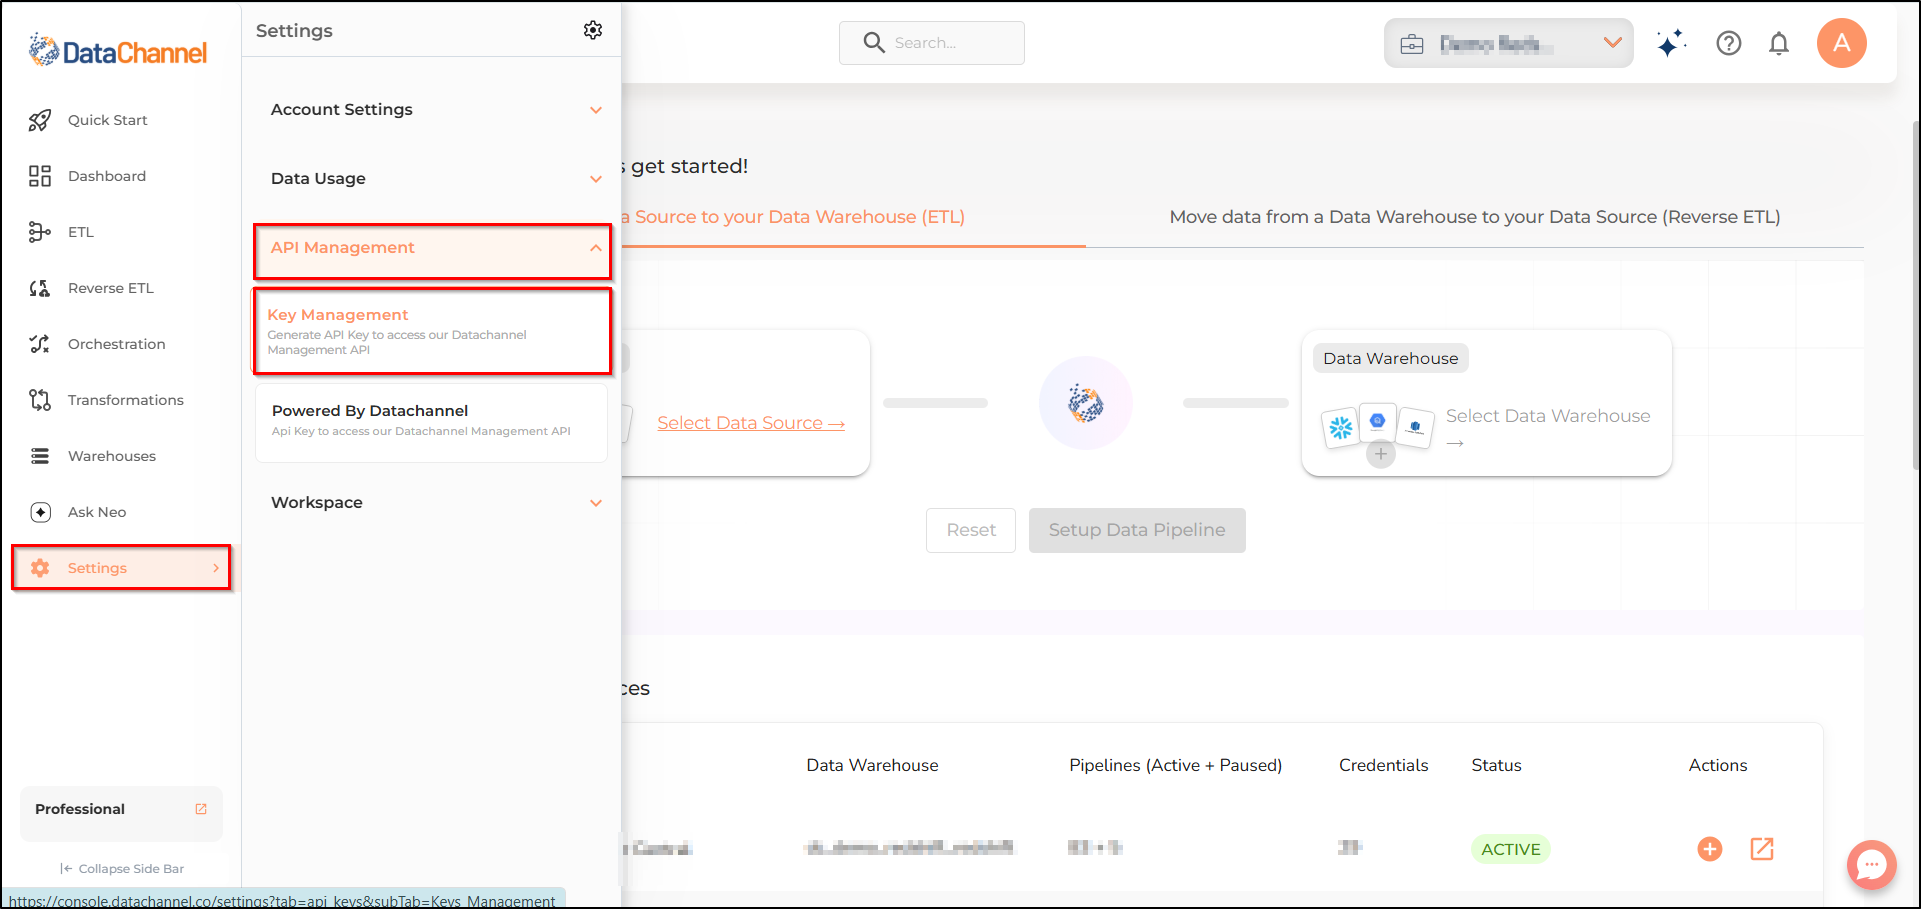
Go to the Settings tab which is the bottommost icon on the sidebar. It will open a side menu.
-
Click the API Management tab and then choose Key Management.
-
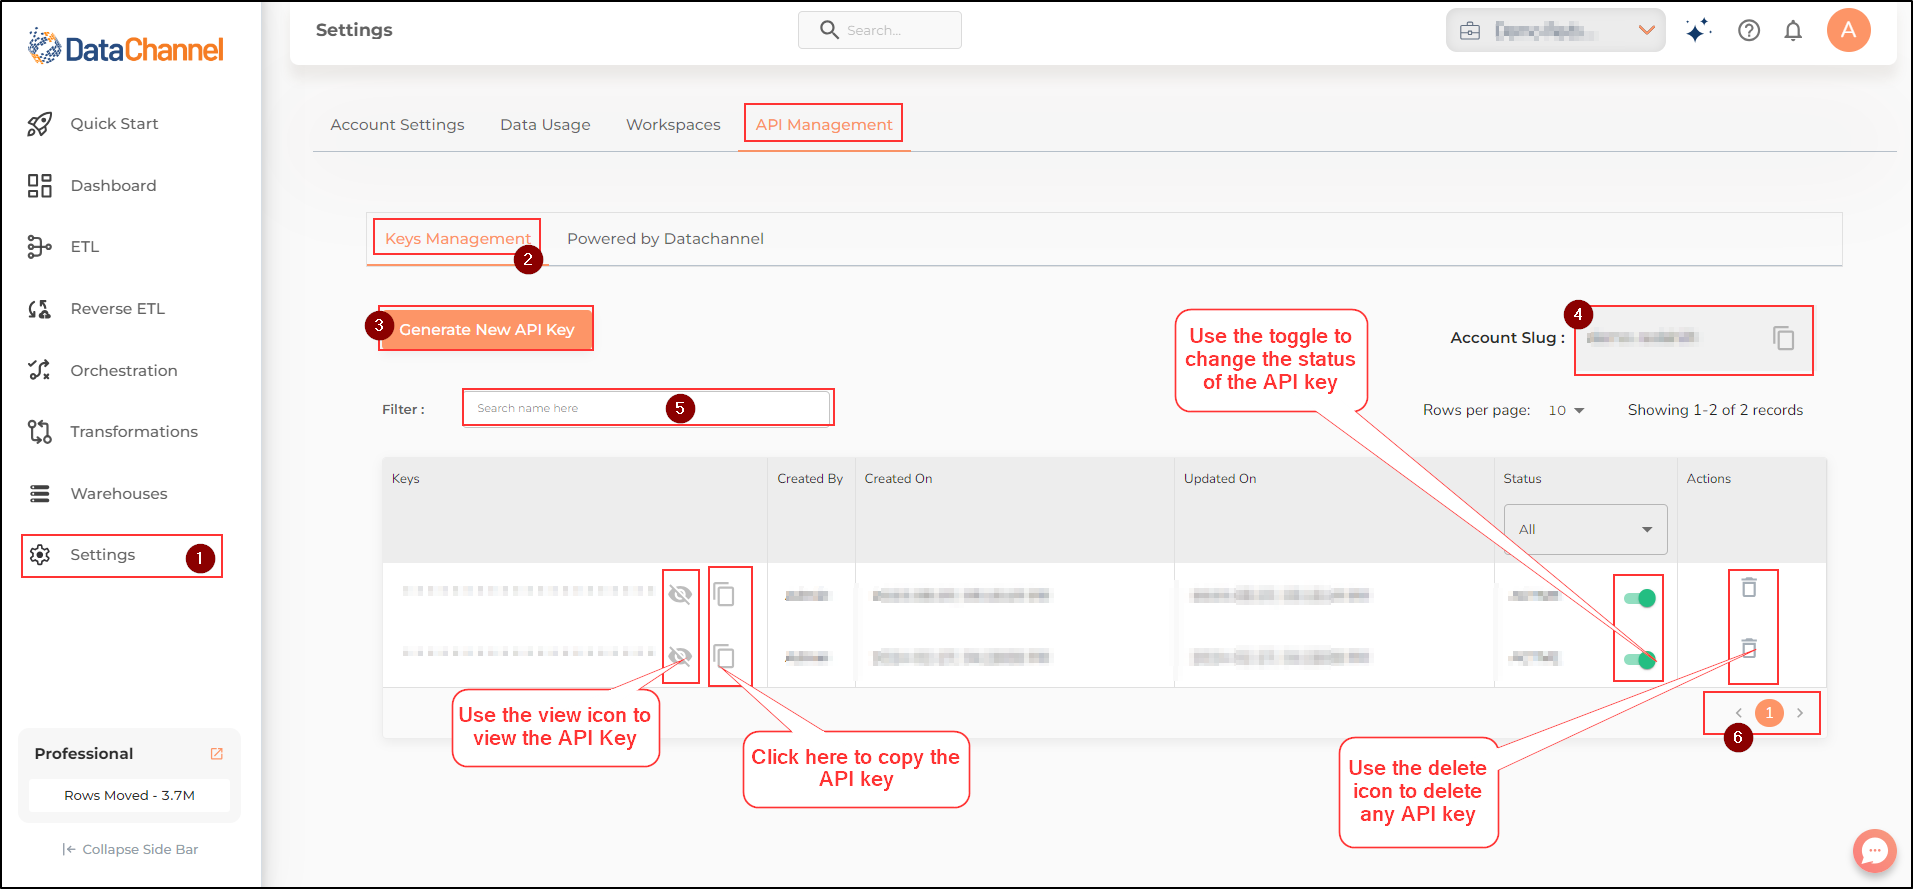
The top left corner of the main UI screen has a Generate New API Key button which allows you to generate a new API Key for your DataChannel Account.
-
The top right corner of the main UI screen shows the account slug for which the API key is generated. You can copy the account slug by clicking on the copy icon next to it.
-
Next, you can filter the API keys by searching for a specific API key in the search box.
-
You can navigate between different pages of the API Key list pane through the page numbers on the navigation bar, near the bottom right corner of the pane.
-
Use the view icon to view the API key in each keys column.
-
You can also copy the API key by clicking on the copy icon next to it.
-
Toggle the activity status of the API key by clicking on the toggle button in the status column.
-
You can also delete the API key by clicking on the delete icon in the actions column.
DataChannel Authentication
-
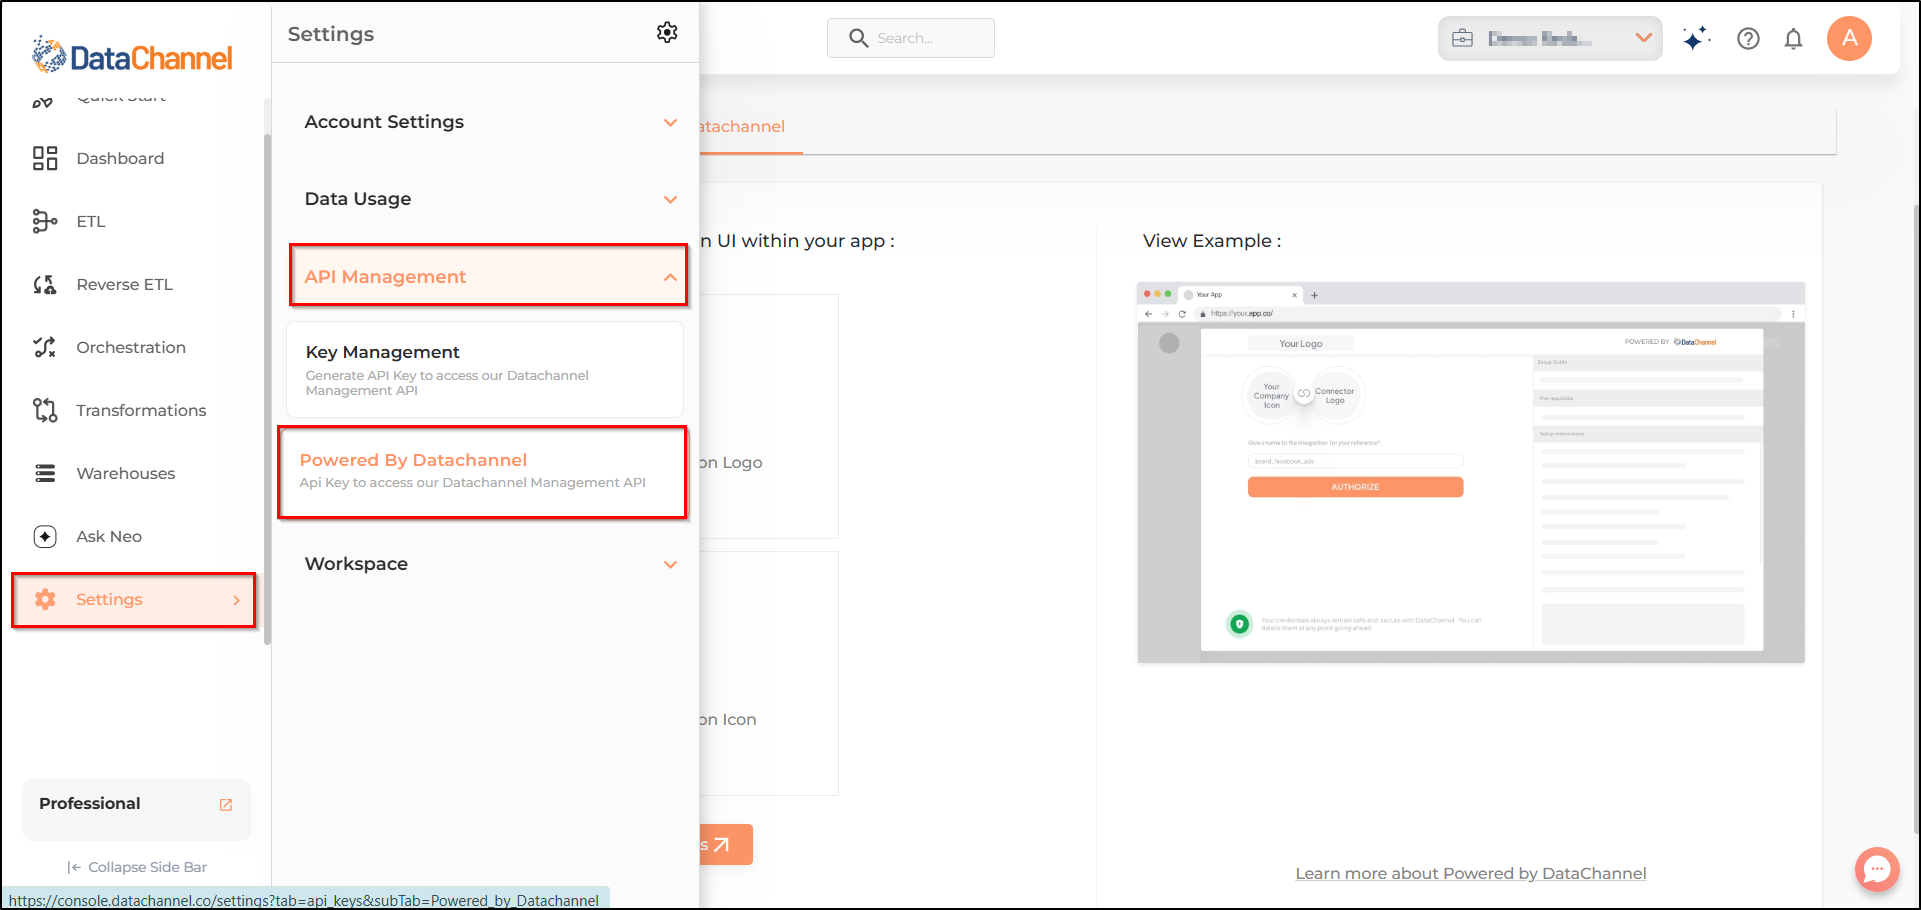
Go to the Settings tab which is the bottommost icon on the sidebar. It will open a side menu.
-
Click the API Management tab
-
Choose Powered By DataChannel tab.
-
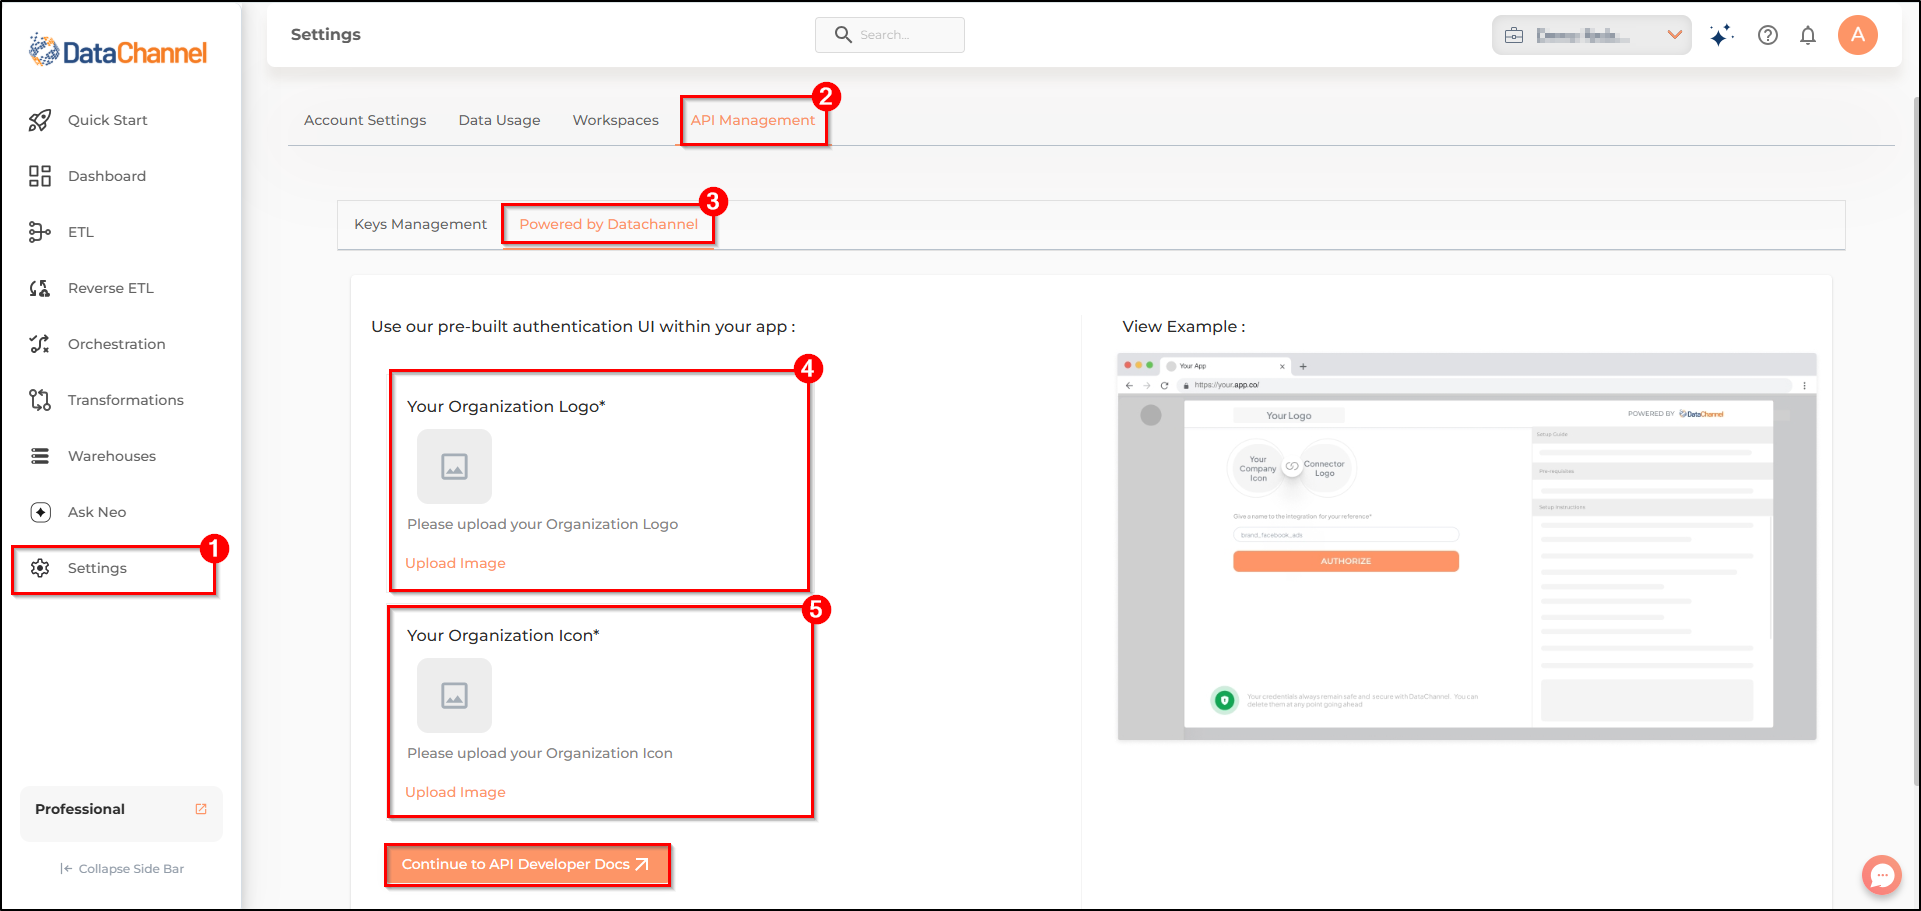
You can upload your organization’s logo by clicking on Upload Image. The uploaded logo will be displayed on the DataChannel Authentication page.
-
You can also upload your organization’s favicon by clicking on Upload Image. The uploaded favicon will be displayed on the DataChannel Authentication page.
-
Click on the Continue to API Developer Docs button to view the API Developer Documentation for DataChannel.
Manage your Workspaces
-
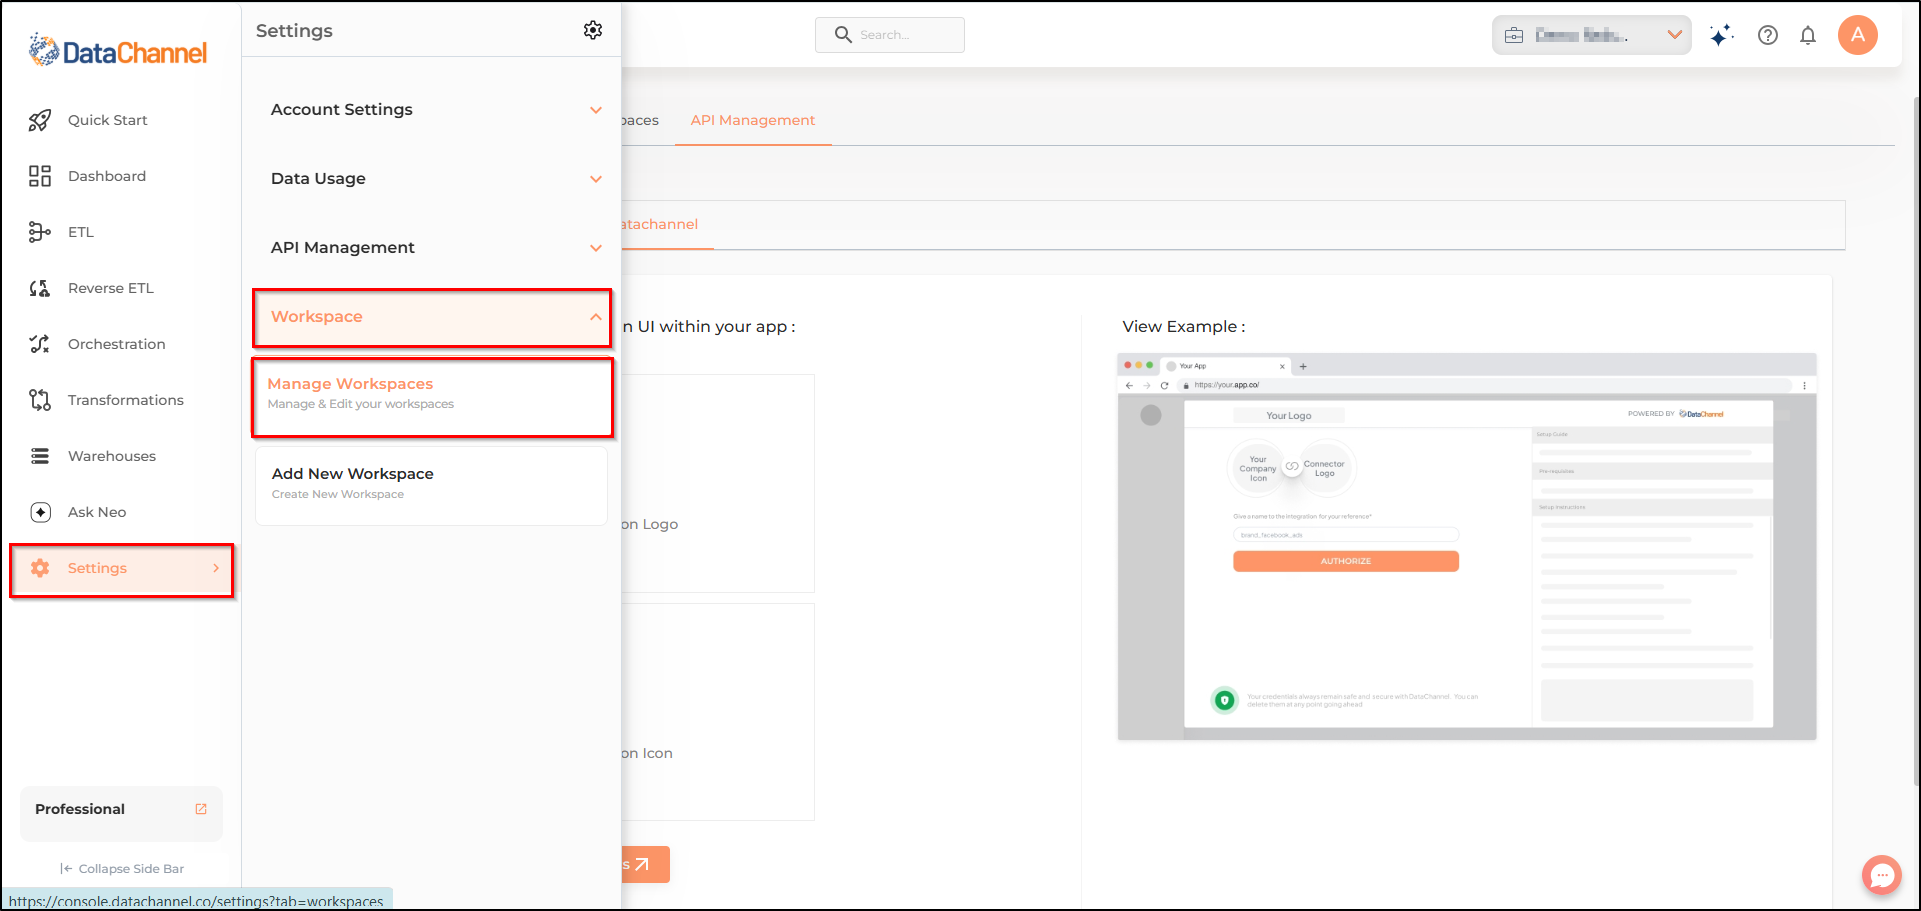
Go to the Settings tab which is the bottommost icon on the sidebar. It will open a side menu.
-
Click the Workspace tab and then choose Manage Workspaces.
-
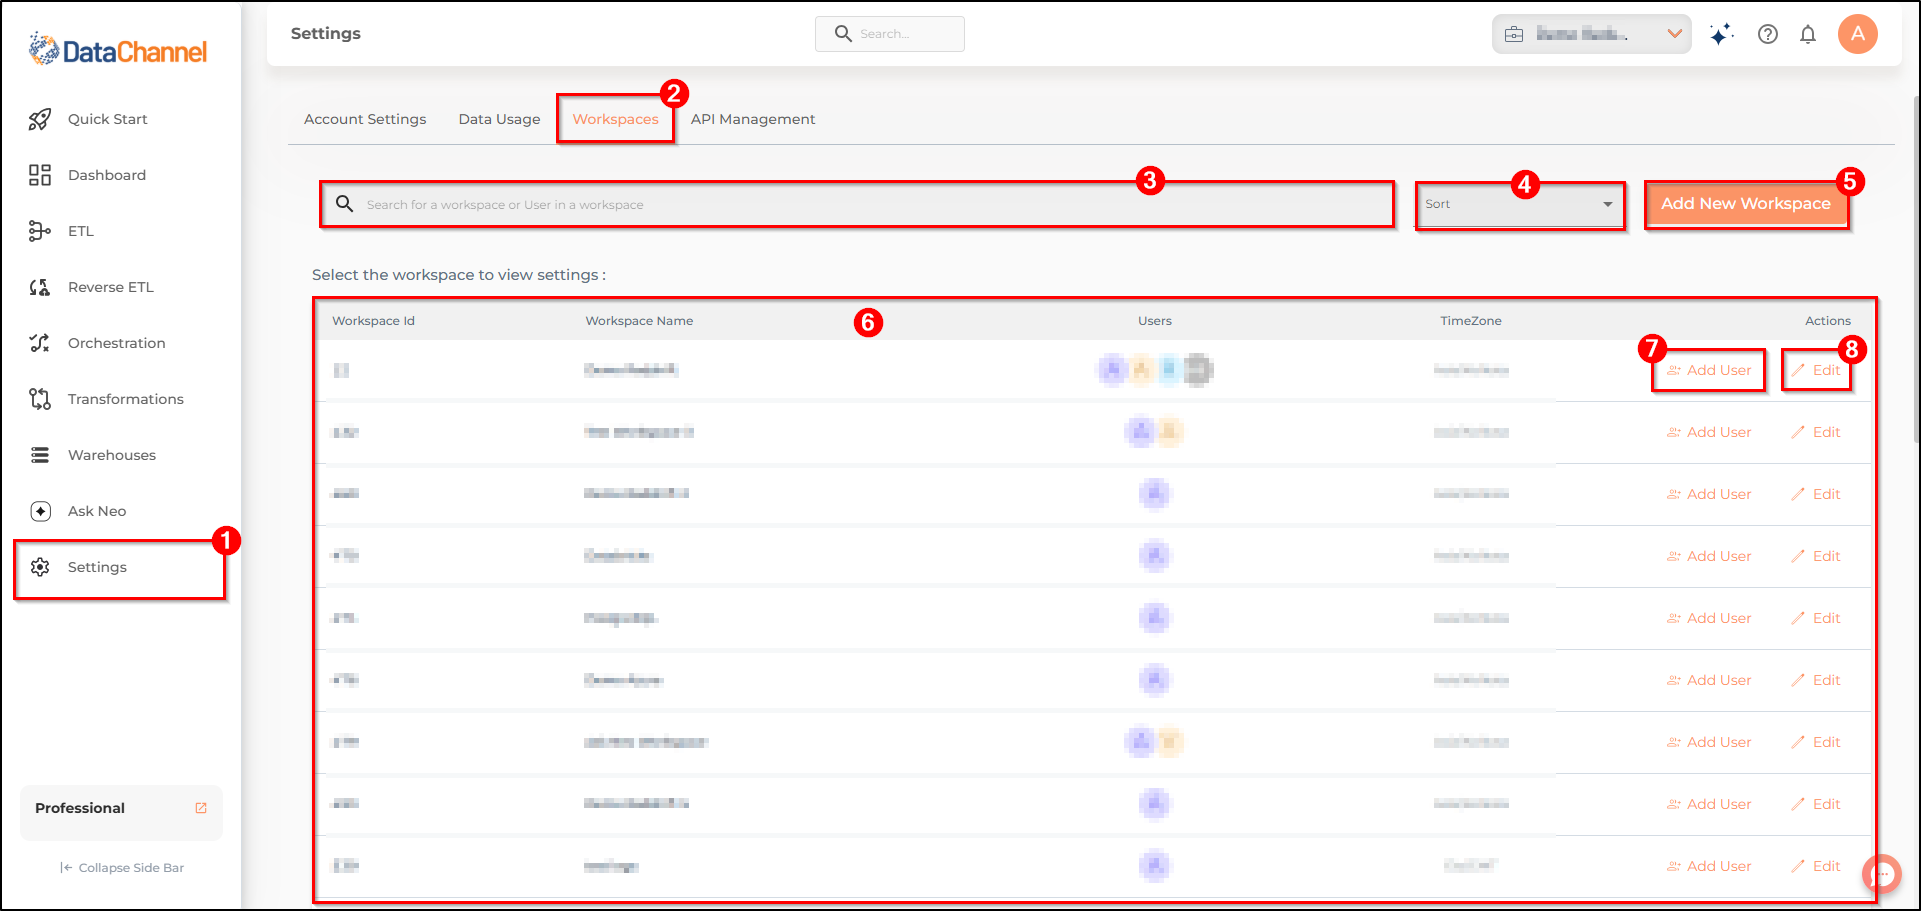
You can search for a specific workspace by entering the name of the workspace in the search box.
-
You can also sort the workspace alpabetically by clicking on the sort dropdown.
-
Click on the Add New Workspace button to add a new workspace to your DataChannel Account.
-
Next, you can view the list of workspaces added by you in the main UI screen.
-
You can add users to a specific workspace by clicking on the Add Users button in the actions column of the workspace list.
-
You can also edit a specific workspace by clicking on the Edit button in the actions column of the workspace list.
-
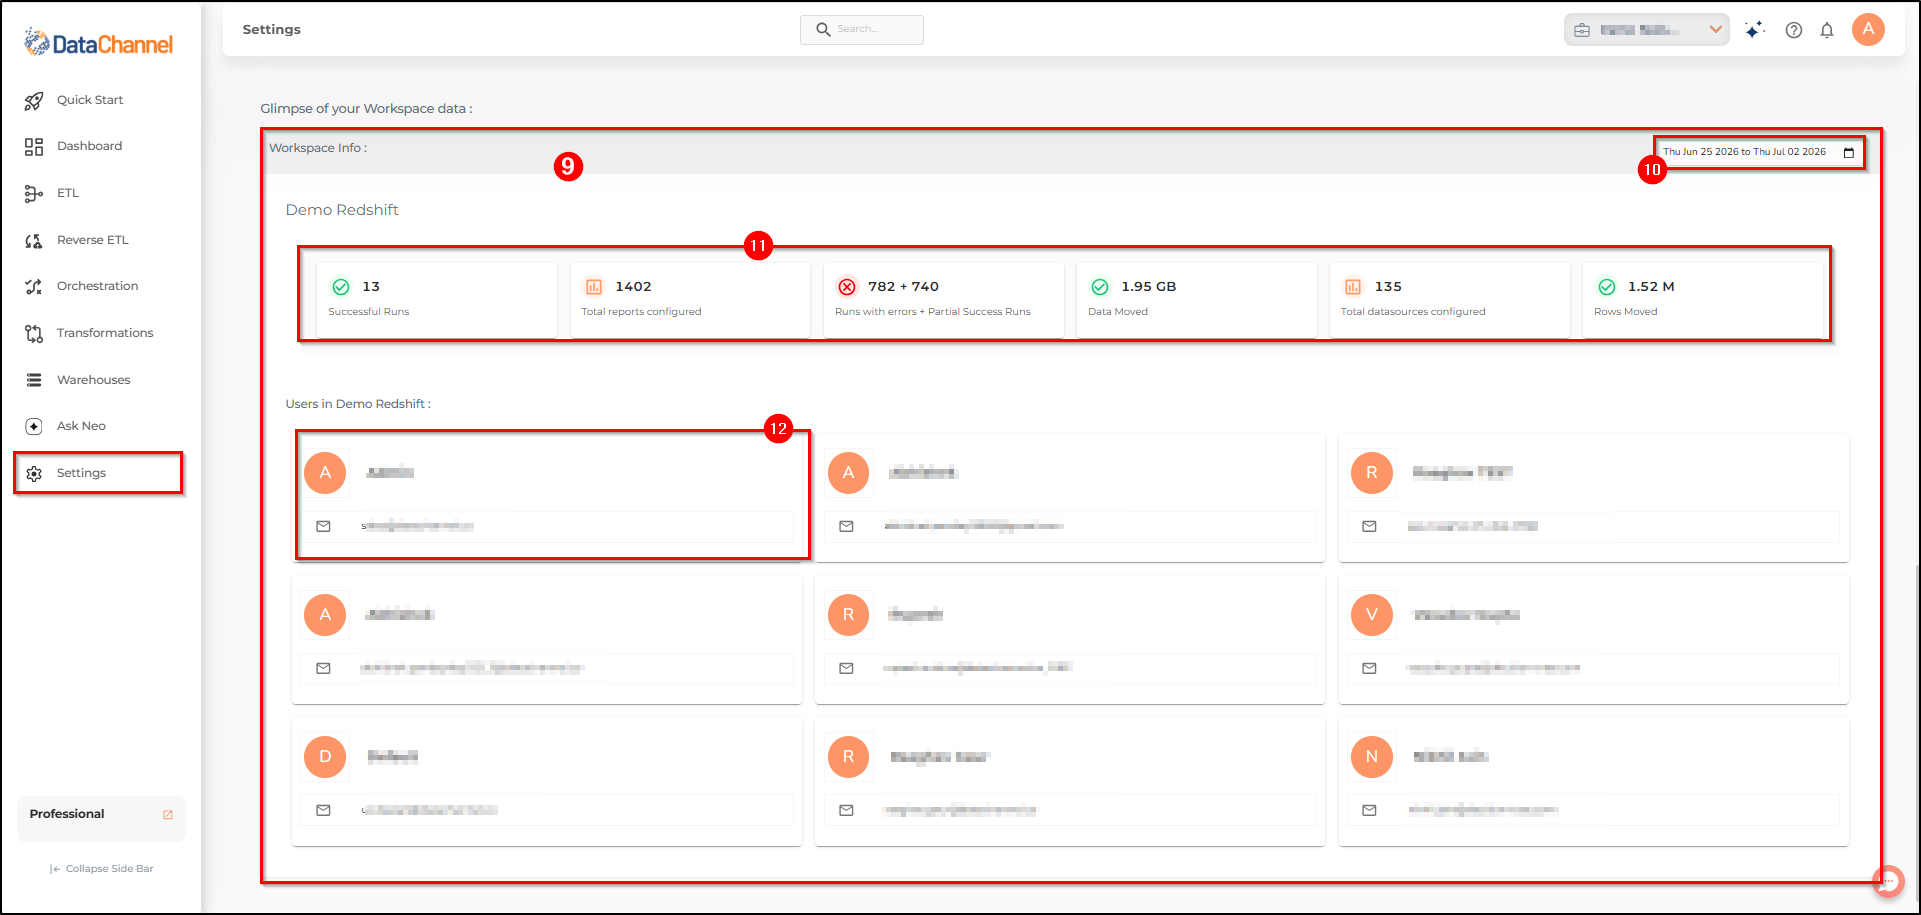
Click on any workspace card to view the details of that workspace. You can view the analytics and the list of users added to that workspace in the main UI screen.
-
You can filter the analytics by choosing a specific date range from the date range dropdown.
-
The workspace analytics card shows the total number of successful runs, reports configured, error runs, data moved, data sources configured and rows moved in the workspace.
-
Next, you can view the list of users added to that workspace in the main UI screen along with their roles and email addresses.
Add New Workspace
-
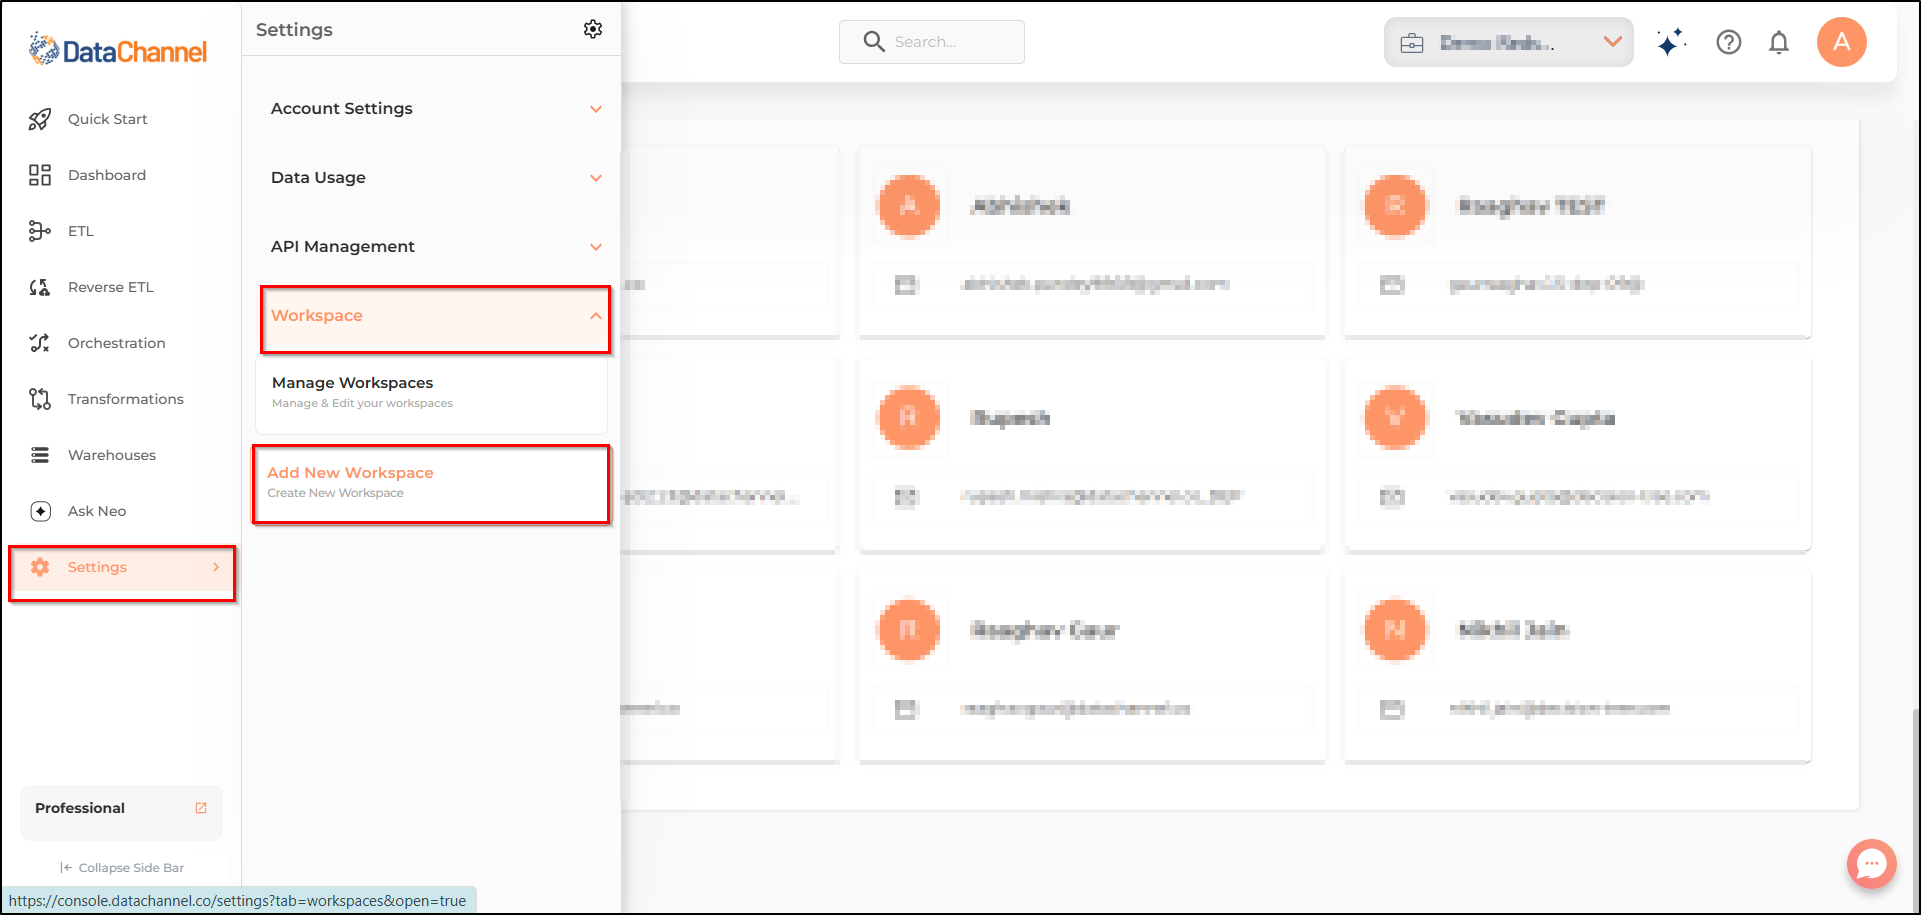
Go to the Settings tab which is the bottommost icon on the sidebar. It will open a side menu.
-
Click the Workspace tab and then choose Add New Workspace tab.
-
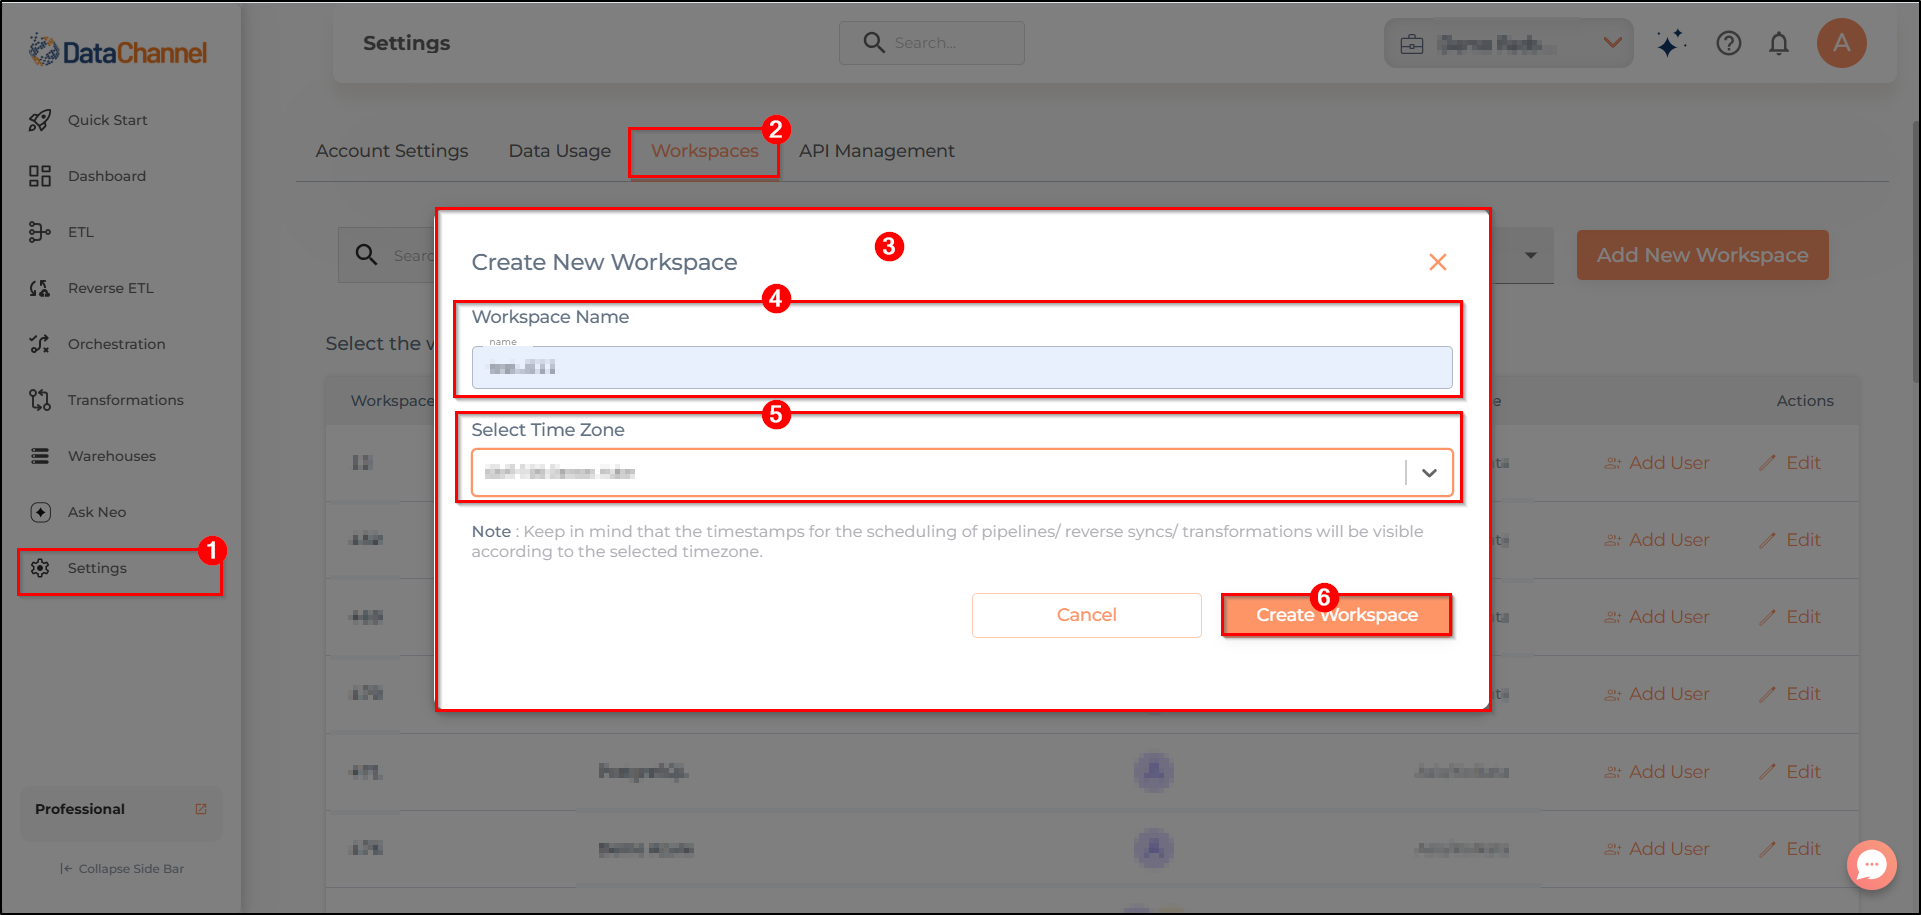
It will pop up a modal where you can enter the name and timezone of the new workspace.
-
Enter the name of the new workspace in the textbox.
-
Select the timezone of the new workspace from the dropdown.
-
Click on the Create Workspace button to save the new workspace.
Still have Questions?
We’ll be happy to help you with any questions you might have! Send us an email at info@datachannel.co.
Subscribe to our Newsletter for latest updates at DataChannel.