Familiarisation with the User Interface
Sidebar
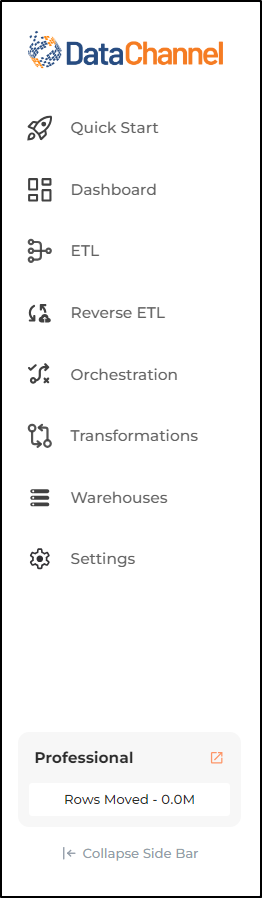
The vertical navigation bar on the left side of the console is the sidebar and it allows you to navigate between different tabs to access various functionalities of the DataChannel Product. This is the starting point for all the functions you can carry out on the DataChannel Console by simply clicking on the required tab. In addition to this, the Settings tab on the sidebar also helps you to monitor your usage in terms of the number of rows used. Remember, you can collapse or expand the sidebar at any time using the Collapse button (arrow buttons) at the bottom of the sidebar. It is important to understand the function of each of these tabs:
-
Quick Start: The Quick Start Tab is the topmost icon on the sidebar right below the DataChannel Logo. When you click on the Quick Start Tab, it takes you to the Home Screen of the DataChannel Console. Here you can view a snapshot of your previously configured connectors or launch the Forward or Reverse Connector Wizards. To get a detailed understanding of the Quick Start Tab click here.
-
Dashboard: The DataChannel Dashboard is easy to use and interactive. The Dashboard Tab is below the Home Tab on the sidebar. Clicking on the Dashboard Tab provides various metrics and a summary of all the recent activities and notifications related to your DataChannel Login. Here you are also able to view/add/edit a list of your previously configured forward and reverse connectors and dbt™ transformations. To get a better grasp of all that is offered by the DataChannel Dashboard click here.
-
ETL: The ETL Tab is the third from top icon on the sidebar, right below the Dashboard Tab. This is the most used Tab on the DataChannel Console, as it takes you to explore the forward connectors on DataChannel’s menu. So, whether you want to connect a new Data source/Web application/ Cloud Storage to your warehouse or add new pipelines to an existing connector, this tab is where you can do it all. Here you will also be able to view a list of your previously configured connectors. Also, the Data Explorer menu lets you quickly access data from a particular pipeline run in a configured data source. To get an elaborate tour of the ETL Tab click here.
-
Reverse ETL: The Reverse ETL Tab is below the ETL Tab on the Sidebar. This tab allows you to create, configure and schedule custom syncs to move data from your data warehouse to your desired destination. You can explore the list of supported destinations and choose the appropriate ones that would help you make your data more actionable. Configuring reverse syncs enables you to integrate your warehouse data with tools / functionalities offered by the destination applications. Also, the Data model menu option lets you define a data model that determines the fields, tables that will be fetched from the stored repository to create and map the schema in the destination web application. The Segments menu option allows you to define rules / filters to be applied to the data fetched from the data warehouse. To know more about the Reverse ETL Tab click here.
-
Orchestration: The Orchestration Tab is the fifth from top icon on the sidebar, right below the Reverse ETL Tab. Orchestration is a multi-step process to manage the flow of your data and activate your siloed and fragmented data. You can create an orchestration by linking multiple Nodes together in their order of execution. To know more about the Orchestration Tab click here.
-
Transformations: The Transformations Tab on the Sidebar and lies above the Data Warehouses Tab. There could be scenarios where you need to perform certain transformations on your data. Using transformations, you can write complex queries to perform useful operations on your data. The Transformations Tab allows you to set up new transformations and edit existing ones. A more detailed explanation on how to create transformations using the Transformations Tab can be found here.
-
Warehouses: The Warehouses Tab is the third last icon on the sidebar, right above the Ask Neo Tab. A Data Warehouse is the repository of all your data. With your connectors you either move data to or from your data warehouse. Thus, to move your data, you must first add a Data Warehouse to your account. This is where you can add one or more data warehouses and view the list of them. There is no limit to the number of Data Warehouses linked to your account. To know more about the Warehouses Tab click here.
-
Ask Neo: The Ask Neo Tab is the second last icon on the sidebar, right above the Settings Tab. The Ask Neo tab runs an AI agent which has the capability to understand users questions in natural language and provide the required insights based on the user’s data stored in their data warehouse and made available to Neo for analysis. To know more about the Ask Neo Tab click here.
-
Settings: The last icon on the sidebar is the Settings Tab. You can access your profile, add multiple users, manage credentials, API keys, set the timezone, view your usage, choose your notification settings and more such functions through this tab. To familiarize yourself with the Settings Tab, click here.
Still have Questions?
We’ll be happy to help you with any questions you might have! Send us an email at info@datachannel.co.
Subscribe to our Newsletter for latest updates at DataChannel.