Step-by-Step guide to register an app in Microsoft Entra ID
Step 2: Open Microsoft Entra ID
-
Go to Microsoft Entra ID: In the left-hand navigation pane, select Azure Active Directory(or search for Microsoft Entra ID if not immediately visible).
Step 3: App Registration
-
Register a New Application: In the Azure Active Directory menu, select App registrations. Click on New registration at the top of the App registrations page.
-
Fill in Application Details:
-
Name: Enter a name for your application (e.g., "Power BI Integration App").
-
Supported account types: Choose who can use the application (e.g., "Accounts in this organizational directory only").
-
-
Register the Application: Click on the Register button at the bottom of the form.
Step 4: Configure API Permissions
-
Open API Permissions: After the app is registered, you will be taken to the app’s Overview page. From there, click on API permissions in the left-hand menu.
-
Add Microsoft Graph Permissions:
-
Click on Add a permission.
-
Select Microsoft Graph.
-
Choose Delegated permissions.
-
Search for and select
User.Read`. -
Click Add permissions.
-
-
Add Power BI Service Permissions:
-
Click on Add a permission again.
-
Select APIs my organization uses.
-
Search for and select "Power BI Service].
-
Choose "Delegated permissions].
-
Select the following permissions:
-
App.Read.All -
Capacity.Read.All -
Capacity.ReadWrite.All -
Content.Create -
Dashboard.Read.All -
Dashboard.ReadWrite.All -
Dataflow.Read.All -
Dataflow.ReadWrite.All -
Dataset.Read.All -
Dataset.ReadWrite.All -
Gateway.Read.All -
Gateway.ReadWrite.All -
Report.Read.All -
Report.ReadWrite.All -
StorageAccount.Read.All -
StorageAccount.ReadWrite.All -
Workspace.Read.All -
Workspace.ReadWrite.All
-
-
Click Add permissions.
-
Step 5: Grant Admin Consent
-
Grant Admin Consent:
-
On the API permissions page, you will see a Grant admin consent button. Click on it.
-
Confirm the action to grant consent for the requested permissions.
-
Step 6: Final Review
-
Review Permissions: Ensure all the permissions have been added and granted successfully. You should see them listed under the API permissions section.
Step 7: Completion
You have now successfully registered an application in Microsoft Entra ID and configured it with the specified API permissions. Your application is now ready to use these permissions for interacting with Microsoft Graph and Power BI Service.
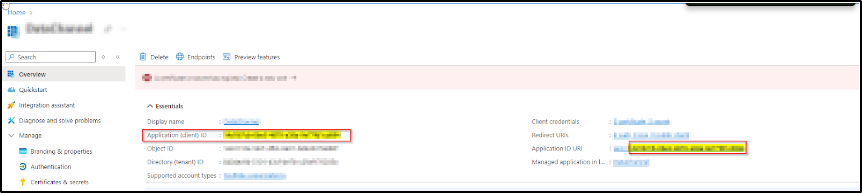
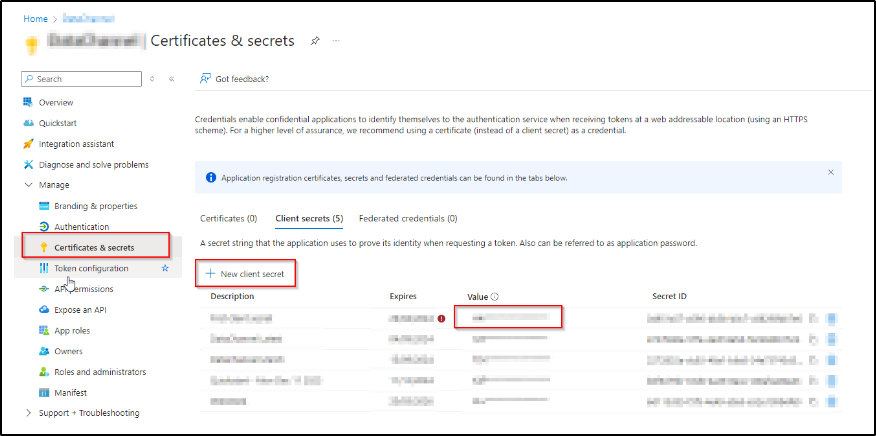
Step 8: Add Client ID & Client Secret to DataChannel Credentials
-
Client ID: On the App Overview screen, you should see a field Application (Client) ID. Copy this field and paste it inside the client ID field in DataChannel Credentials.
-
Client Secret: In the Sidebar Menu, Go to Certificates & Secrets. Add New client secret if it does not already exist. Copy the secret and paste it inside the client secret field in DataChannel Credentials.
Still have Questions?
We’ll be happy to help you with any questions you might have! Send us an email at info@datachannel.co.
Subscribe to our Newsletter for latest updates at DataChannel.